- General optimization guidance
- Coalescing memory operations
- Occupancy and latency hiding
- Using shared memory
- Example 1: transpose
- Coalescing and bank conflict avoidance
- Example 2: efficient parallel reductions
- Using peak performance metrics to guide optimization
- Avoiding SIMD divergence & bank conflicts
- Loop unrolling
- Using template parameters to write general-yet-optimized code
- Algorithmic strategy: Cost efficiency
- 最大化并行独立性
- 最大化计算密度
- 数据可以直接在GPU生成。
- 一次大传输也比分开的小批次快
如果我们数据只会在 GPU 产生和使用,我们不需要来回进行拷贝。
https://migocpp.wordpress.com/2018/06/08/cuda-memory-access-global-zero-copy-unified/
简而言之,在 host 使用命令:cudaHostRegisterMapped
之后用 cudaHostGetDevicePointer 进行映射
最后解除绑定 cudaHostUnregister
即,
// First, pin the memory (or cudaHostAlloc instead)
cudaHostRegister(h_a, …, cudaHostRegisterMapped);
cudaHostRegister(h_b, …, cudaHostRegisterMapped);
cudaHostRegister(h_c, …, cudaHostRegisterMapped);

cudaHostGetDevicePointer(&a, h_a, 0);
cudaHostGetDevicePointer(&b, h_b, 0);
cudaHostGetDevicePointer(&c, h_c, 0);

kernel<<<...>>>(a, b, c);
cudaDeviceSynchronize();

// unpin/release host memory
cudaHostUnregister(h_a);
cudaHostUnregister(h_b);
cudaHostUnregister(h_c);
只要两个thread在 同一个warp中,允许thread直接读其他thread的寄存器值,这种比通过shared Memory进行thread间的通讯效果更好,latency更低,同时也不消耗额外的内存资源来执行数据交换。ref
- Optimize for spatial locality in cached texture memory ???
- 避免bank conflict: 如果没有bank冲突的话,共享内存的访存速度将会非常的快,大约比全局内存的访问延迟低100多倍,但是速度没有寄存器快。然而,如果在使用共享内存时发生了bank冲突的话,性能将会降低很多很多。
对齐(Starting address for a region must be a multiple of region size)集体访问,有数量级的差异Coalesced
利用好每个block里的thread,全部每个线程各自读取自己对齐(Starting address for a region must be a multiple of region size 不一定是自己用的)数据到shared memory开辟的总空间。由于需要的数据全部合力读取进来了,计算时正常使用需要的读入的数据。
特别是对于结构体使用SoA(structure of arrays)而不是AoS(array of structures),
如果结构体实在不能对齐, 可以使用 __align(X), where X = 4, 8, or 16.强制对齐。
对齐读取 float3 code
对于small Kernel和访存瓶颈的Kernel影响很大
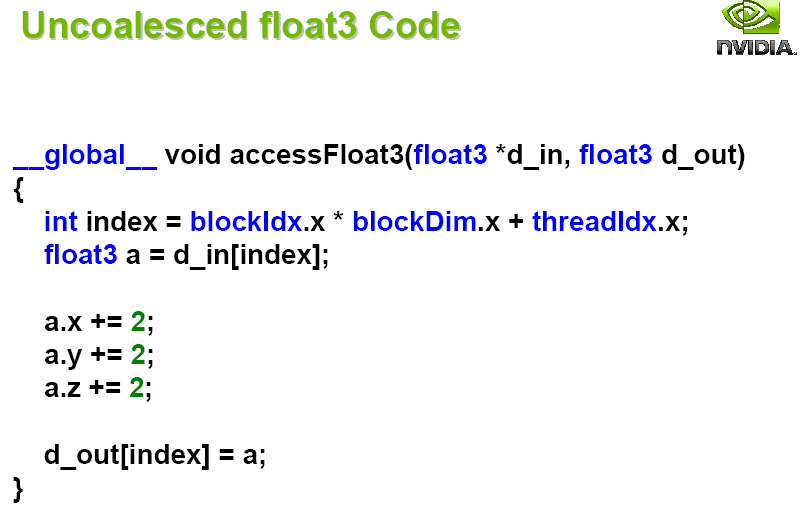
由于需要对齐读取,3float是12字节,所以只能拆成三份。
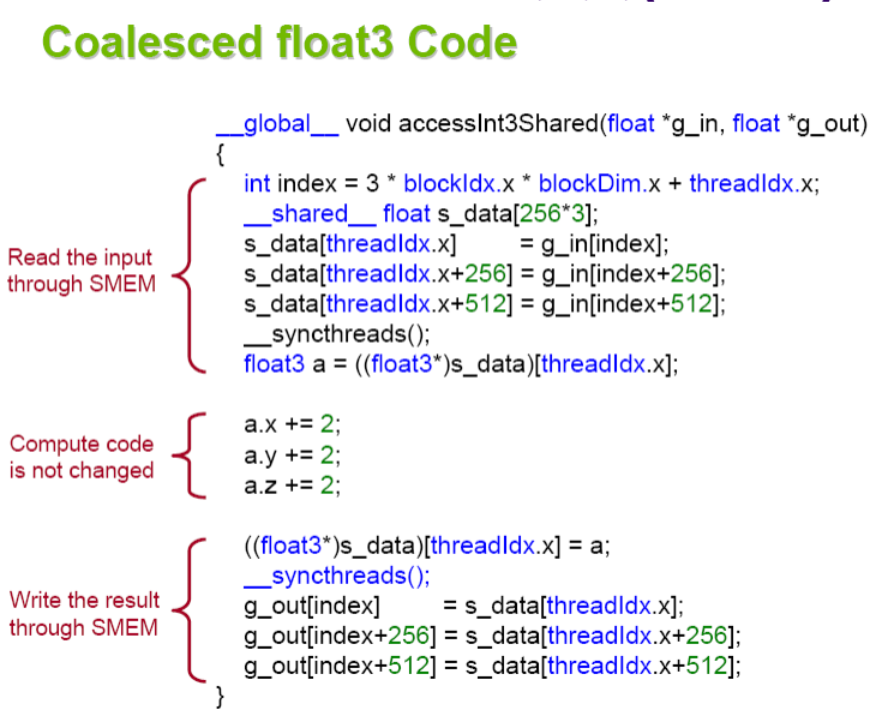
有无采用对齐shared读取,有10倍的加速。
- 比globalMemory快百倍
- 可以来避免 non-Coalesced access
- SM的线程可以共享
- Use one / a few threads to load / compute data shared by all threads
- 增加SM上线程数量,
- block数> SM数,这样所有的multiprocessors至少有一个block执行
- threads/block>128 。原因:机器上一般有最多4个Warp调度器=4*32=128
- threadsInblock=N*WarpSize=N*32
- 在 SM 上的 TB 越多越好,让 Thread Block 不停的跑我们的利用率就会高。
- 但是如果 Thread Block 太多,我们每一个 SM 能分配的寄存器就会变少,所以就会发生 Register Spill, 使用更高级的 L1、L2 Cache 去代替 Registers。所以 TB 不能太多,需要减少 Register Spill 的次数。
- 资源占用率不要太高(最多一半?
- 多使用
__syncthreads
- 最好的参数需要
self-tuning出来
占用率是指每个多处理器(Streaming Multiprocessor,SM)的实际的活动warps数量与最大理论的warps数量的比率。
高的占用率不一定能提升性能,因为这一般意味着每个线程分配的寄存器和shared memory变少。但低的占用率会导致内存延迟无法隐藏。
实际需要计算每个线程大概需要的shared memory和register数量
https://www.cnblogs.com/1024incn/p/4541313.html
https://www.cnblogs.com/1024incn/p/4545265.html
通过SMEM实现coalescing access
原本代码
_global__ void transpose_naive(float *odata, float *idata, int width, int height)
{
   unsigned int xIndex = blockDim.x * blockIdx.x + threadIdx.x;
   unsigned int yIndex = blockDim.y * blockIdx.y + threadIdx.y;
   if (xIndex < width && yIndex < height)
   {
      unsigned int index_in = xIndex + width * yIndex;
      unsigned int index_out = yIndex + height * xIndex;
      odata[index_out] = idata[index_in];
   }
}
思想:将大矩阵划分成方块,并且存储在SMEM里。不仅SMEM速度更快,而且每行元素个数变少,跨行访问的间距变小,局部性增强。而且对于大矩阵加速效果会更明显。
__global__ void transpose(float *odata, float *idata, int width, int height)
{
   __shared__ float block[BLOCK_DIM*BLOCK_DIM];
   unsigned int xBlock = blockDim.x * blockIdx.x;
   unsigned int yBlock = blockDim.y * blockIdx.y;
   unsigned int xIndex = xBlock + threadIdx.x;
   unsigned int yIndex = yBlock + threadIdx.y;
   unsigned int index_out, index_transpose;
   if (xIndex < width && yIndex < height)
   {
      unsigned int index_in = width * yIndex + xIndex;
      unsigned int index_block = threadIdx.y * BLOCK_DIM + threadIdx.x;
      block[index_block] = idata[index_in];
      index_transpose = threadIdx.x * BLOCK_DIM + threadIdx.y;
      index_out = height * (xBlock + threadIdx.y) + yBlock + threadIdx.x;
   }
   __syncthreads();
   if (xIndex < width && yIndex < height)
      odata[index_out] = block[index_transpose]
}
when Block/tile dimensions are multiples of 16 ???
https://developer.nvidia.com/blog/efficient-matrix-transpose-cuda-cc/
对于一个32 × 32个元素的共享内存块,一列数据中的所有元素都映射到相同的SMEM bank ,导致bank conflict 的最坏情况:读取一列数据会导致32路的存储库冲突。
幸运的是,只需要将tile的元素宽度改为33,而不是32就行。
具体问题:将长数组的所有元素,归约求和为一个结果。
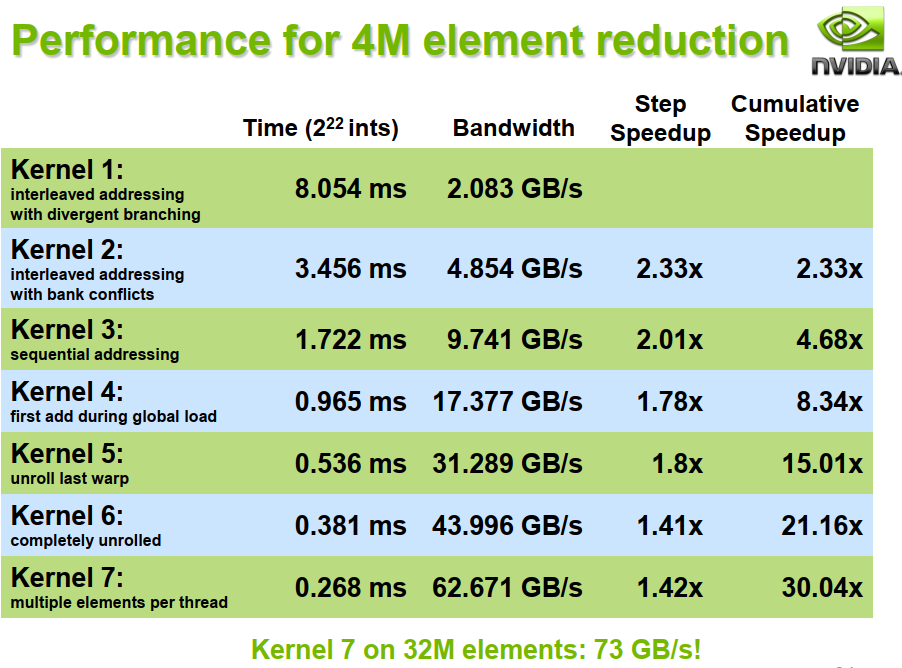
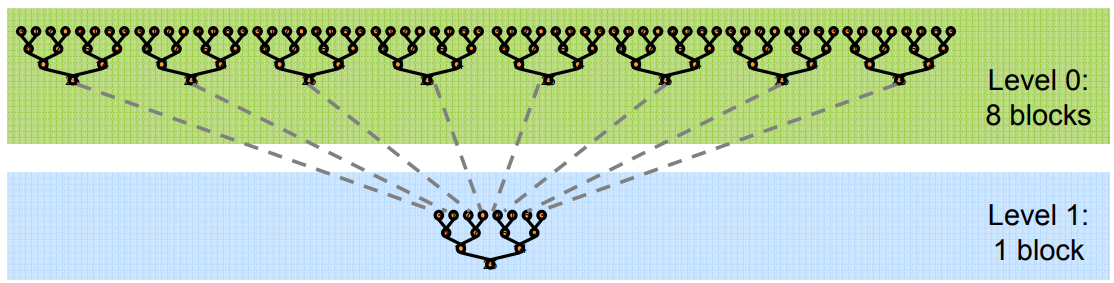
为了避免全局同步的巨大开销,采取分级归约
由于归约的计算密度低
1 flop per element loaded (bandwidth-optimal)
所以优化目标是将访存带宽用满。
384-bit memory interface, 900 MHz DDR
384 * 1800 / 8 = 86.4 GB/s
__global__ void reduce0(int *g_idata, int *g_odata) {
   extern __shared__ int sdata[];

   // each thread loads one element from global to shared mem
   unsigned int tid = threadIdx.x;
   unsigned int i = blockIdx.x*blockDim.x + threadIdx.x;
   sdata[tid] = g_idata[i];
   __syncthreads();

   // do reduction in shared mem
   for(unsigned int s=1; s < blockDim.x; s *= 2) {
      if (tid % (s) == 0) {
         sdata[tid] += sdata[tid + s];
      }
      __syncthreads();
   }

   // write result for this block to global mem
   if (tid == 0) g_odata[blockIdx.x] = sdata[0];
}
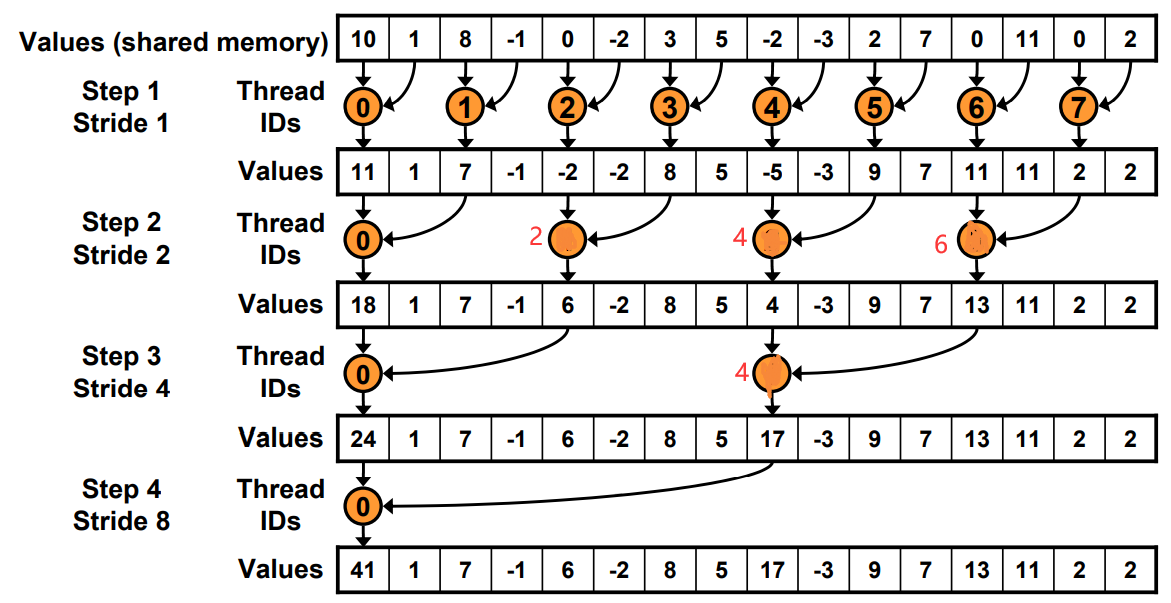 工作的线程越来越少。一开始是全部,最后一次只有thread0.
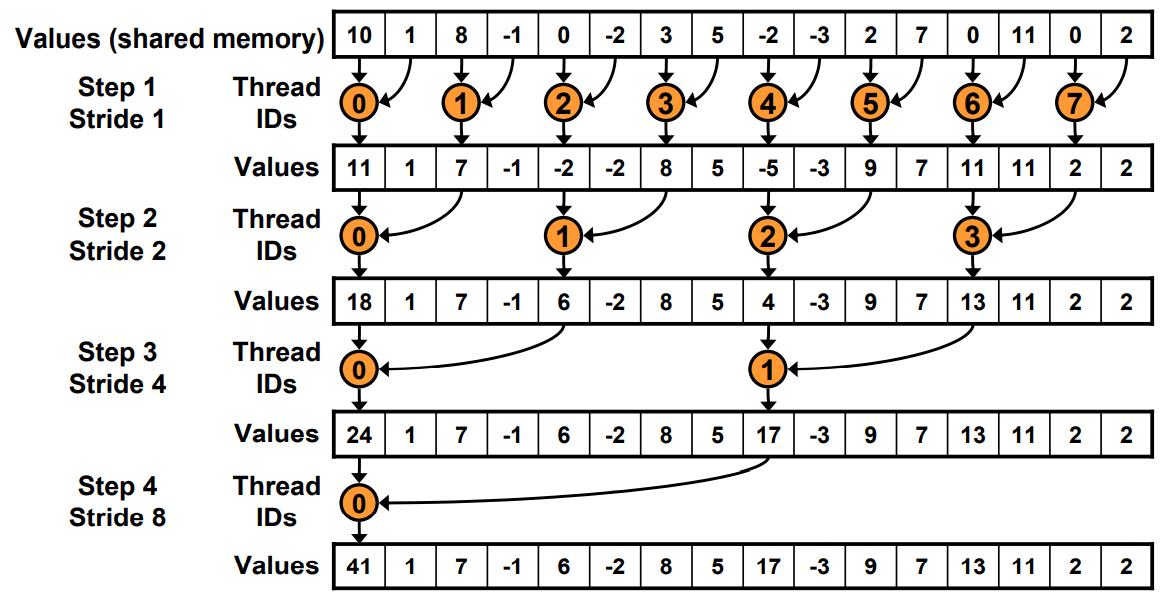
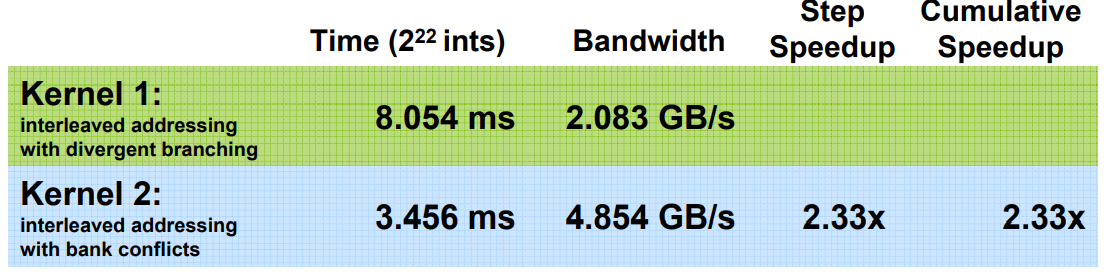
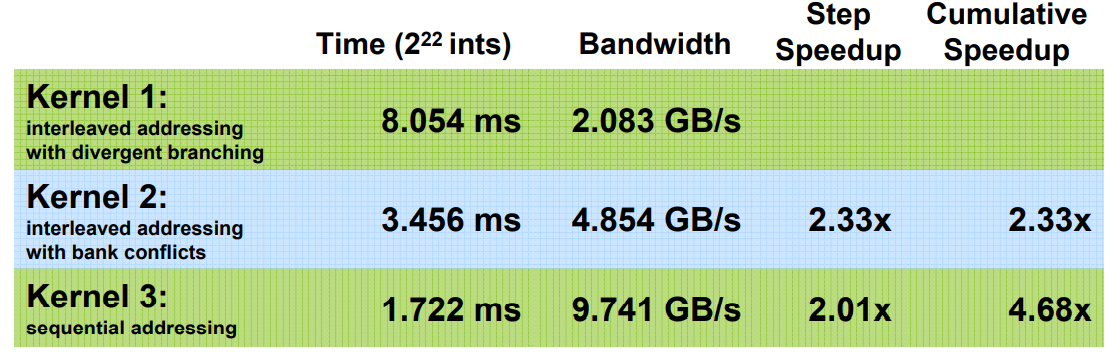
Just replace divergent branch With strided index and non-divergent branch,但是会带来bank conflict。
原理和Warp发射有关,假如在这里每个Warp并行的线程是2。一个Warp运行耗时为T.
Step0: 4+4+2+1=11T
Step1: 4+2+1+1=8T
for (unsigned int s=1; s < blockDim.x; s *= 2) {
   int index = 2 * s * tid;
   if (index < blockDim.x) {
      sdata[index] += sdata[index + s];
   }
   __syncthreads();
}
for (unsigned int s=blockDim.x/2; s>0; s>>=1) {
   if (tid < s) {
      sdata[tid] += sdata[tid + s];
   }
   __syncthreads();
}
原本寻址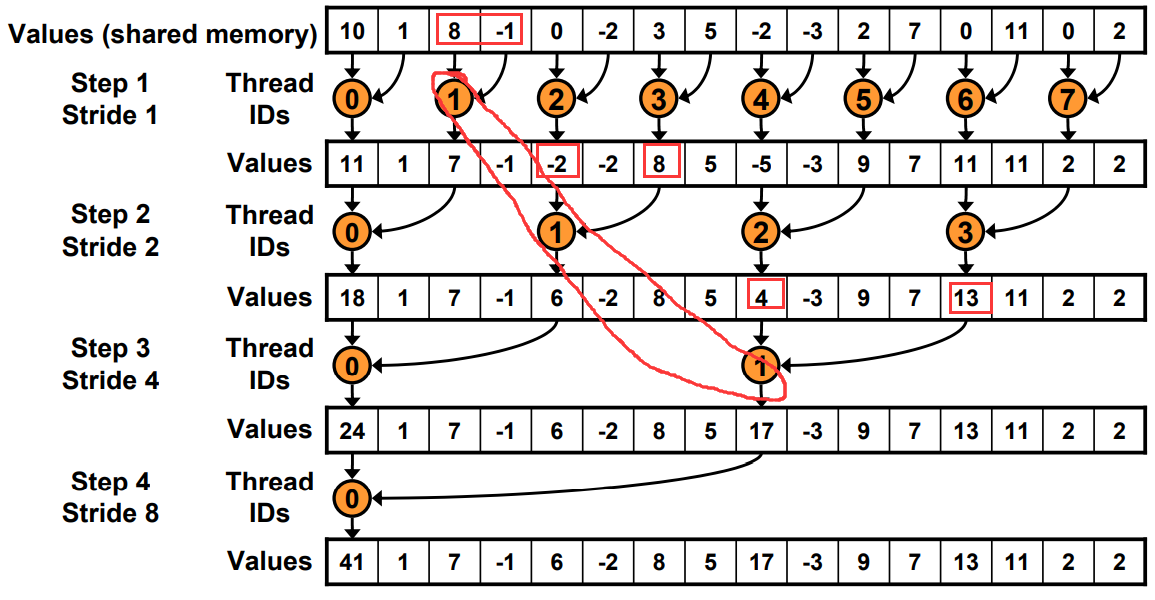
现在寻址有一边连续了
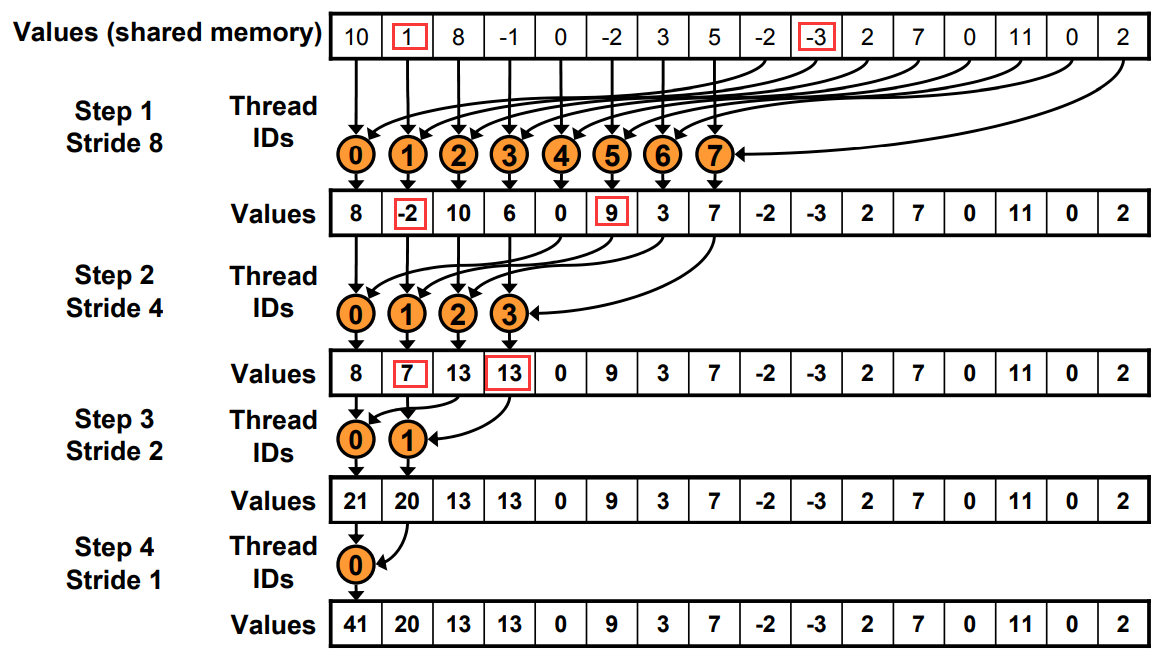
方法: 在load SMEM的时候提前做一次规约加法,通过减少一半的block数,将原本两个block里的值load+add存储在sum里。
// perform first level of reduction,
// reading from global memory, writing to shared memory
unsigned int tid = threadIdx.x;
unsigned int i = blockIdx.x*(blockDim.x*2) + threadIdx.x;
sdata[tid] = g_idata[i] + g_idata[i+blockDim.x];
__syncthreads();

当s< 32的时候,就只有一个Warp工作了。
使用warp的SIMD还省去了__syncthreads()的麻烦
for (unsigned int s=blockDim.x/2; s>32; s>>=1)
{
   if (tid < s)
      sdata[tid] += sdata[tid + s];
   __syncthreads();
}
if (tid < 32)
{
   sdata[tid] += sdata[tid + 32];
   sdata[tid] += sdata[tid + 16];
   sdata[tid] += sdata[tid + 8];
   sdata[tid] += sdata[tid + 4];
   sdata[tid] += sdata[tid + 2];
   sdata[tid] += sdata[tid + 1];
}
为了保持整洁,最后一个if还做了无效的计算。eg, Warp里的最后一个线程只有第一句命令有用。

由于for循环里是二分的,而且小于32的单独处理了,导致for循环里实际运行代码最多就3句。
利用代码模板和编译器的自动优化实现:
template <unsigned int blockSize>
__global__ void reduce5(int *g_idata, int *g_odata)
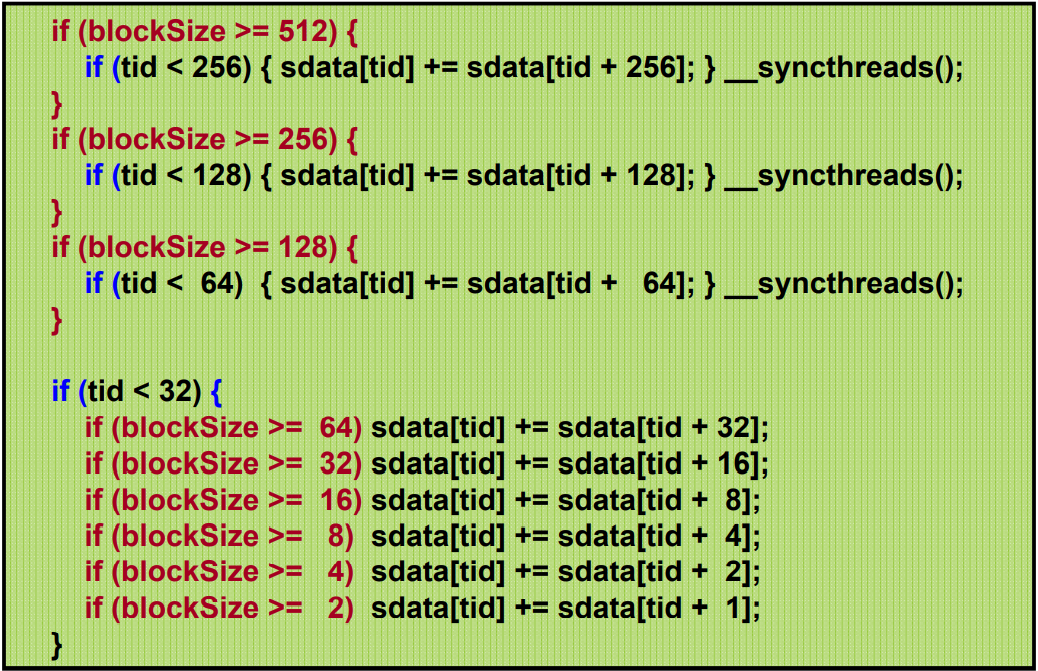
红色代码会在编译时自动优化。

加速级联??
Cost= processors × time complexity
我们知道N个元素直接二叉树归约是O(log N)
时间 Cost=N*O(log N).
但是假如只有P个线程先做N/P的串行加法, 然后是log(P)的归约。
总cost=P(N/P+log(P))
当P=N/log(N), cost=O(N)
each thread should sum O(log n) elements来设置
比如,1024 or 2048 elements per block vs. 256 线程。每个sum n=4个元素。 具体参数要perf
unsigned int tid = threadIdx.x;
unsigned int i = blockIdx.x*(blockSize*2) + threadIdx.x;
unsigned int gridSize = blockSize*2*gridDim.x;
sdata[tid] = 0;
while (i < n) {
   sdata[tid] += g_idata[i] + g_idata[i+blockSize];
   i += gridSize;
}
__syncthreads();

template <unsigned int blockSize>
__global__ void reduce6(int *g_idata, int *g_odata, unsigned int n)
{
   extern __shared__ int sdata[];

   unsigned int tid = threadIdx.x;
   unsigned int i = blockIdx.x*(blockSize*2) + tid;
   unsigned int gridSize = blockSize*2*gridDim.x;
   sdata[tid] = 0;

   do { sdata[tid] += g_idata[i] + g_idata[i+blockSize]; i += gridSize; } while (i < n);
   __syncthreads();

   if (blockSize >= 512) { if (tid < 256) { sdata[tid] += sdata[tid + 256]; } __syncthreads(); }
   if (blockSize >= 256) { if (tid < 128) { sdata[tid] += sdata[tid + 128]; } __syncthreads(); }
   if (blockSize >= 128) { if (tid < 64) { sdata[tid] += sdata[tid + 64]; } __syncthreads(); }

   if (tid < 32) {
      if (blockSize >= 64) sdata[tid] += sdata[tid + 32];
      if (blockSize >= 32) sdata[tid] += sdata[tid + 16];
      if (blockSize >= 16) sdata[tid] += sdata[tid + 8];
      if (blockSize >= 8) sdata[tid] += sdata[tid + 4];
      if (blockSize >= 4) sdata[tid] += sdata[tid + 2];
      if (blockSize >= 2) sdata[tid] += sdata[tid + 1];
   }
   if (tid == 0) g_odata[blockIdx.x] = sdata[0];
}
有if语句是没问题的,只要运行的时候全部执行if或者else就行。不要有些执行if,有些执行else,这才会等待。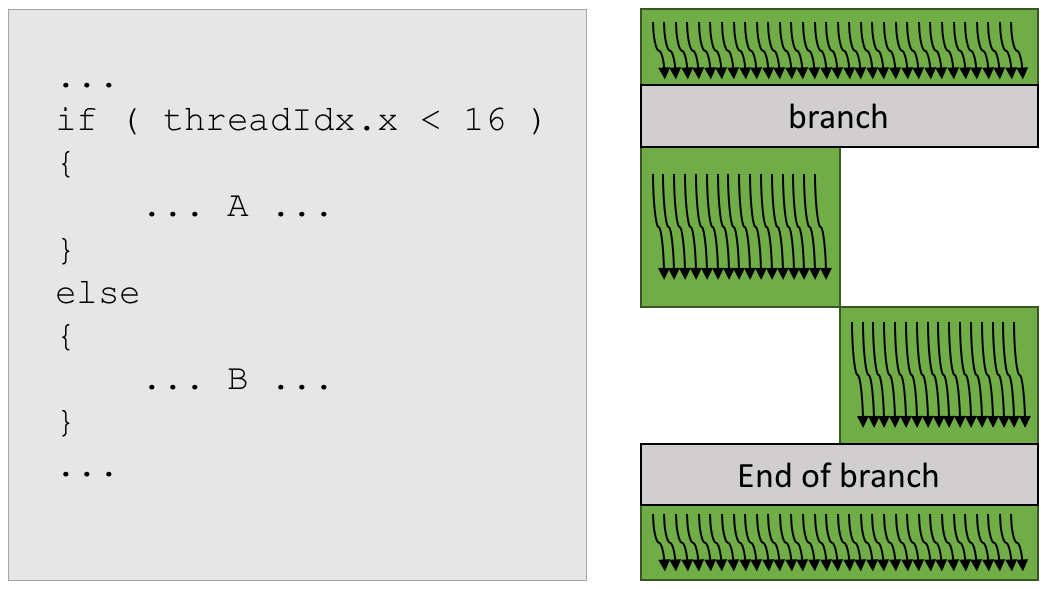
说不定也不是全部执行if或者else就行,只需要连续32个Thread Index,是相同的执行就行。(猜想,需要测试。
通过增加block里的线程数,并且同时读取来隐藏延迟。 不仅可以隐藏Global Memory的延迟,还可以隐藏写后读的延迟
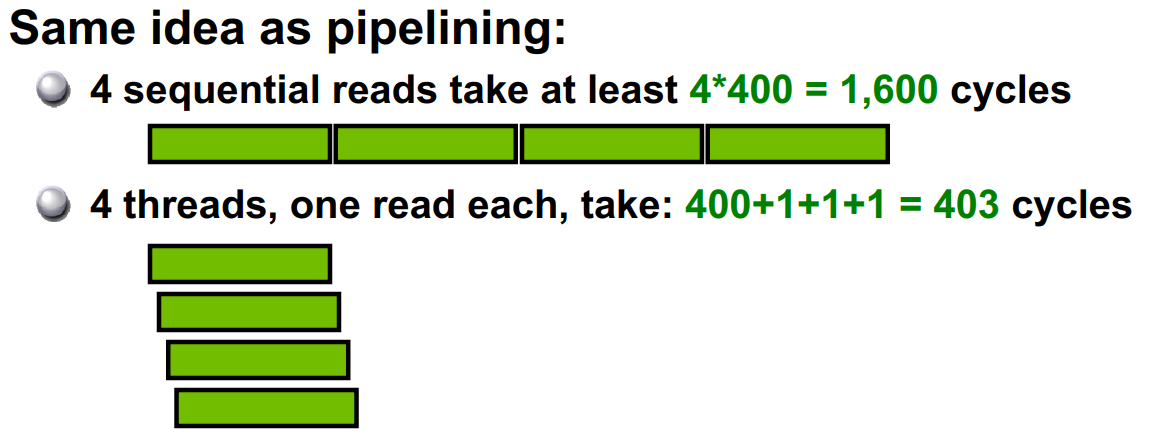
线程太多会导致分配到每一个的寄存器和SMEM变少
通过编译时加-cubin选项,.cubin文件前几行会显示
architecture {sm_10}
abiversion {0}
modname {cubin}
code {
   name = BlackScholesGPU
   lmem = 0    # per thread local memory
   smem = 68   # per thread block shared memory
   reg = 20    # per thread registers