Vscode
导言
VSCODE 是 windows 项目开发的桥梁
必备技巧
导航栏打开所有文件
设置 搜索 wrap tabs 开启。1
AI 代码补全工具
- github Copilot
- Codeium2
- TONGYI Lingma,阿里
- codemate
- IntelliCode, for python
cleancode
必备插件
- Trailing Spaces: 代码末尾空格
- clang_format: 格式化
- SonarLint: 静态分析代码规范(圈复杂度判断?
自动格式化
VSCode 的 C/C++ 插件的设置,用于定义 clang-format 的格式化风格。具体来说,它通过 "C_Cpp.clang_format_fallbackStyle" 配置项来设置格式化风格,以在没有项目特定 .clang-format 文件的情况下作为默认格式化风格。
配置方式
- 打开 VSCode 的设置 (点击右上角齿轮图标 ->
Settings)。 - 在搜索栏中输入
C_Cpp.clang_format_fallbackStyle。 - 在
settings.json中添加或修改以下配置:
"C_Cpp.clang_format_fallbackStyle": "{ BasedOnStyle: Google, ColumnLimit: 0, AllowShortIfStatementsOnASingleLine: false, AllowShortLoopsOnASingleLine: false, IndentWidth: 4, PointerAlignment: Right, SpacesBeforeTrailingComments: 1 }"
配置项解释
- "C_Cpp.clang_format_fallbackStyle": 这个配置项属于
C/C++插件 (ms-vscode.cpptools)。 - 如果项目目录中找不到
.clang-format文件,那么clang-format会使用该配置项中的样式进行格式化。
配置参数
以下是配置中的各个参数含义:
- BasedOnStyle: 指定基础风格,这里是
Google风格。可以选择的其他基础风格包括LLVM、Chromium、Mozilla等。 - ColumnLimit: 设置每行的最大字符数,
0表示不限制行宽。 - AllowShortIfStatementsOnASingleLine: 控制
if语句是否允许写在同一行,这里设置为false禁止在同一行书写。 - AllowShortLoopsOnASingleLine: 控制
for和while循环是否允许写在同一行,这里设置为false禁止在同一行书写。 - IndentWidth: 设置缩进宽度为 4。
- PointerAlignment: 设置指针对齐风格,这里
Right表示将指针符号*放在变量名右边,如int* ptr。 - SpacesBeforeTrailingComments: 在尾随注释前留一个空格。
远程连接
插件
RemoteDev 相当于华为内部的Remote-SSH
报错
远程连接插件 Remote-SSH 插件报错
难以解决就重装VSCODE: 奇怪的问题多是插件兼容性导致
常见报错原理
文件名da76f93349a72022ca4670c1b84860304616aaa2实际上是一个特定VS Code Server版本的唯一标识符(通常称为“提交ID”或“版本哈希”)。VS Code Server的每个版本都有一个不同的提交ID,这个ID对应于VS Code源代码仓库中的一个特定提交。
VS Code如何选择使用哪个版本
- 版本匹配:当VS Code尝试建立与远程环境的连接时,它会检查远程环境中安装的VS Code Server版本。VS Code客户端会根据自己的版本请求匹配的VS Code Server版本,确保二者之间的兼容性。
- 自动下载和安装:如果远程环境中没有找到匹配的VS Code Server版本,VS Code客户端会自动下载并安装所需的VS Code Server版本。这个过程是自动的,确保用户无需手动介入版本匹配和安装过程。
- 多版本共存:在远程环境中,可以存在多个不同版本的VS Code Server。这允许不同版本的VS Code客户端与远程环境连接,每个客户端使用与之兼容的VS Code Server版本。这种设计使得在同一远程环境中支持多用户或多版本使用成为可能。
- 版本选择:当VS Code客户端连接到远程环境时,它会基于客户端的版本信息选择合适的VS Code Server版本。如果远程环境中已经安装了多个版本的VS Code Server,VS Code会自动选择与客户端版本对应的服务器版本。
Could not establish connection. XHR failed
原因是没有网络,需要自己手动下载包
先查看包对应版本
# shaojiemike @ node5 in ~ [15:24:54] C:1
$ rm ~/.vscode-server -rf

# shaojiemike @ node5 in ~ [15:24:59]
$ ls ~/.vscode-server/bin/
784b0177c56c607789f9638da7b6bf3230d47a8c
下载对应版本,移动解压
set_proxy
# 或者 自己电脑下,然后传上去,30MB左右
cd ~/.vscode-server/bin/784b0177c56c607789f9638da7b6bf3230d47a8c
wget https://update.code.visualstudio.com/commit:784b0177c56c607789f9638da7b6bf3230d47a8c/server-linux-x64/stable
mv stable vscode-server-linux-x64.tar.gz
tar -xvxf vscode-server-linux-x64.tar.gz --strip-components 1
重新连接即可
首次连接卡在下载 vscode 服务器
根据remote-ssh日志寻找 编号 138f619c86f1199955d53b4166bef66ef252935c
> Trigger local server download
> e5407081b739:trigger_server_download
> artifact==cli-alpine-x64==
[14:57:11.075] > destFolder==/root/.vscode-server==
> destFolder2==/vscode-cli-138f619c86f1199955d53b4166bef66ef252935c.tar.gz==
> e5407081b739:trigger_server_download_end
> Waiting for client to transfer server archive...
> Waiting for /root/.vscode-server/vscode-cli-138f619c86f1199955d53b4166bef66ef252
> 2935c.tar.gz.done and vscode-server.tar.gz to exist
下载对应版本,移动解压
set_proxy
# 或者 自己电脑下,然后传上去,30MB左右
cd ~/.vscode-server/bin/138f619c86f1199955d53b4166bef66ef252935c
wget https://update.code.visualstudio.com/commit:138f619c86f1199955d53b4166bef66ef252935c/server-linux-x64/stable
mv stable vscode-server-linux-x64.tar.gz
tar -xvxf vscode-server-linux-x64.tar.gz --strip-components 1
重新连接即可
Server installation process already in progress
Server installation process already in progress - waiting and retrying
Acquiring lock on /staff/shaojiemike/.vscode-server/bin/6c3e3dba23e8fadc360aed75ce363ba185c49794/vscode-remote-lock.shaojiemike.6c3e3dba23e8fadc360aed75ce363ba185c49794
[09:25:29.643] > Installation already in progress...
just remove the locked file
过程试图写入的管道不存在
Install terminal quit with output: 过程试图写入的管道不存在。
[08:39:15.476] Received install output: 过程试图写入的管道不存在。
一般是本地的known_hosts冲突了,
- 删除对应项或者文件后。
- terminal重新连接,添加known_hosts
- VS Code 正常
Acquiring lock on
[15:18:37.132] > Acquiring lock on /staff/shaojiemike/.vscode-server/bin/da76f93349a72022ca4670c1b84860304616aaa2/vscode-remote-lock.shaojiemike.da76f93349a72022ca4670c1b84860304616aaa2
[15:18:37.144] > \ln /staff/shaojiemike/.vscode-server/bin/da76f93349a72022ca4670c1b84860304616aaa2/vscode-remote-lock.shaojiemike.da76f93349a72022ca4670c1b84860304616aaa2.target /staff/shaojiemike/.vscode-server/bin/da76f93349a72022ca467
> 0c1b84860304616aaa2/vscode-remote-lock.shaojiemike.da76f93349a72022ca4670c1b84860304616aaa2
[15:18:37.163] > Found existing installation at /staff/shaojiemike/.vscode-server/bin/da76f93349a72022ca4670c1b84860304616aaa2...
> Checking /staff/shaojiemike/.vscode-server/.da76f93349a72022ca4670c1b84860304616aaa2.log and /staff/shaojiemike/.vscode-server/.da76f93349a72022ca4670c1b84860304616aaa2.pid for a running server
> Looking for server with pid: 1679721
[15:18:37.208] > Found running server...
this is because connect the same user in shared disk system (e.g., NFS) at the same time from snode6 and icarus0 two different machine.
So just open all fold from the same machine using VSCODE. Or kill -9 pid twice will jump to the before question.
C++ 开发
自动跳转
- 已经安装了 C/C++和 C++ Intellisense 插件;
- 确认 C_Cpp: IntelliSenseEngine 的开关打开
- 左击插件 C/C++,选择小齿轮 -> 扩展设置。
- 搜索框内输入 “intell”,将 C_Cpp:Intelli Sense Engine 开关设置为 Default。
- “Ctrl + Shift + P”打开C/C++:Edit Configurations(JSON)创建。
另一个基于ctag+vscode的实现方法
- 安装插件
格式化代码
C/C++插件会自动包含clang-format可执行文件,- 也支持设置里自定义
clang_format_style, 设置file:C:\Users\94364\github\.clang-format
# 华为兼容格式
# 基于默认样式设置,比如 LLVM,然后覆写相关配置
BasedOnStyle: Google

# 配置项
IndentWidth: 4                  # 缩进宽度为4个空格
TabWidth: 4                     # Tab宽度为4个空格
UseTab: Never                   # 使用空格代替Tab

# BreakBeforeBraces: Attach       # 函数的括号独占一行(Allman 风格)花括号与函数名同行( Attach K&R 风格,默认)。
BreakBeforeBraces: Custom       # 使用自定义的括号换行规则

BraceWrapping:                  # 详细设置括号的换行规则
  AfterFunction: true           # 函数的左花括号换行
  AfterClass: false             # 类的左花括号不换行
  AfterControlStatement: false  # 控制语句(if/else/for/while)的左花括号不换行
  BeforeCatch: false            # catch 不换行
  BeforeElse: false             # else 不换行

AllowShortIfStatementsOnASingleLine: false  # 禁止if-else单行写法
SpaceBeforeParens: ControlStatements        # if/else 后的括号与关键字间保留一个空格

ColumnLimit: 0                  # 不限制每行代码的最大字符数
IndentCaseLabels: false         # 不缩进 case 标签
NamespaceIndentation: All       # 所有命名空间内的内容都会缩进
Debug
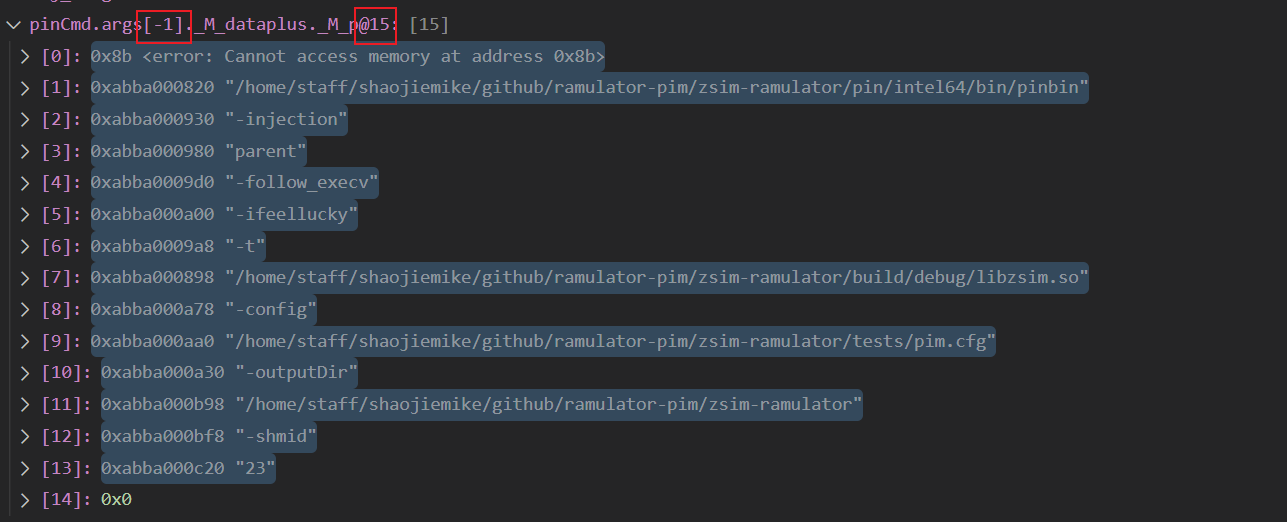
数组查看技巧
参考GDB的命令
conda环境调试
{
    "version": "0.2.0",
    "configurations": [
        {
            "name": "Python 调试程序: 当前文件1",
            "type": "debugpy",
            "request": "launch",
            "program": "${file}", // 运行当前文件, 注意不要是当前的json!!!
            "console": "integratedTerminal",
            "cwd": "/home/t00906153/github/HEBO-EDA-dev_c00832084/algorithms/kunpeng",
            "python": "/home/anaconda3/envs/t00906153_bindCore/bin/python"
        }
    ]
}
多线程进程调试c++
注意编译选项-g -O0。不然常量参数flag=1会被优化掉。
修改代码
void LaunchProcess(uint32_t procIdx) {
    int cpid = fork();
    int tsj_flag = 1;
    while(tsj_flag){
        sleep(0.5);
    }
找到运行子进程的PID
PID USER      PRI  NI  VIRT   RES   SHR S CPU% MEM%   TIME+  Command
243149 shaojiemi  20   0 1026M  2132  2036 S  8.4  0.0  0:07.00 │  │  └─ ./build/opt/zsim tests/pim.cfg
243150 shaojiemi  20   0 1026M   136    40 S  9.0  0.0  0:07.04 │  │     └─ ./build/opt/zsim tests/pim.cfg
VSCODE设置,连接上后需要暂停再启动一次
{
    "name": "(gdb) 附加",
    "type": "cppdbg",
    "request": "attach",
    "program": "/home/staff/shaojiemike/github/ramulator-pim/zsim-ramulator/build/debug/zsim",
    "processId":"276570",
    "MIMode": "gdb",
    "setupCommands": [
        {
            "description": "为 gdb 启用整齐打印",
            "text": "-enable-pretty-printing",
            "ignoreFailures": true
        },
        {
            "description":  "将反汇编风格设置为 Intel",
            "text": "-gdb-set disassembly-flavor intel",
            "ignoreFailures": true
        }
    ]
},
多线程进程调试python
指定conda环境,python版本
两种方式:
- 选择 Conda 环境: 在 VSCode 中按
Ctrl+Shift+P,然后选择 "Python: Select Interpreter"。这将列出所有可用的 Python 解释器。选择你想要使用的 Conda 环境。 - 修改
launch.json文件: 在 launch.json 文件中,你可以通过指定pythonPath来让 VSCode 使用特定的 Conda 环境。你需要把 pythonPath 配置项指向 Conda 环境的解释器路径。
{
    // 使用 IntelliSense 了解相关属性。
    // 悬停以查看现有属性的描述。
    // 欲了解更多信息,请访问: https://go.microsoft.com/fwlink/?linkid=830387
    "version": "0.2.0",
    "configurations": [
        {
            "name": "Python: 当前文件",
            "type": "python",
            "request": "launch",
            "program": "${file}",
            "args": ["txt", "E:\\PowerShell\\github\\classin-downloader\\bb.html"],
            "console": "integratedTerminal",
            "justMyCode": true,
            "pythonPath": "C:\\Users\\YourUsername\\Anaconda3\\envs\\your-conda-env\\python.exe"
        }
    ]
}
对于通过subprocess.Popen(cmd).communicate()已经创建的子进程(代码中编写time.sleep(20),并在下一条指令标记断点),需要设置launch.json,在同一个VSCODE窗口下启动一个新的debug示例,然后选择其PID来监控
{
   "name": "Python: 使用 PID 连接",
   "type": "python",
   "request": "attach",
   "processId": "${command:pickProcess}"
  },
对于threading.Thread(target = fuc, args = (xxx)).start()启动的线程不需要额外监视。
单线程启动
{
  "name": "C++ Launch",
  "type": "cppdbg",
  "request": "launch",
  "program": "${workspaceFolder}/a.out",
  "args": ["arg1", "arg2"],
  "environment": [{ "name": "config", "value": "Debug" }],
  "cwd": "${workspaceFolder}"
}
{
    "configurations": [
  {
   "name": "(gdb) 启动",
   "type": "cppdbg",
   "request": "launch",
   "program": "/home/staff/shaojiemike/github/ramulator-pim/zsim-ramulator/build/opt/zsim",
            //args设置注意双引号内没有空格,也就是原本命令中的空格就是分隔符。还需要注意路径
   "args": ["/home/staff/shaojiemike/github/ramulator-pim/zsim-ramulator/tests/pim.cfg"],
            "args": ["--config", "${workspaceFolder}/Configs/host.cfg",
                "--disable-perf-scheduling","true","--mode=cpu",
                "--stats","host.stats","--trace","${workspaceFolder}/sample_traces/host/rodiniaBFS.out",
                "--core-org=outOrder","--number-cores=4","--trace-format=zsim","--split-trace=true"],
   "stopAtEntry": false,
   "cwd": "/home/staff/shaojiemike/github/ramulator-pim/zsim-ramulator",
   "environment": [{ "name":"LD_LIBRARY_PATH","value":"/home/staff/shaojiemike/github/ramulator-pim/zsim-ramulator/pin/intel64/runtime/pincrt:/home/staff/shaojiemike/github/ramulator-pim/zsim-ramulator/pin/extras/xed-intel64/lib" } ],
   "externalConsole": false,
   "MIMode": "gdb",
   "setupCommands": [
    {
     "description": "为 gdb 启用整齐打印",
     "text": "-enable-pretty-printing",
     "ignoreFailures": true
    },
    {
     "description":  "将反汇编风格设置为 Intel",
     "text": "-gdb-set disassembly-flavor intel",
     "ignoreFailures": true
    }
   ]
  }

 ]
}
参数
{
    // 使用 IntelliSense 了解相关属性。
    // 悬停以查看现有属性的描述。
    // 欲了解更多信息,请访问: https://go.microsoft.com/fwlink/?linkid=830387
    "version": "0.2.0",
    "configurations": [
        {
            "name": "Python: 当前文件",
            "type": "python",
            "request": "launch",
            "program": "${file}",
            "args": ["txt", "E:\\PowerShell\\github\\classin-downloader\\bb.html"],
            "console": "integratedTerminal",
            "justMyCode": true
        }
    ]
}
"args": [],里添加


