package manager: apt
基本概念
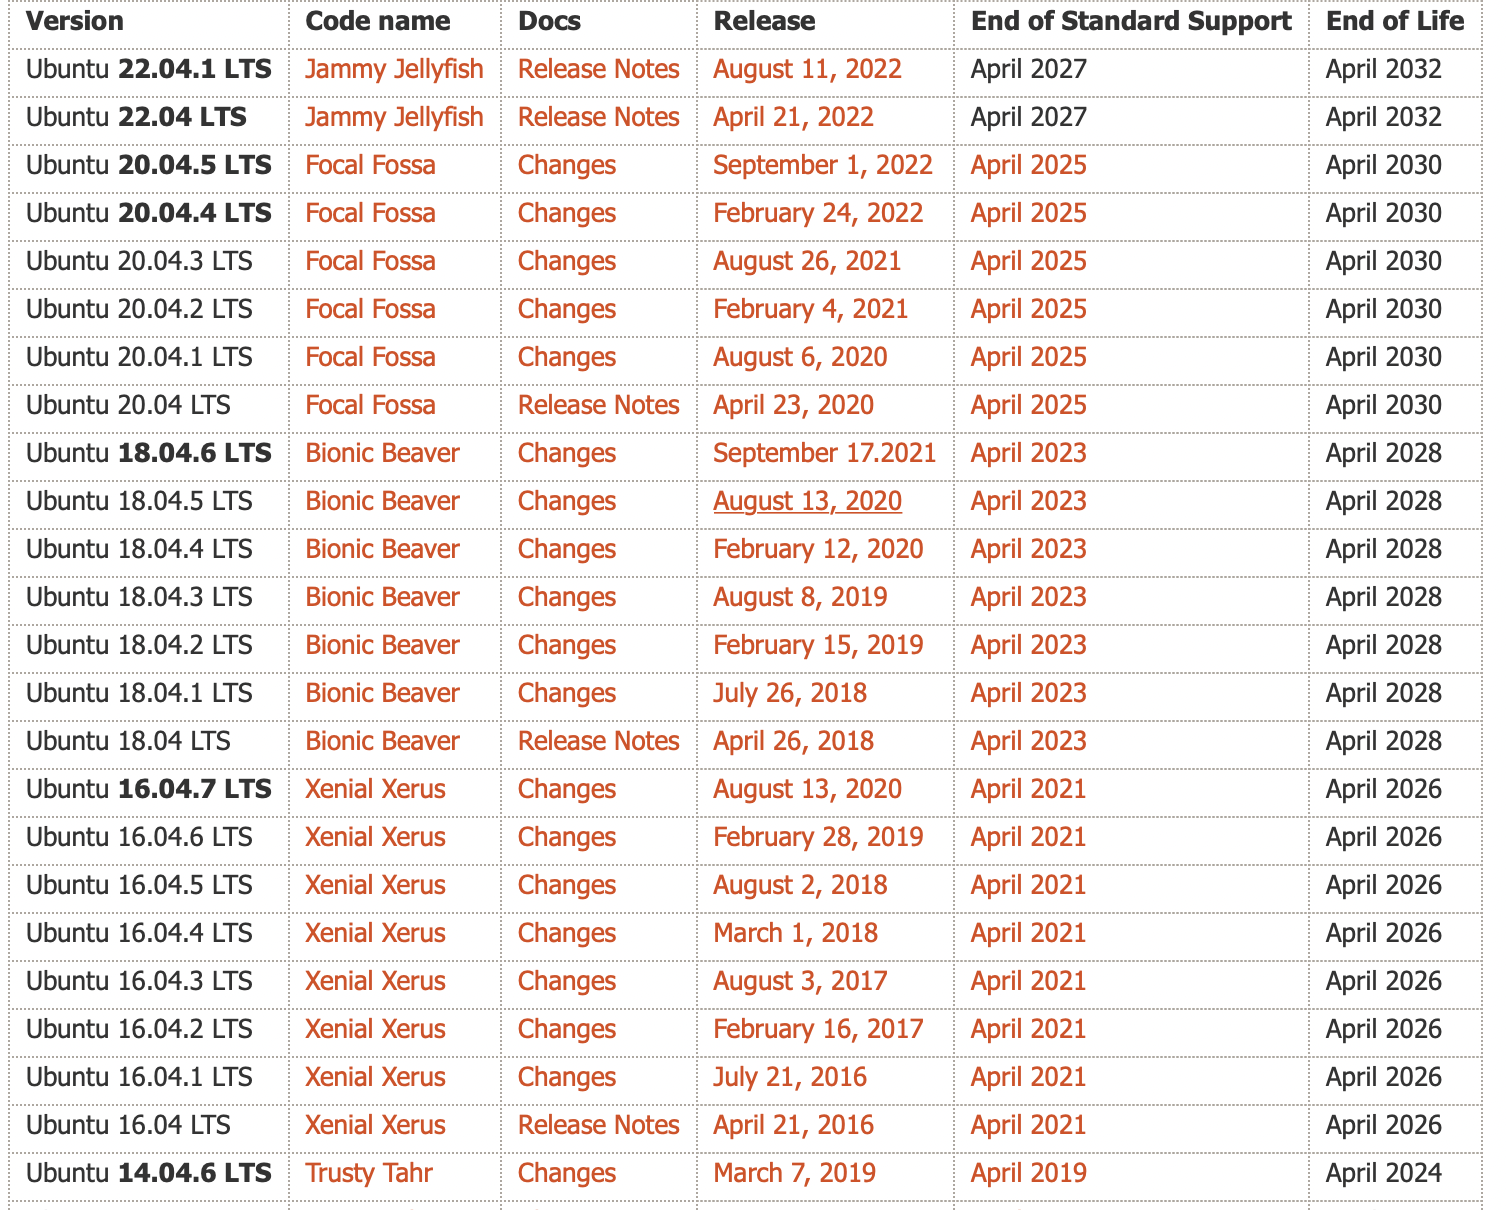
Ubuntu 版本代号
都是动物, 都是两个词,并且两个词的首字母相同,从6.06开始,首字母从D开始递增。
中间版本也有代号 Ubuntu 14.10 (Utopic Unicorn) 以及 Ubuntu 14.04.5 LTS (Trusty Tahr) 官网可以查看
$ lsb_release -a
No LSB modules are available.
Distributor ID: Ubuntu
Description:    Ubuntu 20.04.5 LTS
Release:        20.04
Codename:       focal
各版本 代号
PPA(Personal Package Archive)
- PPA 代表 个人包存档。
- PPA 允许应用程序开发人员和 Linux 用户创建自己的存储库来分发软件。
- 使用 PPA,您可以轻松获得更新的软件版本或无法通过官方 Ubuntu 存储库获得的软件。
- 除了PPA之外,其他操作系统也有类似的概念,例如Debian的APT存储库、Fedora的DNF存储库等。
常见三板斧
sudo add-apt-repository ppa:dr-akulavich/lighttable
sudo apt-get update
sudo apt-get install lighttable-installer
DEB packages
DEB packages(Debian Binary Package)是Debian及其基于Debian的操作系统(如Ubuntu)中使用的软件包格式。它们是一种存档格式,包含软件的二进制文件、配置文件、依赖关系和其他必要的文件。DEB packages是一种用于软件分发和安装的标准格式。
- 相比于PPA,大部分DEB的包没有
source.list.不能自动更新。
repository
存储库是文件的集合,其中包含有关各种软件、其版本和其他一些详细信息(如校验和)的信息。每个 Ubuntu 版本都有自己的一套官方的四个存储库:
- Main – Canonical-supported free and open-source software. 规范支持的免费和开源软件。
- Universe – Community-maintained free and open-source software. 社区维护的自由和开源软件。
- Restricted – Proprietary drivers for devices. 设备的专有驱动程序。
- Multiverse – Software restricted by copyright or legal issues. 受版权或法律问题限制的软件。
Ubuntu 添加软件源
清空缓存
PPA vs repository
to read: https://itsfoss.com/ppa-guide/
实践
Ubuntu20.04 install old gcc4.8
寻找支持gcc-4.8的apt源,也就是xenial版本的一个源。
vim /etc/apt/sources.list

deb http://dk.archive.ubuntu.com/ubuntu/ xenial main
deb http://dk.archive.ubuntu.com/ubuntu/ xenial universe

sudo apt update
//会显示 Get:54 http://dk.archive.ubuntu.com/ubuntu xenial/main i386 Packages [1,196 kB]
sudo apt install gcc-4.8
Ubuntu20.04 install new glibc-2.35
Ubuntu 22.04 有对应的 glibc
原本的思路是安装gcc-11, 结果发现glibc需要增量安装。需要在node5进行测试。
Unpacking libc6:i386 (2.35-0ubuntu3) over (2.31-0ubuntu9.9) ...
Preparing to unpack .../6-libselinux1_3.3-1build2_amd64.deb ...
De-configuring libselinux1:i386 (3.0-1build2) ...
Unpacking libselinux1:amd64 (3.3-1build2) over (3.0-1build2) ...
tar: /lib/x86_64-linux-gnu/libc.so.6: version `GLIBC_2.33' not found (required by /lib/x86_64-linux-gnu/libselinux.so.1)
tar: /lib/x86_64-linux-gnu/libc.so.6: version `GLIBC_2.34' not found (required by /lib/x86_64-linux-gnu/libselinux.so.1)
dpkg-deb: error: tar subprocess returned error exit status 1
dpkg: error processing archive /tmp/apt-dpkg-install-b0waQ0/7-libselinux1_3.3-1build2_i386.deb (--unpack):
 dpkg-deb --control subprocess returned error exit status 2
tar: /lib/x86_64-linux-gnu/libc.so.6: version `GLIBC_2.33' not found (required by /lib/x86_64-linux-gnu/libselinux.so.1)
tar: /lib/x86_64-linux-gnu/libc.so.6: version `GLIBC_2.34' not found (required by /lib/x86_64-linux-gnu/libselinux.so.1)
dpkg-deb: error: tar subprocess returned error exit status 1
dpkg: error processing archive /tmp/apt-dpkg-install-b0waQ0/8-libc-bin_2.35-0ubuntu3_amd64.deb (--unpack):
 dpkg-deb --control subprocess returned error exit status 2
Errors were encountered while processing:
 /tmp/apt-dpkg-install-b0waQ0/4-libc6_2.35-0ubuntu3_amd64.deb
 /tmp/apt-dpkg-install-b0waQ0/7-libselinux1_3.3-1build2_i386.deb
 /tmp/apt-dpkg-install-b0waQ0/8-libc-bin_2.35-0ubuntu3_amd64.deb
/usr/bin/dpkg: /lib/x86_64-linux-gnu/libc.so.6: version `GLIBC_2.33' not found (required by /lib/x86_64-linux-gnu/libselinux.so.1)
/usr/bin/dpkg: /lib/x86_64-linux-gnu/libc.so.6: version `GLIBC_2.34' not found (required by /lib/x86_64-linux-gnu/libselinux.so.1)
/usr/bin/gdbus: /lib/x86_64-linux-gnu/libc.so.6: version `GLIBC_2.33' not found (required by /lib/x86_64-linux-gnu/libselinux.so.1)
/usr/bin/gdbus: /lib/x86_64-linux-gnu/libc.so.6: version `GLIBC_2.34' not found (required by /lib/x86_64-linux-gnu/libselinux.so.1)
E: Sub-process /usr/bin/dpkg returned an error code (1)
E: Sub-process dpkg --set-selections returned an error code (1)
E: Couldn't revert dpkg selection for approved remove/purge after an error was encountered!
Install newest gcc
https://gist.github.com/application2000/73fd6f4bf1be6600a2cf9f56315a2d91
update-alternatives 设置软件版本
sudo update-alternatives --install /usr/bin/clang clang /usr/bin/clang-6.0 1 --slave /usr/bin/clang++ clang++ /usr/bin/clang++-6.0
sudo update-alternatives --install /usr/bin/clang clang /usr/bin/clang-10 1 --slave /usr/bin/clang++ clang++ /usr/bin/clang++-10
sudo update-alternatives --install /usr/bin/gcc gcc /usr/bin/gcc-4.8 20
将某个版本加入gcc候选中,最后的数字是优先级.
运行下面命令切换
代理 apt-get
apt不能使用export http_proxy的代理,需要额外设置
临时设置
如果只是暂时设置代理,一次性使用:
sudo -E http_proxy="http://proxy.example.com:port" apt-get update

# or -o 'xxx'
sudo apt -o Acquire::https::proxy="http://<proxy-url>:<port>/" update
sudo apt-get -o Acquire::http::proxy="http://<proxy-url>:<port>/" update
永久设置
Or add lines in /etc/apt/apt.conf
Acquire::http::proxy "http://<proxy>:<port>/";
Acquire::ftp::proxy "ftp://<proxy>:<port>/";
Acquire::https::proxy "https://<proxy>:<port>/";

Acquire::http::proxy "http://127.0.0.1:7233/";
Acquire::ftp::proxy "ftp://127.0.0.1:7233/";
Acquire::https::proxy "https://127.0.0.1:7233/";
This was the reason why you could reach proxy but couldn't get past it, since there is no username password information. So just put that info into it.
Acquire::http::proxy "http://<username>:<password>@<proxy>:<port>/";
Acquire::ftp::proxy "ftp://<username>:<password>@<proxy>:<port>/";
Acquire::https::proxy "https://<username>:<password>@<proxy>:<port>/";
save the file and you are done...
TIP: More better add these lines in another file, /etc/apt/apt.conf.d/80proxy. This will ensure that after a version upgrade changes won't be lost.
Could not handshake: The TLS connection was non-properly terminated.
Err:3 https://swupdate.openvpn.net/community/openvpn3/repos focal Release
Could not handshake: The TLS connection was non-properly terminated. [IP: 127.0.0.1 7233]
- 直接将
Acquire::https::proxy "https://<proxy>:<port>/"; - 改成
Acquire::https::proxy "http://<proxy>:<port>/";
有时候代理也解决不了,就只能手动安装deb包
可以参考jellyfin的教程
问题
E: Could not open lock file
shaojiemike@snode6 ~/github/llvm-3.5/llvm-project  [01:59:12]
> apt update
Reading package lists... Done
E: Could not open lock file /var/lib/apt/lists/lock - open (13: Permission denied)
E: Unable to lock directory /var/lib/apt/lists/
W: Problem unlinking the file /var/cache/apt/pkgcache.bin - RemoveCaches (13: Permission denied)
W: Problem unlinking the file /var/cache/apt/srcpkgcache.bin - RemoveCaches (13: Permission denied)
sudo 解决, or sudo rm /var/lib/apt/lists/lock
etcd start fail
See "systemctl status etcd.service" and "journalctl -xe" for details.
invoke-rc.d: initscript etcd, action "start" failed.
● etcd.service - etcd - highly-available key value store
Loaded: loaded (/lib/systemd/system/etcd.service; disabled; vendor preset: enabled)
Active: failed (Result: exit-code) since Thu 2024-09-05 22:21:44 EDT; 10ms ago
    Docs: https://github.com/coreos/etcd
        man:etcd
Process: 71732 ExecStart=/usr/bin/etcd $DAEMON_ARGS (code=exited, status=1/FAILURE)
Main PID: 71732 (code=exited, status=1/FAILURE)

Sep 05 22:21:43 huawei systemd[1]: Starting etcd - highly-available key value store...
Sep 05 22:21:44 huawei etcd[71732]: etcd on unsupported platform without ETCD_UNSUPPORTED_ARCH=arm64 set.
Sep 05 22:21:44 huawei systemd[1]: etcd.service: Main process exited, code=exited, status=1/FAILURE
Sep 05 22:21:44 huawei systemd[1]: etcd.service: Failed with result 'exit-code'.
Sep 05 22:21:44 huawei systemd[1]: Failed to start etcd - highly-available key value store.
dpkg: error processing package etcd-server (--configure):
installed etcd-server package post-installation script subprocess returned error exit status 1
dpkg: dependency problems prevent configuration of etcd:
etcd depends on etcd-server; however:
Package etcd-server is not configured yet.

dpkg: error processing package etcd (--configure):
dependency problems - leaving unconfigured
Setting up zsh (5.4.2-3ubuntu3.2) ...
No apport report written because the error message indicates its a followup error from a previous failure.
                                                                                                        Processing triggers for man-db (2.8.3-2ubuntu0.1) ...
Errors were encountered while processing:
etcd-server
etcd
E: Sub-process /usr/bin/dpkg returned an error code (1)
这个错误的主要原因是 etcd 尝试在不受支持的架构上运行(即 arm64),并且你没有设置环境变量 ETCD_UNSUPPORTED_ARCH=arm64 来强制 etcd 运行。因此,etcd 服务启动失败。
要解决这个问题,你可以尝试以下步骤:
- 设置环境变量
ETCD_UNSUPPORTED_ARCH=arm64
编辑 etcd.service 的配置文件,使其在启动时包含该环境变量。
-
打开
/lib/systemd/system/etcd.service: -
在
[Service]部分添加以下行: -
保存并关闭文件。
-
重新加载 systemd 配置并启动
etcd
完成修改后,执行以下命令来重新加载 systemd 配置并启动 etcd:
- 检查服务状态
检查 etcd 服务是否正常启动:
- 查看日志
如果 etcd 服务仍未启动,可以查看 journalctl 以获取详细日志:
这些步骤应该能帮助你解决 etcd 服务在 arm64 架构上的启动问题。如果问题仍然存在,日志可能会提供进一步的线索。