Docker
简介
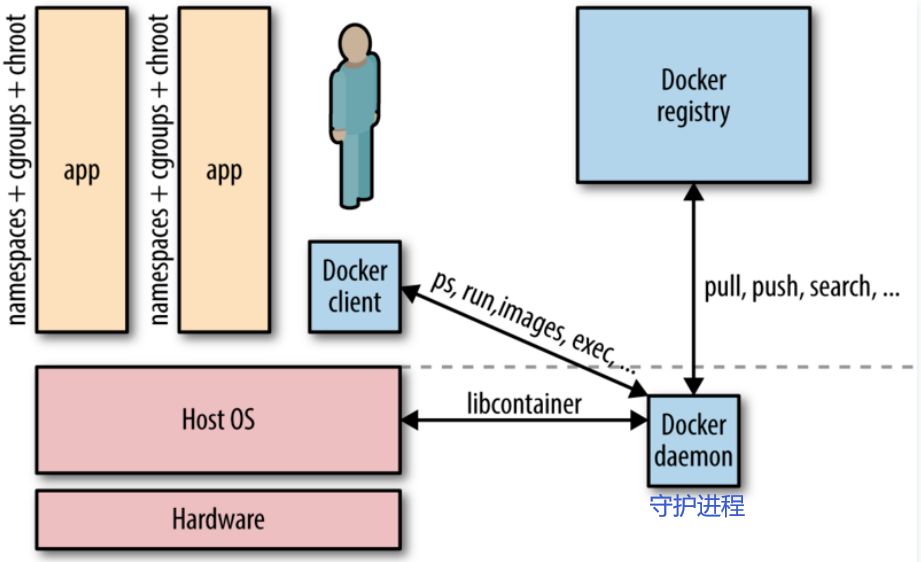
基于 Go 语言 并遵从 Apache2.0 协议开源。Docker 可以让开发者打包他们的应用以及依赖包到一个轻量级、可移植的容器中,然后发布到任何流行的 Linux 机器上。
structure
Docker vs VMWare
相对于传统虚拟机,Docker 没有硬件虚拟化/hypervisor,可以运行在物理机、虚拟机, 甚至嵌套运行在 Docker 容器内,并且其不携带操作系统的,会轻巧很多。而且调用资源时利用 Docker Engine 去调用宿主的的资源,这时候过程是虚拟内存->真正物理内存。


Linux内核的潜在兼容性问题
how docker run different ubuntu version Sharing the same running kernel? no SW conficts?
If your host kernel is "compatible enough" with the software in the container you want to run it will work; otherwise, it won't.1 So what does "compatible enough" mean? It depends on what requests the program makes of the kernel (system calls) and what features it expects the kernel to support. Some programs make requests that will break things; others don't.
Compatibility
on an Ubuntu 18.04 (kernel 4.19) or similar host:1
docker run centos:7 bash works fine.
docker run centos:6 bash fails with exit code 139, meaning it terminated with a segmentation violation signal; this is because the 4.19 kernel doesn't support something that that build of bash tried to do.
docker run centos:6 ls works fine because it's not making a request the kernel can't handle, as bash was.
If you try docker run centos:6 bash on an older kernel, say 4.9 or earlier, you'll find it will work fine.
Portainer 统一管理
- 安装Portainer Community Edition (CE)而不是Portainer Business Edition (BE)
- WSL的安装和linux类似
# 创建 Portainer Server 将用于存储其数据库的卷 docker volume create portainer_data # 下载并安装 Portainer Server 容器, 9000为WebUI端口, 8000 是可选的,仅当您计划将边缘计算功能与边缘代理一起使用时才需要。 docker run -d -p 8000:8000 -p 9000:9000 --name portainer --restart=always -v /var/run/docker.sock:/var/run/docker.sock -v /portainer_data:/data portainer/portainer-ce:2.11.1 - Portainer里的docker部署: 建议使用 Stacks 下的 docker-compose 来进行
端口映射
2333:8000 为 容器内部端口8000,宿主机端口为2333
远程WebUI访问
默认部署在 http://localhost:9000, 可以如下操作来部署 http://222.195.72.218:9000/#!/home
Install
# 安裝 docker
curl -sSL get.docker.com | sh
# 將目前使用者新增到 docker 群組內,需要重新登入才會生效
sudo usermod -aG docker $USER

# 安裝 docker-compose
sudo curl -L "https://github.com/docker/compose/releases/download/$(curl -sL https://api.github.com/repos/docker/compose/releases/latest | grep tag_name | cut -d'"' -f 4)/docker-compose-$(uname -s)-$(uname -m)" -o /usr/local/bin/docker-compose
sudo chmod +x /usr/local/bin/docker-compose
Relationship
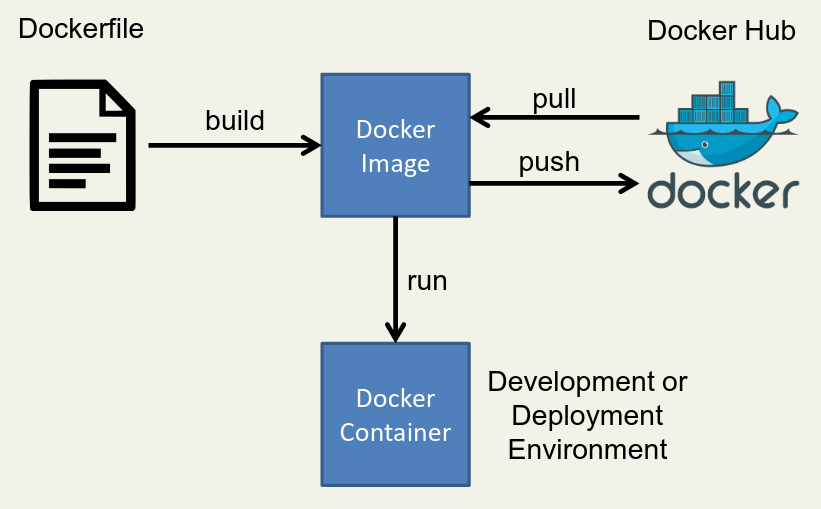
- Image like a static configed/compiled software using dockerfile/gcc.
- And container is a running process that we can control.
Dockerfile
First, write an installation script for all of your dependencies. This script is written with Docker specific syntax and is called a Dockerfile(1).
- A Dockerfile is a script used to create a Docker image, which is a lightweight, standalone, and executable package that includes everything needed to run a piece of software, including the code, runtime, system tools, system libraries, and settings.
Using dockerfile in portainer
Images > Build image
Dockerfile
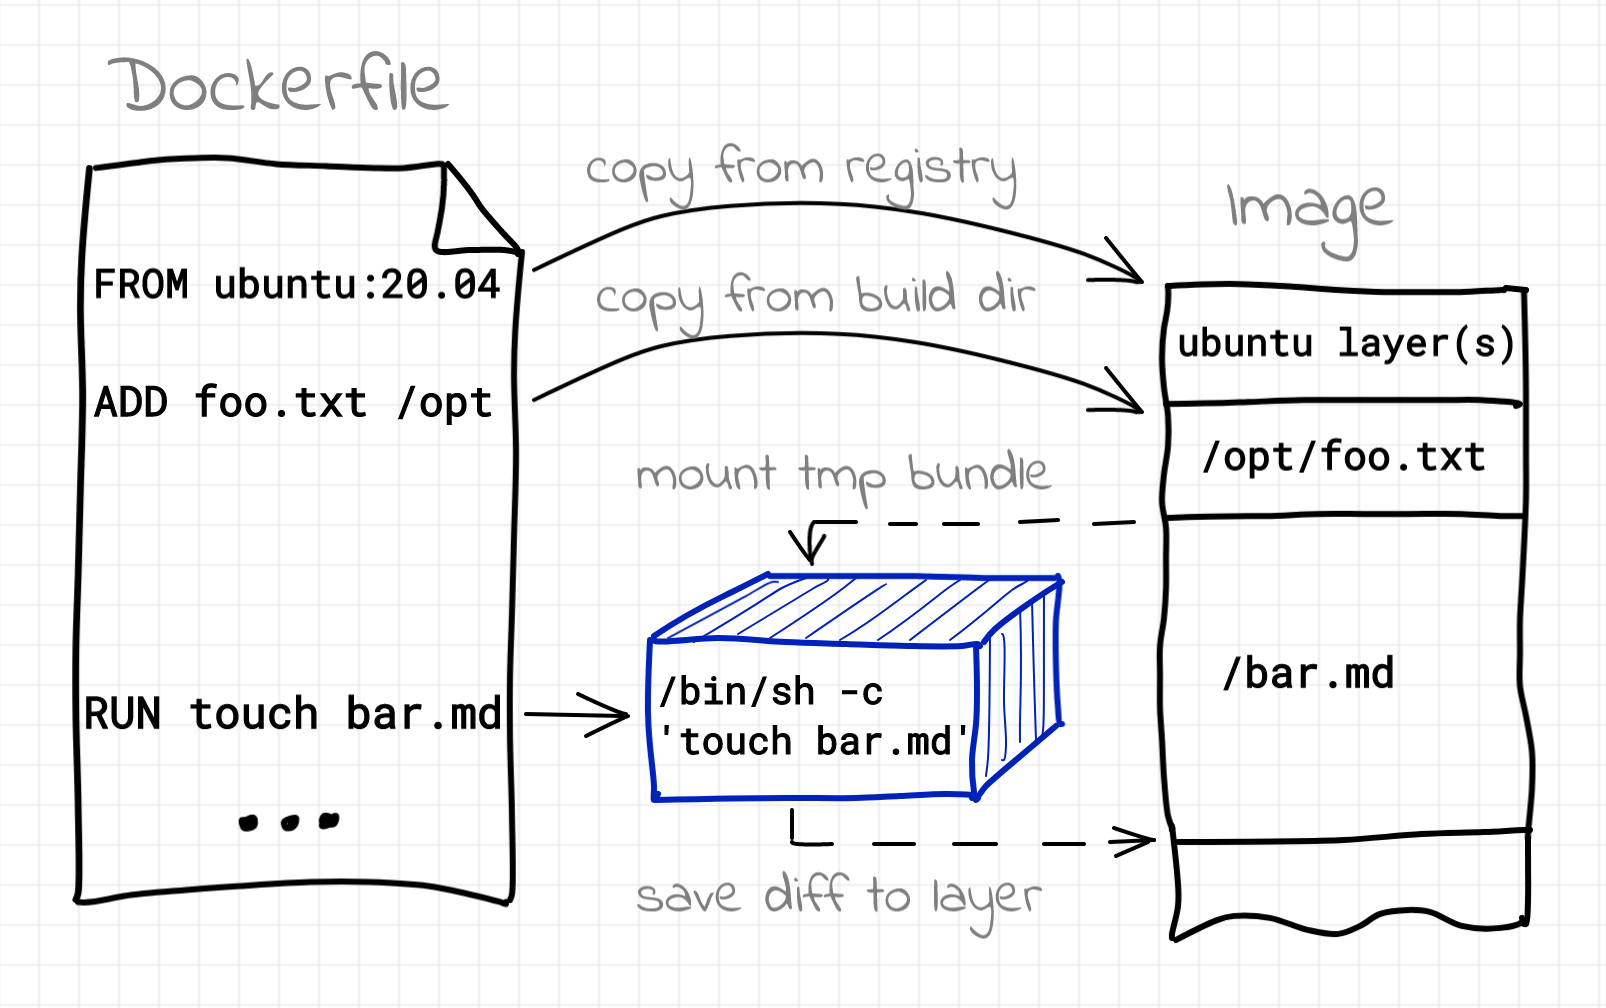
Here's a simple Dockerfile code snippet(it's usually built on official base image):
# Use an official base image
FROM ubuntu:20.04

# Set environment variables
ENV MY_ENV_VARIABLE my_value

# Run commands to install packages and set up the environment
RUN apt-get update && apt-get install -y \
    package1 \
    package2 \
    && rm -rf /var/lib/apt/lists/*

# Copy files from your local machine to the container
COPY local_directory /container_directory

# Set the working directory
WORKDIR /app

# Expose a port
EXPOSE 8080

# Define the command to run when the container starts
CMD ["command_to_start_application"]
In this example, and more options:
FROMspecifies the base image, in this case, Ubuntu 20.04.ENVsets an environment variable.RUNexecutes commands to install packages.COPYcopies files from your local machine to the container.WORKDIRsets the working directory within the container.EXPOSEspecifies that the container will listen on port 8080.CMDdefines the command that will be executed when the container starts.
Cheat Sheet
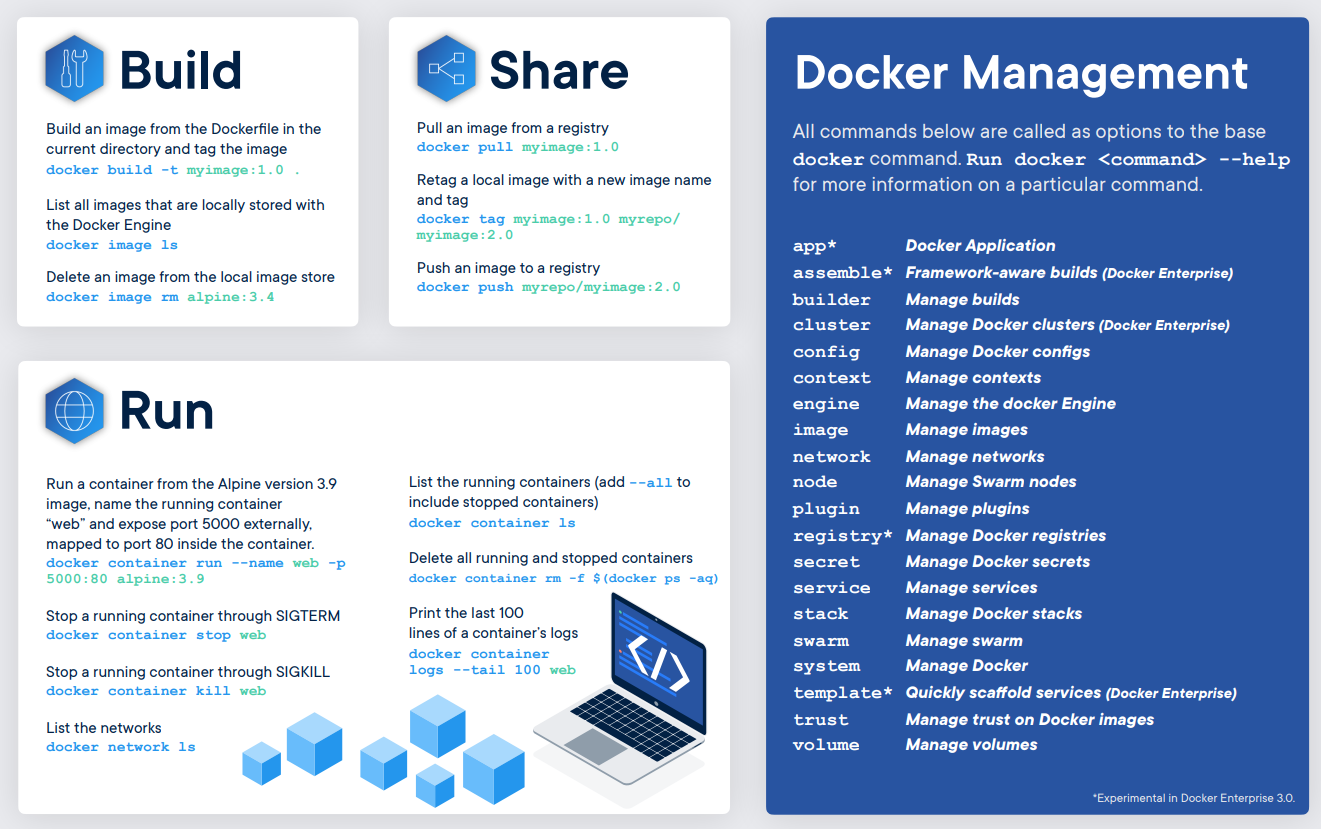
查看容器出错日志:docker logs --tail 1000 1fed0d4782cf最后一项是容器ID
换源
24年6月后国内镜像站按照国家要求已经陆续关闭,还是只能挂代理
使用docker info可以查看到文件保存路径,和是否有换源:
nano /etc/docker/daemon.json 把以下内容复制进去:
{
    "registry-mirrors": [
        "https://y0xk2hg9.mirror.aliyuncs.com",
        "https://registry.hub.docker.com",
        "http://hub-mirror.c.163.com",
        "https://docker.mirrors.ustc.edu.cn",
        "https://registry.docker-cn.com"
    ]
}
重启systemctl restart docker, 检查docker info
代理
在构建 Docker 镜像时,如果需要通过代理访问外部网络资源(例如,安装软件包或依赖项),你可以通过以下几种方式设置代理:
docker search ubuntu验证
单个Dockerfile
使用 --build-arg
docker build 命令中使用 --build-arg 选项,传递代理相关的环境变量。
docker build \
--build-arg http_proxy=http://your.proxy.server:port \
--build-arg https_proxy=http://your.proxy.server:port \
-t your-image-name .
在 Dockerfile 中,你需要使用 ARG 指令来声明这些构建参数,以便 Docker 在构建过程中能够使用它们:
Dockerfile 中直接设置
全局配置
在 Docker 守护进程中配置全局代理
通过配置 Docker 守护进程,在全局范围内使用代理。具体操作步骤如下:
-
创建或编辑
/etc/systemd/system/docker.service.d/{任意名字 e.g.,proxy}.conf文件(对于 HTTP 代理): -
重新加载守护进程配置,并重启 Docker:
-
通过
docker build命令构建镜像时,Docker 守护进程会自动使用配置的代理。 - 验证代理设置:
systemctl show docker --property Environment和docker info会显示 如下:
(base) root@localhost /etc/systemd/system/docker.service.d  [04:47:18]
> sudo systemctl show docker --property Environment
Environment=GOTRACEBACK=crash HTTP_PROXY=http://p_atlas:proxy%[email protected]:8080 HTTPS_PROXY=http://p_atlas:proxy%[email protected]:8080 NO_PROXY=localhost,127.0.0.1
(base) root@localhost /etc/systemd/system/docker.service.d  [05:02:04]
> docker info |grep HTTP
HTTP Proxy: http://xxxxx:[email protected]:8080
HTTPS Proxy: http://xxxxx:[email protected]:8080
docker show没有 HTTP_PROXY, 看日志
sudo journalctl -u docker.service 检查 代理环境变量为什么没生效
Dec 30 16:32:59 localhost.localdomain systemd[1]: Started Docker Application Container Engine.
Dec 30 16:33:12 localhost.localdomain systemd[1]: /etc/systemd/system/docker.service.d/http-proxy.conf:2: Failed to resolve specifiers in HTTP_PROXY=http://p_atlas:proxy%[email protected]:6688, ignoring: Invalid slot
Dec 30 16:33:12 localhost.localdomain systemd[1]: /etc/systemd/system/docker.service.d/http-proxy.conf:3: Failed to resolve specifiers in HTTPS_PROXY=http://p_atlas:proxy%[email protected]:6688, ignoring: Invalid slot
发现还是转义符的问题,%40123 要写成 %%40123
使用 ~/.docker/config.json
你还可以在 ~/.docker/config.json 文件中配置代理:
{
"proxies": {
    "default": {
    "httpProxy": "http://your.proxy.server:port",
    "httpsProxy": "https://your.proxy.server:port",
    "noProxy": "localhost,127.0.0.1"
    }
}
}
通过这些方法,你可以在 docker build 命令中使用代理,从而在需要外部网络资源的场景下顺利构建 Docker 镜像。
证书问题
Error response from daemon: Get "https://ghcr.io/v2/": x509: certificate signed by unknown authority
编辑 Docker 配置文件 /etc/docker/daemon.json,添加以下内容:
重启 Docker 服务:
image
# load image from zip
docker load -i <image.tar>

# save current container to image
docker commit containerid  image_name:tag

# save image to zip
docker save myimage:latest | gzip > myimage.tar.gz
# save all
docker save $(docker images -q) | gzip > all-images.tar.gz
docker push/pull
- It is in these containers that you will run or develop your code.
- If you would like other people to be able to use your Docker image you can push to DockerHub (with
docker push), - and if you want to use someone else’s image you can pull from DockerHub (with
docker pull).3
网络问题
root@UGREEN-A0E9:~# docker pull dreamacro/clash
Using default tag: latest
Error response from daemon: Get "https://registry-1.docker.io/v2/": net/http: request canceled (Client.Timeout exceeded while awaiting headers)
需要换源
docker build
Then, run these commands to build a Docker image of your environment by using docker build.
Dockfile Path
docker build 基本的格式为 docker build [ 选项 ] 路径,该命令将读取指定路径下(包括子目录)的 Dockerfile,并将该路径下所有内容发送给 Docker 服务端,由服务端来创建镜像。因此一般建议放置 Dockerfile 的目录为空目录。也可以通过 .dockerignore 文件(每一行添加一条匹配模式)来让 Docker 忽略路径下的目录和文件。
option
option like
docker build use proxy
docker build --network=host\
    --build-arg http_proxy=http://127.0.0.1:7890 \
    --build-arg https_proxy=http://127.0.0.1:7890 \
    --build-arg "NO_PROXY=localhost,127.0.0.1,.example.com" \
    -t ithemal:latest .
You also can set the proxy in the Dockerfile.5
docker 内代理经常导致网络异常
通过下面验证代理:
docker exec -it windmill-caddy-1 /bin/sh进去 curl(受到全小写环境变量http_proxy影响) and wgetdocker inspect windmill-windmill_worker-1 | grep -i proxy
docker tag
镜像的完整 tag 不仅包含镜像名字, 还指明了镜像从哪里来, 要到哪里去, 就像一个 URL。可以通过 -t 选项指定镜像的标签信息,譬如:
docker run
Once successfully built, you can instantiate copies of this image as many times as you would like by using docker run to create Docker containers.
option
# 使用镜像nginx:latest以交互模式启动一个容器,在容器内执行/bin/bash命令。
$ docker run -it nginx:latest /bin/bash
# remove all stop container
$ docker container prune
-i: 以交互模式运行容器,通常与-t同时使用;-t: 为容器重新分配一个伪输入终端,通常与-i同时使用;-d: 后台运行容器,并返回容器ID;-P: 随机端口映射,容器内部端口随机映射到主机的端口-p: 指定端口映射,格式为:主机(宿主)端口:容器端口--name="nginx-lb": 为容器指定一个名称;-e username="ritchie": 设置环境变量;-v <path to datasets>:/datasets挂载本地目录
Volumes 挂载
volumes allow me to interact with data outside of the docker container.
Volumes is better than bind mounts
- Volumes are easier to back up or migrate than bind mounts.
- Volumes work on both Linux and Windows containers.
So option
-vis better than--mount
options
docker-compose
- Compose 是用于定义和运行多容器 Docker 应用程序的工具。需要额外安装。通过 Compose,您可以使用 YML 文件来配置应用程序需要的所有服务。然后,使用一个命令,就可以从 YML 文件配置中创建并启动所有服务。
- 和docker共用代理配置,
docker info |grep HTTP查看。
十分不建议使用docker-compose命令
使用root用户执行docker-compose up -d,不然会有文件权限问题。各种问题,软件版本问题等,十分折磨。
compose file
version: "3"

services:
  mihoyo-bbs:
    image: darkatse/mihoyo-bbs
    environment:
      - CRON_SIGNIN=30 9 * * *
      - MULTI=TRUE
    volumes: # 将主机的数据卷或着文件挂载到容器里。
      - .:/var/app
    logging: # driver:指定服务容器的日志记录驱动程序,默认值为json-file
      driver: "json-file"
      options:
        max-size: "1m" # 最多1m个文件,当达到文件限制上限,会自动删除旧得文件。
AutoMihoyoBBS4 将上述 YAML 文件保存为 docker-compose.yml,然后在包含该文件的目录中运行以下命令:
deploy
docker-compose logs -f命令来查看程序输出。 -f, --follow Follow log output
# docker-compose up 命令来启动并运行整个应用程序。
# docker-compose down 可以将整个应用停止并删除相关资源。
$ docker-compose up -d
# 在后台执行该服务可以加上 -d 参数
Creating network "automihoyobbs_default" with the default driver
Pulling mihoyo-bbs (darkatse/mihoyo-bbs:)...
latest: Pulling from darkatse/mihoyo-bbs
df9b9388f04a: Pull complete
a1ef3e6b7a02: Pull complete
7a687728470e: Pull complete
4ecf30de1710: Pull complete
a1f99e431609: Pull complete
7e9141a60a66: Pull complete
7aa39aec04ec: Pull complete
a75b4b3d5690: Pull complete
dee0a6b07871: Pull complete
abed80702fed: Pull complete
Digest: sha256:10958801df87675c390a8cdcc153c2f87a41af92d35f9f2cf9b7758aa3e10d1b
Status: Downloaded newer image for darkatse/mihoyo-bbs:latest
Creating automihoyobbs_mihoyo-bbs_1 ... done
docker exec
实例
提供高版本GCC
宿主机往往因为OS的原因,提供不了合适的GCC版本,为此在docker里编译是一种便捷的选择。
AllForOne 脚本
#!/bin/bash
docker_name="mihoyo-bbs"
docker stop ${docker_name}
docker rm ${docker_name}
echo -e "\033[5;36mOrz 旧容器(镜像)已清理\033[0m"

time_now=$(date "+%m%d%H")
docker build -f dockerfile --tag ${docker_name}:"${time_now}" .
echo -e "\033[5;36mOrz 镜像重建完成\033[0m"

docker run -itd \
    --name ${docker_name} \
    --log-opt max-size=1m \
    -v $(pwd):/var/app \
    ${docker_name}:"${time_now}"
echo -e "\033[5;36mOrz 镜像启动完成\033[0m"
docker ps -a #顯示目前的 container 及狀態
docker logs ${docker_name} -f # -f, --follow         Follow log output
hackergame2020 的源码的dockerfile
奇怪的使用
启动docker并通过xhost保持tmux连接
docker/docker_connect.sh或者 https://blog.csdn.net/winter2121/article/details/118223637- What if I want to use X forwarding from within a Docker container?3
Docker of VNC
在Linux服务器上使用Docker运行图形化界面的应用程序。为了实现这一点,您需要使用一个特别配置的Docker镜像,该镜像支持图形用户界面(GUI)。这通常涉及到安装一个桌面环境和任何必要的图形驱动程序。
以下是实现这一目的的基本步骤:
- 选择一个合适的基础镜像:您可以从一个已经包含了桌面环境的基础镜像开始,例如Ubuntu或Fedora。
- 安装图形界面:在Dockerfile中,您可以安装一个桌面环境,如GNOME、KDE或Xfce,以及任何其他必需的软件。
- 配置X11或其他显示服务器:为了让图形界面能够显示,您需要配置X11或类似的显示服务器。这可能涉及到暴露和映射一些端口,以及安装和配置VNC服务器或其他远程桌面软件。
- 运行容器并连接到图形界面:一旦容器运行起来,您需要通过VNC客户端或其他远程桌面工具连接到它。
这里是一个示例的Dockerfile,用于创建一个带有图形界面的Ubuntu容器:
FROM ubuntu:latest

# 安装必要的软件包
RUN apt-get update && apt-get install -y \
    ubuntu-desktop \
    vnc4server \
    xterm

# 设置VNC服务器
RUN mkdir /root/.vnc
RUN echo "your-password" | vncpasswd -f > /root/.vnc/passwd
RUN chmod 600 /root/.vnc/passwd

# 设置VNC启动脚本
COPY vnc_startup.sh /root/vnc_startup.sh
RUN chmod +x /root/vnc_startup.sh

# 暴露VNC端口
EXPOSE 5900

CMD ["/root/vnc_startup.sh"]
在这个Dockerfile中,ubuntu-desktop和vnc4server被安装,以便提供图形界面和VNC访问。您需要创建一个VNC启动脚本(vnc_startup.sh),以启动VNC服务器并运行桌面环境。
请注意,运行图形界面的容器通常比标准的、无GUI的容器更加资源密集,并且可能需要更多的存储空间和内存。此外,确保遵循最佳安全实践,特别是在暴露VNC或其他远程访问服务时。
常见问题
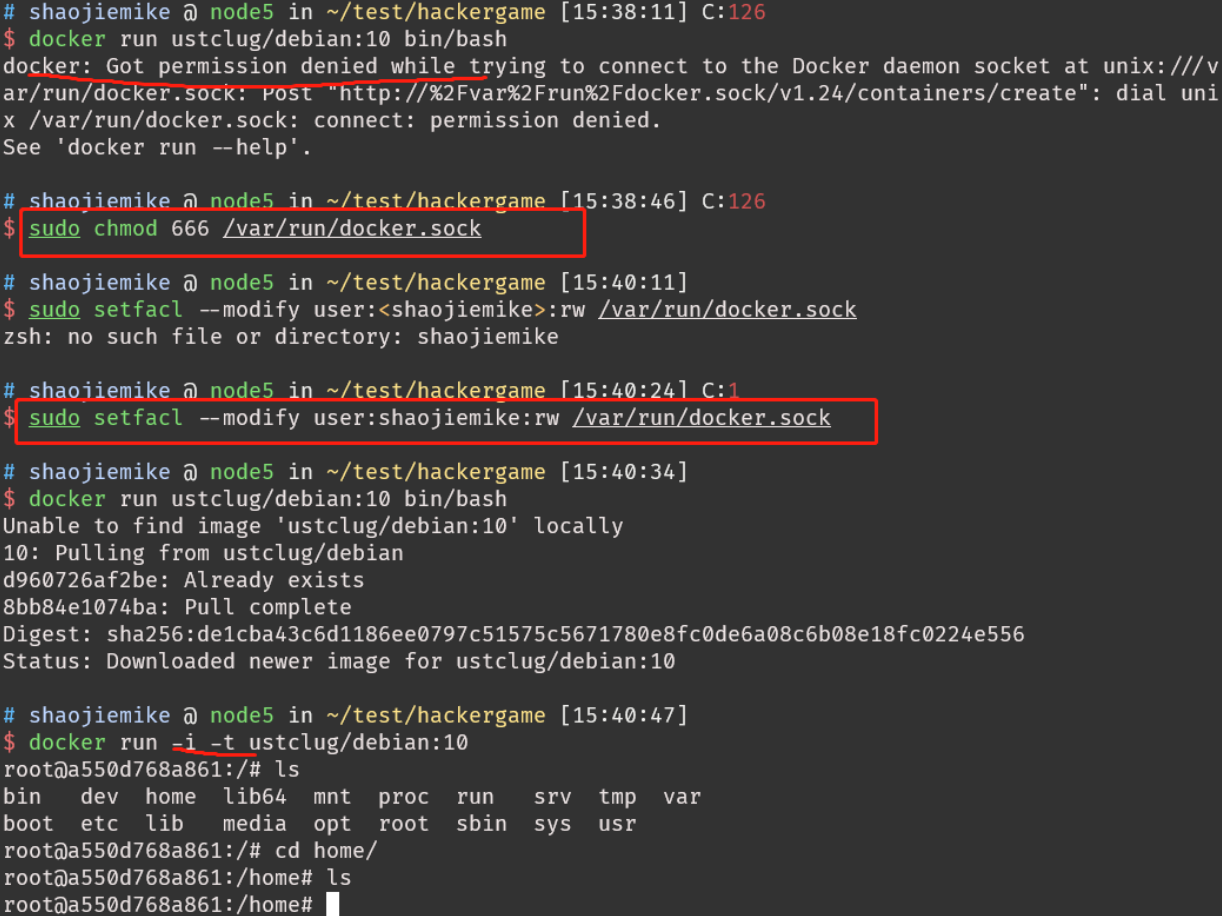
Got permission denied while trying to connect to the Docker daemon socket
- sudo 运行
- 加入docker用户组
failed to create endpoint portainer on network bridge: adding interface xxx to bridge yyy failed: Device does not exist.
gpt's solution的无效答案
这个错误表明 Docker 在创建容器时遇到了问题,具体原因是无法将网络接口 veth2c573cd 添加到 Docker 网络桥 docker0,并且提示设备不存在。
查看 Docker 网络列表,确保相关的网络(可能是 bridge)存在:
如果不存在,你可以尝试删除并重新创建:
然后再次运行你的 Docker 容器。
参考文献
https://cloud.tencent.com/developer/article/1395434
-
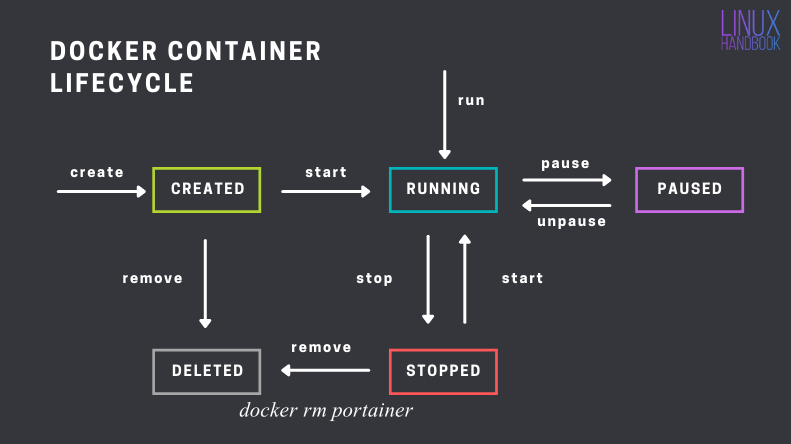
Docker Commands for Managing Container Lifecycle (Definitive Guide) ↩
-
https://github.com/Womsxd/AutoMihoyoBBS ↩
-
https://cloud.tencent.com/developer/article/1806455 & http://www.debugself.com/2018/01/17/docker_network/ ↩