OpenWRT on router
OpenWRT Installation on router
原理
原理在路由器的两个flash(firmware和firmware1)的两个系统里,写入一个支持图形化OpenWRT的新系统
查看路由器型号是否支持
查看系统型号[^1]:路由器默认是魔改的openwrt的系统:
root@XiaoQiang:~# cat /etc/os-release
NAME="OpenWrt"
VERSION="18.06-SNAPSHOT"
ID="openwrt"
ID_LIKE="lede openwrt"
PRETTY_NAME="OpenWrt 18.06-SNAPSHOT"
VERSION_ID="18.06-snapshot"
HOME_URL="http://openwrt.org/"
BUG_URL="http://bugs.openwrt.org/"
SUPPORT_URL="http://forum.lede-project.org/"
BUILD_ID="unknown"
LEDE_BOARD="mediatek/mt7622"
LEDE_ARCH="aarch64_cortex-a53_neon-vfpv4"
LEDE_TAINTS="no-all glibc busybox"
LEDE_DEVICE_MANUFACTURER="OpenWrt"
LEDE_DEVICE_MANUFACTURER_URL="http://openwrt.org/"
LEDE_DEVICE_PRODUCT="Generic"
LEDE_DEVICE_REVISION="v0"
LEDE_RELEASE="OpenWrt 18.06-SNAPSHOT unknown"
刷入OpenWRT后:
root@ax6s:~# cat /etc/os-release
NAME="OpenWrt"
VERSION="22.03.2"
ID="openwrt"
ID_LIKE="lede openwrt"
PRETTY_NAME="OpenWrt 22.03.2"
VERSION_ID="22.03.2"
HOME_URL="https://openwrt.org/"
BUG_URL="https://bugs.openwrt.org/"
SUPPORT_URL="https://forum.openwrt.org/"
BUILD_ID="r19803-9a599fee93"
OPENWRT_BOARD="mediatek/mt7622"
OPENWRT_ARCH="aarch64_cortex-a53"
OPENWRT_TAINTS=""
OPENWRT_DEVICE_MANUFACTURER="OpenWrt"
OPENWRT_DEVICE_MANUFACTURER_URL="https://openwrt.org/"
OPENWRT_DEVICE_PRODUCT="Generic"
OPENWRT_DEVICE_REVISION="v0"
OPENWRT_RELEASE="OpenWrt 22.03.2 r19803-9a599fee93"
路由器开启dropbear
dropbear 是一种轻量级sshd服务
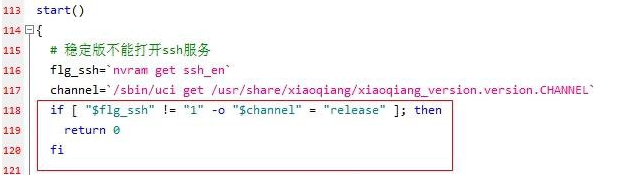
nvram set ssh_en=1  # 不是1也退出1
/etc/init.d/dropbear start # 脚本start段里增加了判断,稳定版不让启动直接退出
netstat -n # 查看22端口
修改/etc/dropbear/authorized_keys 来添加ssh公钥
Redmi-Ax6s实操
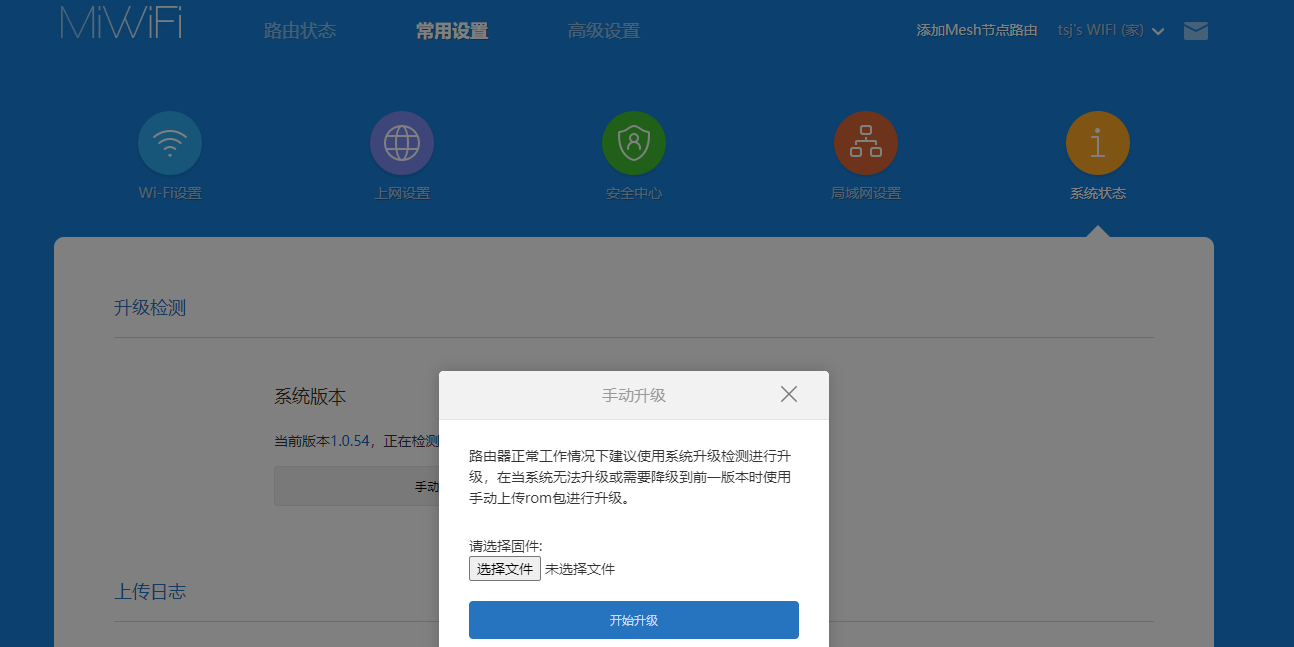
Step1: 打开 telnet access
- installing a beta version of the stock firmware (miwifi_rb03_firmware_stable_1.2.7_closedbeta.bin)上传文件安装
Step2: 获取密码,本地运行返回密码。<S/N>为产品序列号(可以在路由器下面的标签上找到序列号。)
#!/usr/bin/env python3
import sys
import hashlib

if sys.version_info < (3,7):
    print("python version is not supported", file=sys.stderr)
    sys.exit(1)

# credit goes to zhoujiazhao:
# https://blog.csdn.net/zhoujiazhao/article/details/102578244

salt = {'r1d': 'A2E371B0-B34B-48A5-8C40-A7133F3B5D88',
        'others': 'd44fb0960aa0-a5e6-4a30-250f-6d2df50a'}


def get_salt(sn):
    if "/" not in sn:
        return salt["r1d"]

    return "-".join(reversed(salt["others"].split("-")))


def calc_passwd(sn):
    passwd = sn + get_salt(sn)
    m = hashlib.md5(passwd.encode())
    return m.hexdigest()[:8]


if __name__ == "__main__":
    if len(sys.argv) != 2:
        print(f"Usage: {sys.argv[0]} <S/N>")
        sys.exit(1)

    serial = sys.argv[1]
    print(calc_passwd(serial))
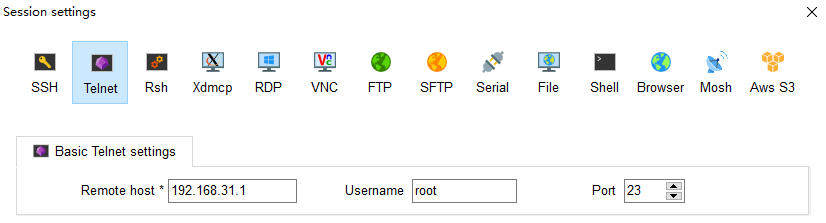
Step3: telnet到机器上(ssh不行). 密码为前面设置的(登录上去passwd把密码改简单)
XiaoQiang login: root
Password:


BusyBox v1.25.1 (2021-10-25 11:02:56 UTC) built-in shell (ash)

-----------------------------------------------------
    Welcome to XiaoQiang!
-----------------------------------------------------
$$$$$$\  $$$$$$$\  $$$$$$$$\      $$\      $$\        $$$$$$\  $$\   $$\
$$  __$$\ $$  __$$\ $$  _____|     $$ |     $$ |      $$  __$$\ $$ | $$  |
$$ /  $$ |$$ |  $$ |$$ |           $$ |     $$ |      $$ /  $$ |$$ |$$  /
$$$$$$$$ |$$$$$$$  |$$$$$\         $$ |     $$ |      $$ |  $$ |$$$$$  /
$$  __$$ |$$  __$$< $$  __|        $$ |     $$ |      $$ |  $$ |$$  $$<
$$ |  $$ |$$ |  $$ |$$ |           $$ |     $$ |      $$ |  $$ |$$ |\$$\
$$ |  $$ |$$ |  $$ |$$$$$$$$\       $$$$$$$$$  |       $$$$$$  |$$ | \$$\
\__|  \__|\__|  \__|\________|      \_________/        \______/ \__|  \__|


root@XiaoQiang:~# ls
Step4: 先备份, 路由器flash有若干分区,其中有一个分区存储路由器MAC地址、无线校准参数等。若损坏可能导致无线信号弱等问题。因此刷之前最好备份。
-
通过cat /proc/mtd,知道对应关系
root@XiaoQiang:/tmp# cat /proc/mtd dev: size erasesize name mtd0: 07f80000 00020000 "ALL" mtd1: 00080000 00020000 "Bootloader" mtd2: 00040000 00020000 "Config" mtd3: 00040000 00020000 "Bdata" mtd4: 00040000 00020000 "Factory" mtd5: 00040000 00020000 "crash" mtd6: 00040000 00020000 "crash_syslog" mtd7: 00040000 00020000 "cfg_bak" mtd8: 00400000 00020000 "kernel0" mtd9: 00400000 00020000 "kernel1" mtd10: 01a00000 00020000 "rootfs0" mtd11: 01a00000 00020000 "rootfs1" mtd12: 02600000 00020000 "overlay" mtd13: 01b80000 00020000 "obr" mtd14: 00c1c000 0001f000 "ubi_rootfs" mtd15: 021e8000 0001f000 "data" -
备份,其中Factory中存储了EEPROM的数据
cat /dev/mtd4 > Factory.dump
cat /dev/mtd3 > Bdata.dump

#on windows
scp [email protected]:/tmp/factory.bin .
scp [email protected]:/tmp/factory.bin .
Step5: 准备刷OpenWRT
-
路由器ssh终端,配置环境变量
```bash # nvram写入flash # Enable uart and boot_wait, useful for testing or recovery if you have an uart adapter! nvram set ssh_en=1 # 设置串口打开,以便ssh失败时,硬件debug nvram set uart_en=1 nvram set boot_wait=on # Set kernel1 as the booting kernel nvram set flag_boot_success=1 nvram set flag_try_sys1_failed=0 nvram set flag_try_sys2_failed=0 # Commit our nvram changes nvram commit ``` -
电脑本地准备传输可执行文件(开启了ssh服务,直接scp传上去即可)
- Rename the file openwrt-mediatek-mt7622-xiaomi_redmi-router-ax6s-squashfs-factory.bin you previously downloaded to your computer to
factory.bin - in the same directory where the file factory.bin is located, run the following command
python -m http.server
- Rename the file openwrt-mediatek-mt7622-xiaomi_redmi-router-ax6s-squashfs-factory.bin you previously downloaded to your computer to
-
路由器ssh终端,配置环境变量接受并运行
-
完成后重启,默认ip变成
192.168.1.1 - 失败加上
nvram set "boot_fw1=run boot_rd_img;bootm"重来
WireGuard Server in OpenWRT
OpenWRT换软件安装源
修改/etc/opkg/distfeeds.conf的配置,参考
下面为x86软路由的源(由于是snapshot的安装不了,内核不匹配),如果是arm的需要看对应架构代号。
src/gz openwrt_core https://mirrors.ustc.edu.cn/openwrt/releases/22.03.3/targets/x86/64/packages
src/gz openwrt_base https://mirrors.ustc.edu.cn/openwrt/releases/22.03.3/packages/x86_64/base
src/gz openwrt_luci https://mirrors.ustc.edu.cn/openwrt/releases/22.03.3/packages/x86_64/luci
src/gz openwrt_packages https://mirrors.ustc.edu.cn/openwrt/releases/22.03.3/packages/x86_64/packages
src/gz openwrt_routing https://mirrors.ustc.edu.cn/openwrt/releases/22.03.3/packages/x86_64/routing
src/gz openwrt_telephony https://mirrors.ustc.edu.cn/openwrt/releases/22.03.3/packages/x86_64/telephony
比如ax6s
[root@ax6s ~]$ cat /etc/opkg/distfeeds.conf
src/gz openwrt_core https://downloads.openwrt.org/releases/22.03.2/targets/mediatek/mt7622/packages
src/gz openwrt_base https://downloads.openwrt.org/releases/22.03.2/packages/aarch64_cortex-a53/base
src/gz openwrt_luci https://downloads.openwrt.org/releases/22.03.2/packages/aarch64_cortex-a53/luci
src/gz openwrt_packages https://downloads.openwrt.org/releases/22.03.2/packages/aarch64_cortex-a53/packages
src/gz openwrt_routing https://downloads.openwrt.org/releases/22.03.2/packages/aarch64_cortex-a53/routing
src/gz openwrt_telephony https://downloads.openwrt.org/releases/22.03.2/packages/aarch64_cortex-a53/telephony
可以通过cat /etc/os-release查看, 上面的如下
root@OpenWrt:~# cat /etc/os-release
NAME="OpenWrt"
VERSION="SNAPSHOT" # snapshot是开发版的意思
PRETTY_NAME="OpenWrt SNAPSHOT"
VERSION_ID="snapshot"
BUILD_ID="r5636-25f88e06f"
OPENWRT_BOARD="x86/64"
OPENWRT_ARCH="x86_64"

[root@ax6s ~]$ cat /etc/os-release
NAME="OpenWrt"
VERSION="22.03.2"
PRETTY_NAME="OpenWrt 22.03.2"
VERSION_ID="22.03.2"
BUILD_ID="r19803-9a599fee93"
OPENWRT_BOARD="mediatek/mt7622"
OPENWRT_ARCH="aarch64_cortex-a53"
WireGuard安装服务端程序
- eSir精品小包固件下载地址(感谢esir的辛勤付出)
- 内置了wireguard(使用对等节点的公私钥加密)
-
OpenWrt安装WireGuard命令(eSir精品小包已集成WireGuard,无需安装)
WireGuard服务端设置
具体步骤
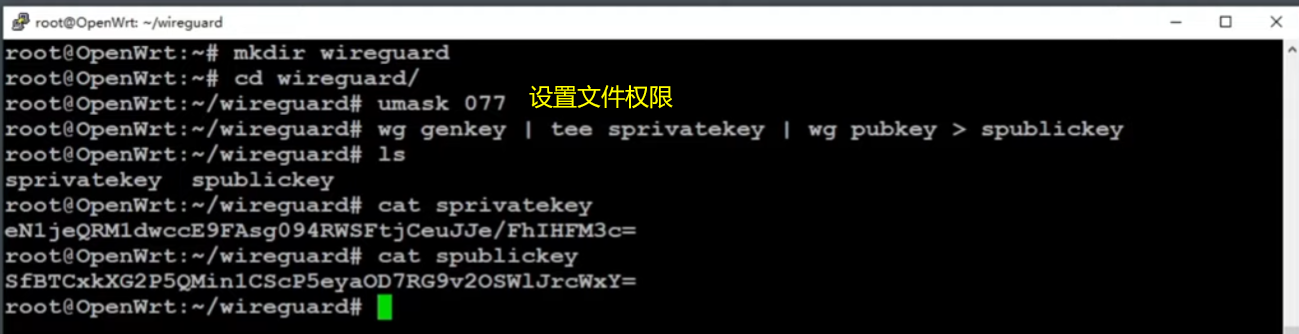
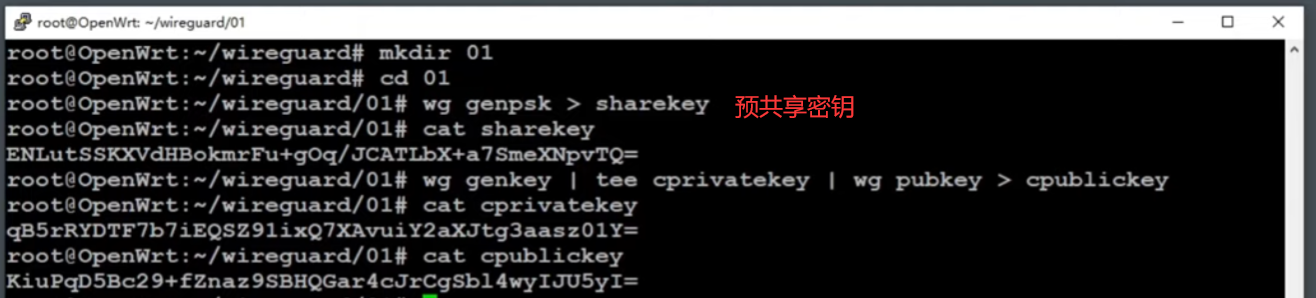
- 配置WG服务器端公私钥
- OpenWrt的luci界面配置服务器节点


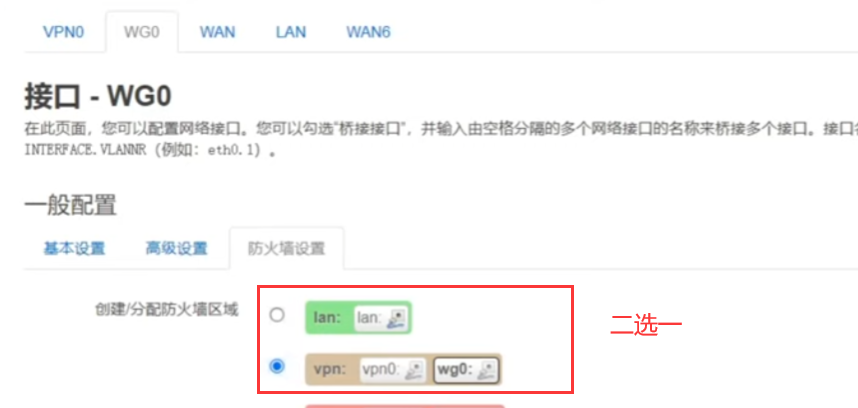
- OpenWrt-网络-防火墙设置
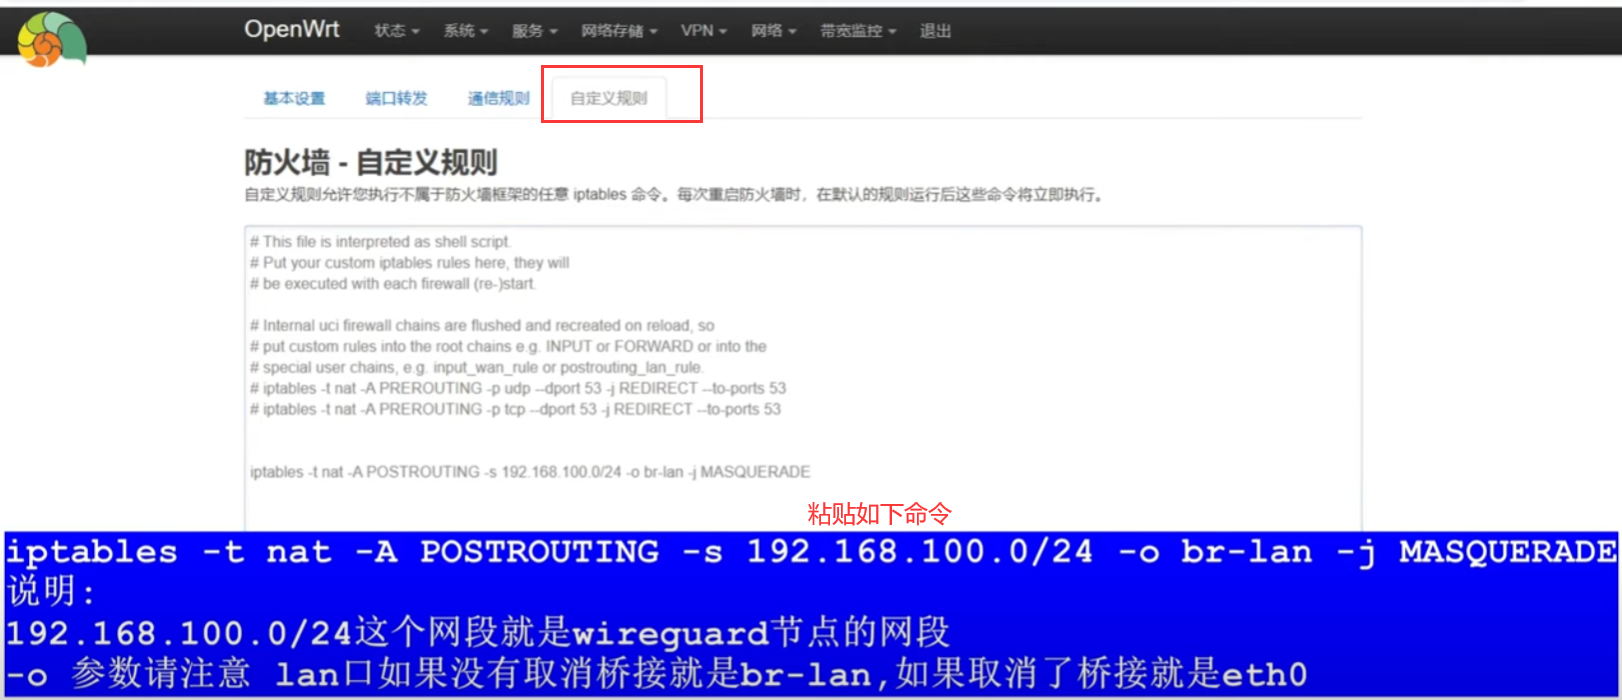
- 如果OpenWrt做主路由,还需要在防火墙->通信规则中开放端口

- 假如是旁路由,需要设置端口转发

- 如果OpenWrt做主路由,还需要在防火墙->通信规则中开放端口
- 为每个客户端节点创建密钥
- OpenWrt->网络->接口,修改原本的WG0设置。修改Peers
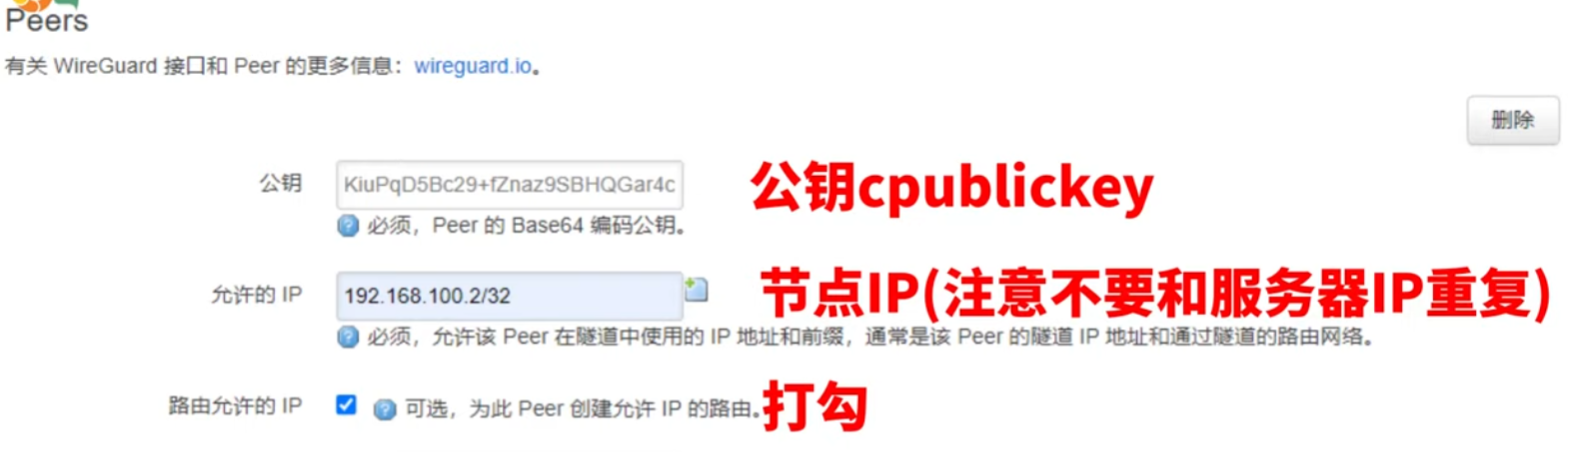 1. 左下角
更多选项选择预共享密钥,添加 2. 由于不能同时用,所以每个机器要单独配置,不能公用
WireGuard客户端设置
客户端模板文件test.conf
[Interface]
Address = 192.168.100.2 约定的IP
PrivateKey = cprivatekey文件内容
DNS = 路由器IP


[Peer]
PublicKey = spublickey文件内容

AllowedIPs = 0.0.0.0/0
//上面代表所有流量走WG。如果启用下面这行代码,表示只有192.168.2.0/24, 192.168.100.0/24这两个子网的IP走WireGuard
//逗号前是家庭局域网的IP段,后面是VPN的IP段
//AllowedIPs = 192.168.2.0/24, 192.168.100.0/24

PresharedKey=sharedkey内容
Endpoint = 公网IP(动态域名):端口号
PersistentKeepalive = 25
WireGuard配置匹配一览图
"[Interface] Address" is the address that gets assigned to the (virtual) network interface (e.g. wg0).
简单来说客户端和服务器端约定的相同的虚拟地址来通信。
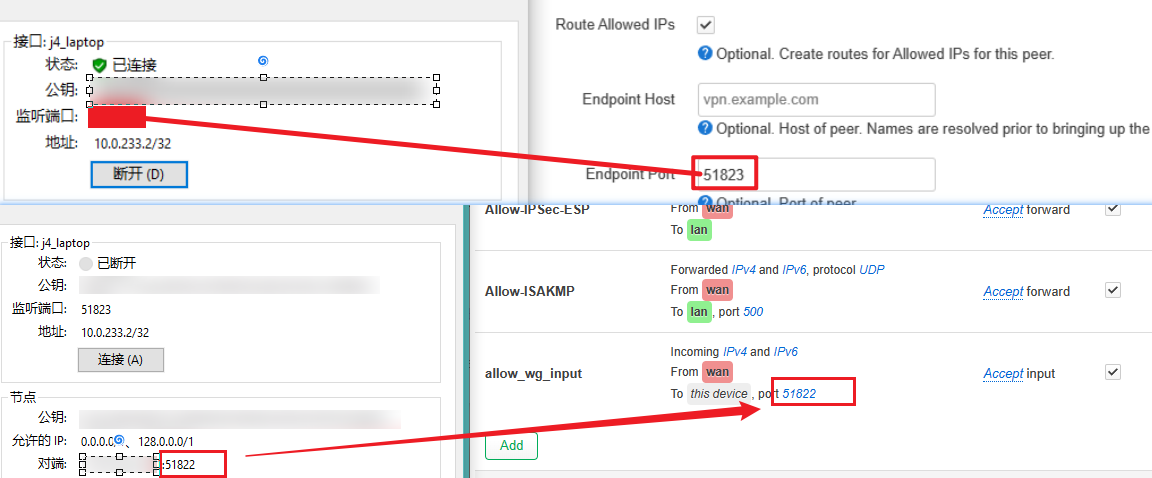
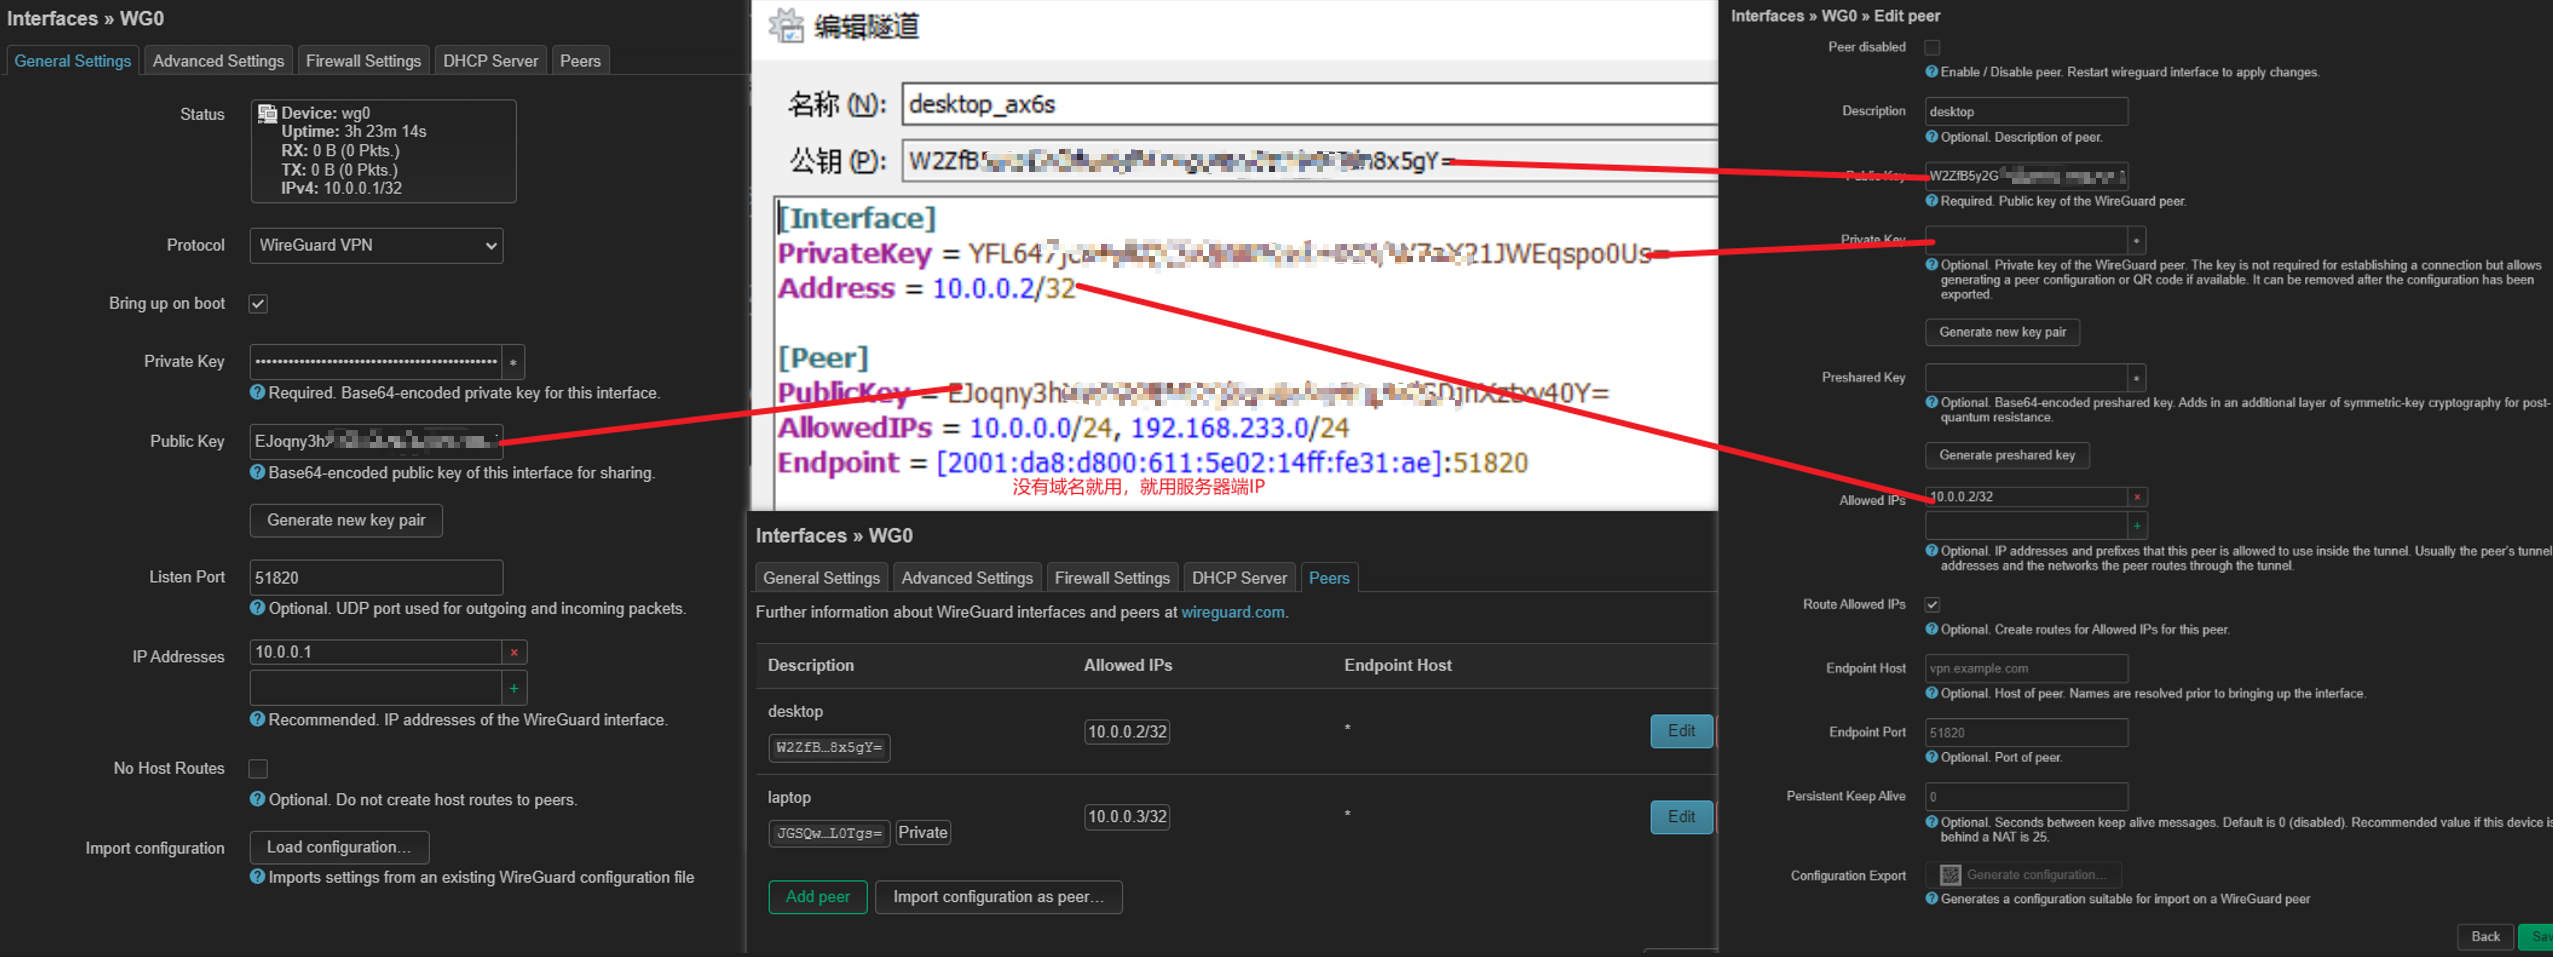 注意防火墙放行端口
 官方客户端软件下载
WireGuard常见问题
注意:如果连接不上
- 首先保证路由器有网,不是路由器下的电脑有网
- 上次师兄的电脑开了OpenVPN上网,导致路由器ipv6能ping通,但是不能上网
- 注意防火墙,一个是wan口允许某几个端口进来(wg连接请求)。另一个是wan能到wg,wg也能到wan,才能实现上网
- 至于和lan的关系,如果需要通过wg访问lan口下的设备(nas,电脑)再打开即可。
Clash in OpenWrt
- 安装版本来自github
- 但是由于DDNS会出问题,所以关闭了。(可以考虑2次wireguard蹭网和clash for linux)
- BT,PT有时也会被代理,需要注意。
安装编译好的 IPK 文件(openwrt 的软件包)
安装依赖
#iptables
opkg update
opkg install coreutils-nohup bash iptables dnsmasq-full curl ca-certificates ipset ip-full iptables-mod-tproxy iptables-mod-extra libcap libcap-bin ruby ruby-yaml kmod-tun kmod-inet-diag unzip luci-compat luci luci-base

#nftables
opkg update
opkg install kmod-nft-tproxy

wget https://github.com/vernesong/OpenClash/releases/download/v0.45.59-beta/luci-app-openclash_0.45.59-beta_all.ipk
root@ax6s:/tmp# opkg install luci.ipk
Installing luci-app-openclash (0.45.59-beta) to root...
Configuring luci-app-openclash.
cfg117882
重启后出现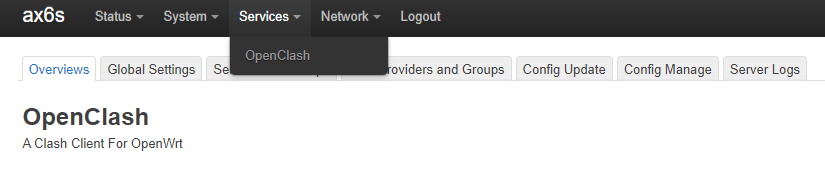
注意不会代理ping,所以ping不通的话,可以用curl来测试代理是否生效。https失败可以尝试http
安装问题
Collected errors:
 * check_data_file_clashes: Package dnsmasq-full wants to install file /etc/hotplug.d/ntp/25-dnsmasqsec
        But that file is already provided by package  * dnsmasq
 * check_data_file_clashes: Package dnsmasq-full wants to install file /etc/init.d/dnsmasq
        But that file is already provided by package  * dnsmasq
 * check_data_file_clashes: Package dnsmasq-full wants to install file /usr/lib/dnsmasq/dhcp-script.sh
        But that file is already provided by package  * dnsmasq
 * check_data_file_clashes: Package dnsmasq-full wants to install file /usr/sbin/dnsmasq
        But that file is already provided by package  * dnsmasq
 * check_data_file_clashes: Package dnsmasq-full wants to install file /usr/share/acl.d/dnsmasq_acl.json
        But that file is already provided by package  * dnsmasq
 * check_data_file_clashes: Package dnsmasq-full wants to install file /usr/share/dnsmasq/dhcpbogushostname.conf
        But that file is already provided by package  * dnsmasq
 * check_data_file_clashes: Package dnsmasq-full wants to install file /usr/share/dnsmasq/rfc6761.conf
        But that file is already provided by package  * dnsmasq
 * opkg_install_cmd: Cannot install package luci-app-openclash.
解决办法如下
DDNS in OpenWRT
DDNS简介
Dynamic DNS: 根據網際網路的域名訂立規則,域名必須跟從固定的IP位址。但動態DNS系統為動態網域提供一個固定的名稱伺服器(Name server),透過即時更新,使外界使用者能夠連上動態使用者的網址。
cloudflare动态域名 或者阿里云动态域名的DDNS都是很好的选择。
定时脚本实现DDNS
[root@ax6s ~]$ cat ddns.sh
#!/bin/bash

Network=wan@eth0

Date=`echo $'\n\n' >> /tmp/ddns_ipv4`
Date=`echo "$(date)" >> /tmp/ddns_ipv4`
IPv4=`ip a|grep -A 2 ${Network}|sed -n '3p'|awk  '{print $2}' |sed -e 's/\/[0-9]*//'`
echo $IPv4 >> /tmp/ddns_ipv4
IPv6=`ip a|grep -A 4 ${Network}|sed -n '5p'|awk  '{print $2}' |sed -e 's/\/[0-9]*//'`
echo $IPv6 >> /tmp/ddns_ipv4

curl -v http://v6.sync.afraid.org/u/4TY5…………tKF/?address=${IPv6} 2>&1 >> /tmp/ddns_ipv4
curl -v http://sync.afraid.org/u/M8uh9Zf…………ryjxs/?address=${IPv4} 2>&1 >> /tmp/ddns_ipv4
修改crontab -e
PATH=/sbin:/bin:/usr/sbin:/usr/bin:/usr/local/sbin:/usr/local/bin
4,9,14,19,24,29,34,39,44,49,54,59 * * * * sleep 11 ; /root/ddns.sh
OpenWRT 为局域网设备设置IPv6 DDNS
脚本围绕,打印邻居路由表命令
[root@ax6s ~]$ ip -6 neigh | grep 2c:f0:5d
2001:da8:d800:611:1818:61b6:6422:56a1 dev br-lan lladdr 2c:f0:5d:ac:1d:2c DELAY
2001:da8:d800:611:5464:f7ab:9560:a646 dev br-lan lladdr 2c:f0:5d:ac:1d:2c STALE
2001:da8:d800:611:4d13:ead8:9aaf:bfc4 dev br-lan lladdr 2c:f0:5d:ac:1d:2c REACHABLE
2001:da8:d800:611:a063:863f:caa3:4a73 dev br-lan lladdr 2c:f0:5d:ac:1d:2c STALE
2001:da8:d800:611:8c75:4f49:f9d0:42b6 dev br-lan lladdr 2c:f0:5d:ac:1d:2c STALE
新建 /usr/lib/ddns/dynamic_dns_iphelper.sh
#!/bin/sh

get_ip(){
    MAC=$1
    if [ "$MAC" = "" ]
    then
        exit 0
    fi
    IP=$(ip -6 neigh | grep -i $MAC | grep -v "fe80:" | grep -E "REACHABLE|STALE" | cut -d" " -f1 | grep -m 1 -E -o "([0-9a-fA-F]{1,4}(:?)){8}")
    if [ "$IP" = "" ]
    then
        IP=$(mac_to_ipv6_ll $MAC $(get_ip_prefix))
    fi
    echo $IP
}

mac_to_ipv6_ll() {
    PREFIX="fe80::"
    if [ "$#" = 2 ]; then
        PREFIX=$2
    fi
    IFS=':'; set $1; unset IFS
    echo "$PREFIX$(printf %02x $((0x$1 ^ 2)))$2:${3}ff:fe$4:$5$6"
}

get_ip_prefix() {
    IP_PREFIX=$(ip -6 addr | awk '{print $2}' | grep '::1' | grep -m 1 -E -o "([0-9a-fA-F]{1,4}(:?)){4}")
    echo $IP_PREFIX
}

if [ "$1" != "" ]; then
    echo `get_ip $1`
fi
新建 /usr/lib/ddns/getip_demo.sh
#!/bin/sh

. /usr/lib/ddns/dynamic_dns_iphelper.sh
# 遵循 EUI-64 的设备使用这个方式 可以获取到静态后缀的IPv6地址
# 00:00:00:00:00:00修改为目标设备的MAC地址
echo $(mac_to_ipv6_ll "00:00:00:00:00:00" $(get_ip_prefix))

# 或者
#!/bin/sh

. /usr/lib/ddns/dynamic_dns_iphelper.sh
# 00:00:00:00:00:00修改为目标设备的MAC地址
# 不遵循 EUI-64 的设备 可以获取到动态IPv6地址
echo `get_ip "00:00:00:00:00:00"`
脚本chmod +x就行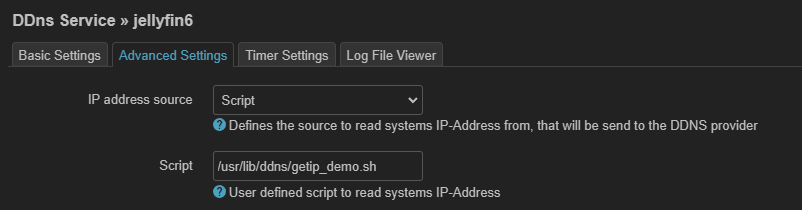
School Network
- 根据学校的网络通各个端口的说明,0号端口没有经过NAT,登录之后获得公网ipv4。但是IPv4封了许多端口(至少ssh的22端口是不行的)
- IPv6是直接可以ssh访问的。
参考文献
https://www.youtube.com/watch?v=F8z74oE71Gg&t=19s
https://xiumu.org/technology/openwrt-set-for-local-area-network-lan-equipment-ipv6-ddns.shtml