1.2 Career
简介
工作回顾,当前工作,未来展望
简介
工作回顾,当前工作,未来展望
简介
工作回顾,当前工作,未来展望
秋招篇
| 命令 | 描述 |
|---|---|
next |
单步执行 |
step |
单步进入 |
finish or fin |
跳出当前函数 |
continue |
继续执行到下一个断点 |
until |
继续运行到指定位置 |
finish: Continue running until just after function in the selected stack frame returns. Print the returned value (if any). gdb --args 正常程序+参数set args 参数f 打印当前文件 ,便于打断点info breakpoints 查看已经的断点del 3 删除NUM=3的第三个断点给某个结构体内的函数全部上break
show argsinfo localsp result=20btinfo threadsthread 2thread apply all btgef➤ p -raw-values off -- this->TotalCycles
gef➤ p this
$11 = (llvm::mca::SummaryView * const) 0x7fffffffcc08
gef➤ p *this
p **matrix@3@3p *matrix@3p *(int *)matrix@3p *(int (*)[3])matrix可以看到打印了array数组第60~69个元素的值。如果要打印从数组开头连续元素的值,也可使用这个命令:“p *array@num”:
格式:x /nfu <addr>
说明:
x 是 examine 的缩写。n 表示要显示的内存单元的个数。f 表示显示方式,可取如下值:| 显示方式 | 描述 |
|---|---|
x |
按十六进制格式显示变量。 |
d |
按十进制格式显示变量。 |
u |
按无符号整型格式显示变量。 |
o |
按八进制格式显示变量。 |
t |
按二进制格式显示变量。 |
a |
按十六进制格式显示变量。 |
i |
指令地址格式。 |
c |
按字符格式显示变量。 |
f |
按浮点数格式显示变量。 |
u 表示一个地址单元的长度,长度类型如下:| 类型 | 描述 |
|---|---|
b |
单字节 |
h |
双字节 |
w |
四字节 |
g |
八字节 |
example:
(gdb) x 0x8049948
0x8049948: 0x20726f46
(gdb) x/s 0x8049948
0x8049948: "For NASA,space is still a high priority."
(gdb) x/4 0x7fffe536dbc0 # display 4 bytes info?
0x7fffe536dbc0: 0x0     0x0     0x9d835 0x0
段错误定位
# ulimit -c 显示核心转储文件大小的最大值
ulimit -c unlimited # 打开
ulimit -c 0         # 关闭

# 改变core存储位置
#%e 打印线程name
#%p 打印进程id
#%h 打印主机名
#%t 打印时间
echo '/tmp/core-%e.%p.%h.%t' > /proc/sys/kernel/core_pattern
(gdb) bt
#0  0x00002af6047e4a4b in fgets () from /lib64/libc.so.6
#1  0x000000000040450a in LoadPPM (filename=0x407e63 "input_image.ppm", data=0x7ffecda55cc8, width=0x7ffecda55cc4, height=0x7ffecda55cc0) at SLIC_raw.cpp:692
#2  0x00000000004049e1 in main (argc=1, argv=0x7ffecda55de8) at SLIC_raw.cpp:794
python 程序
会打印详细的信息
需要GDB10以上
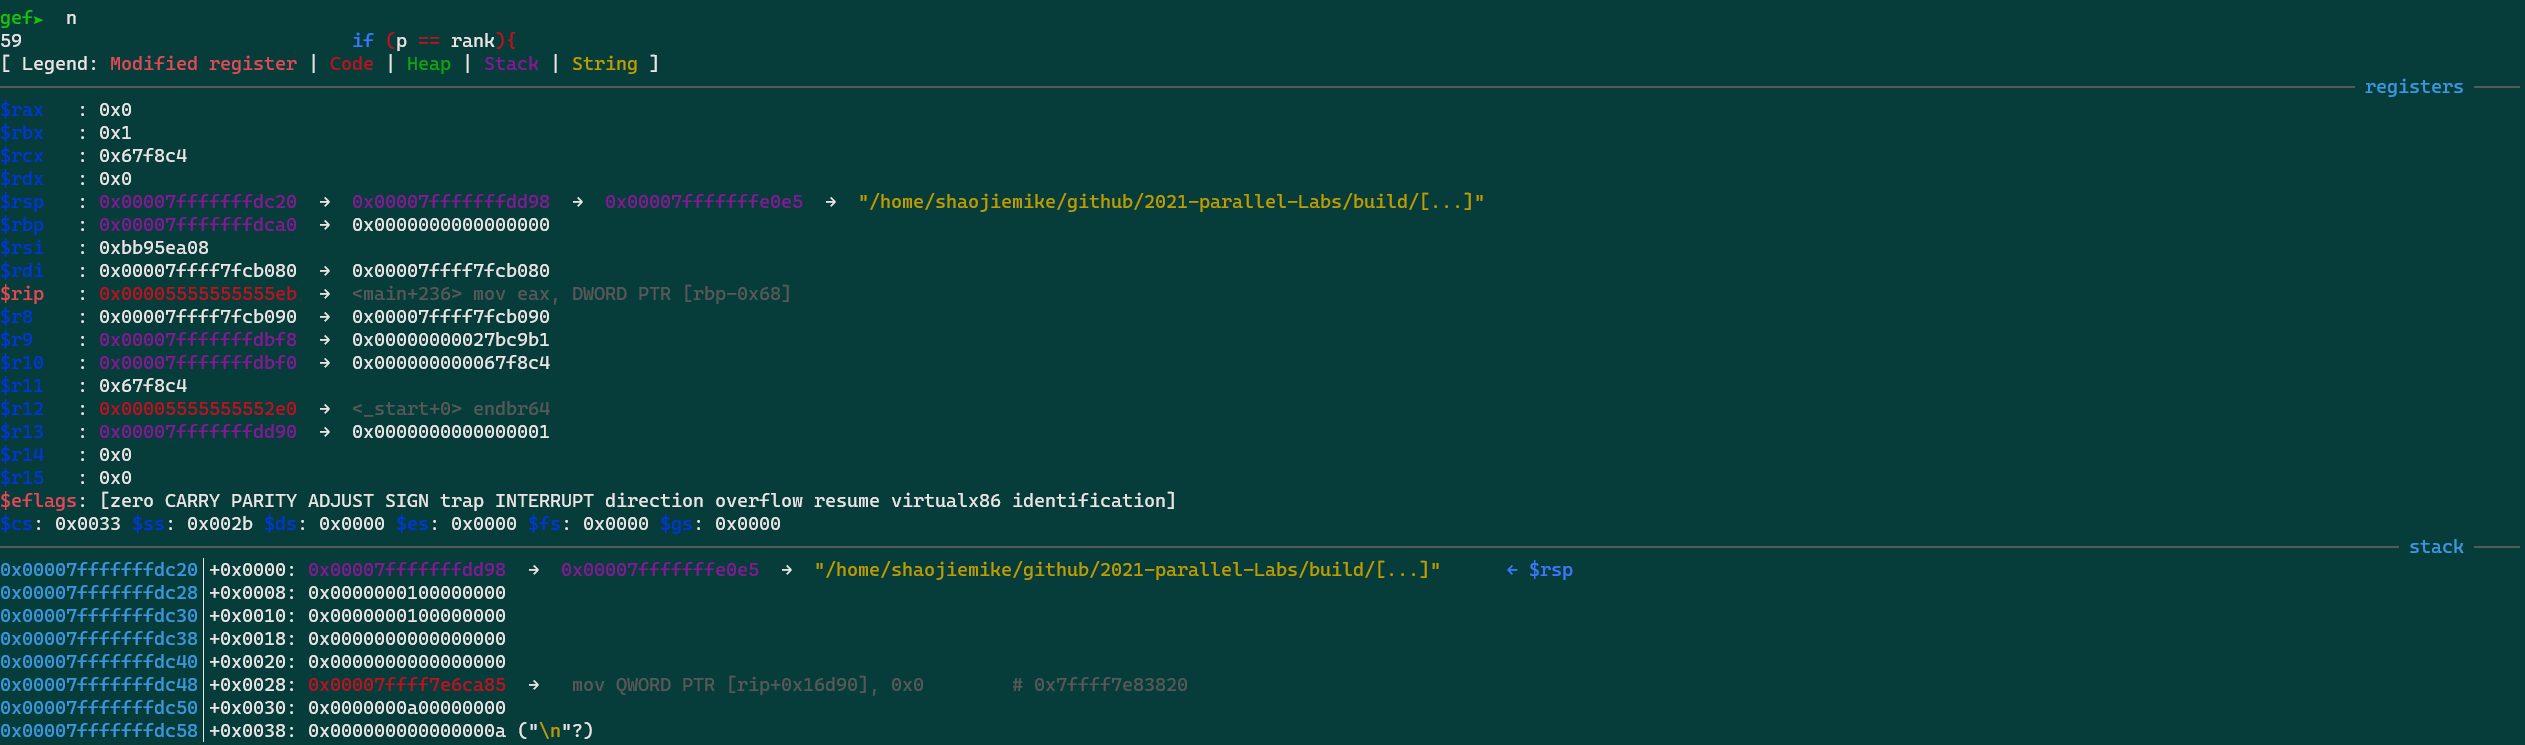
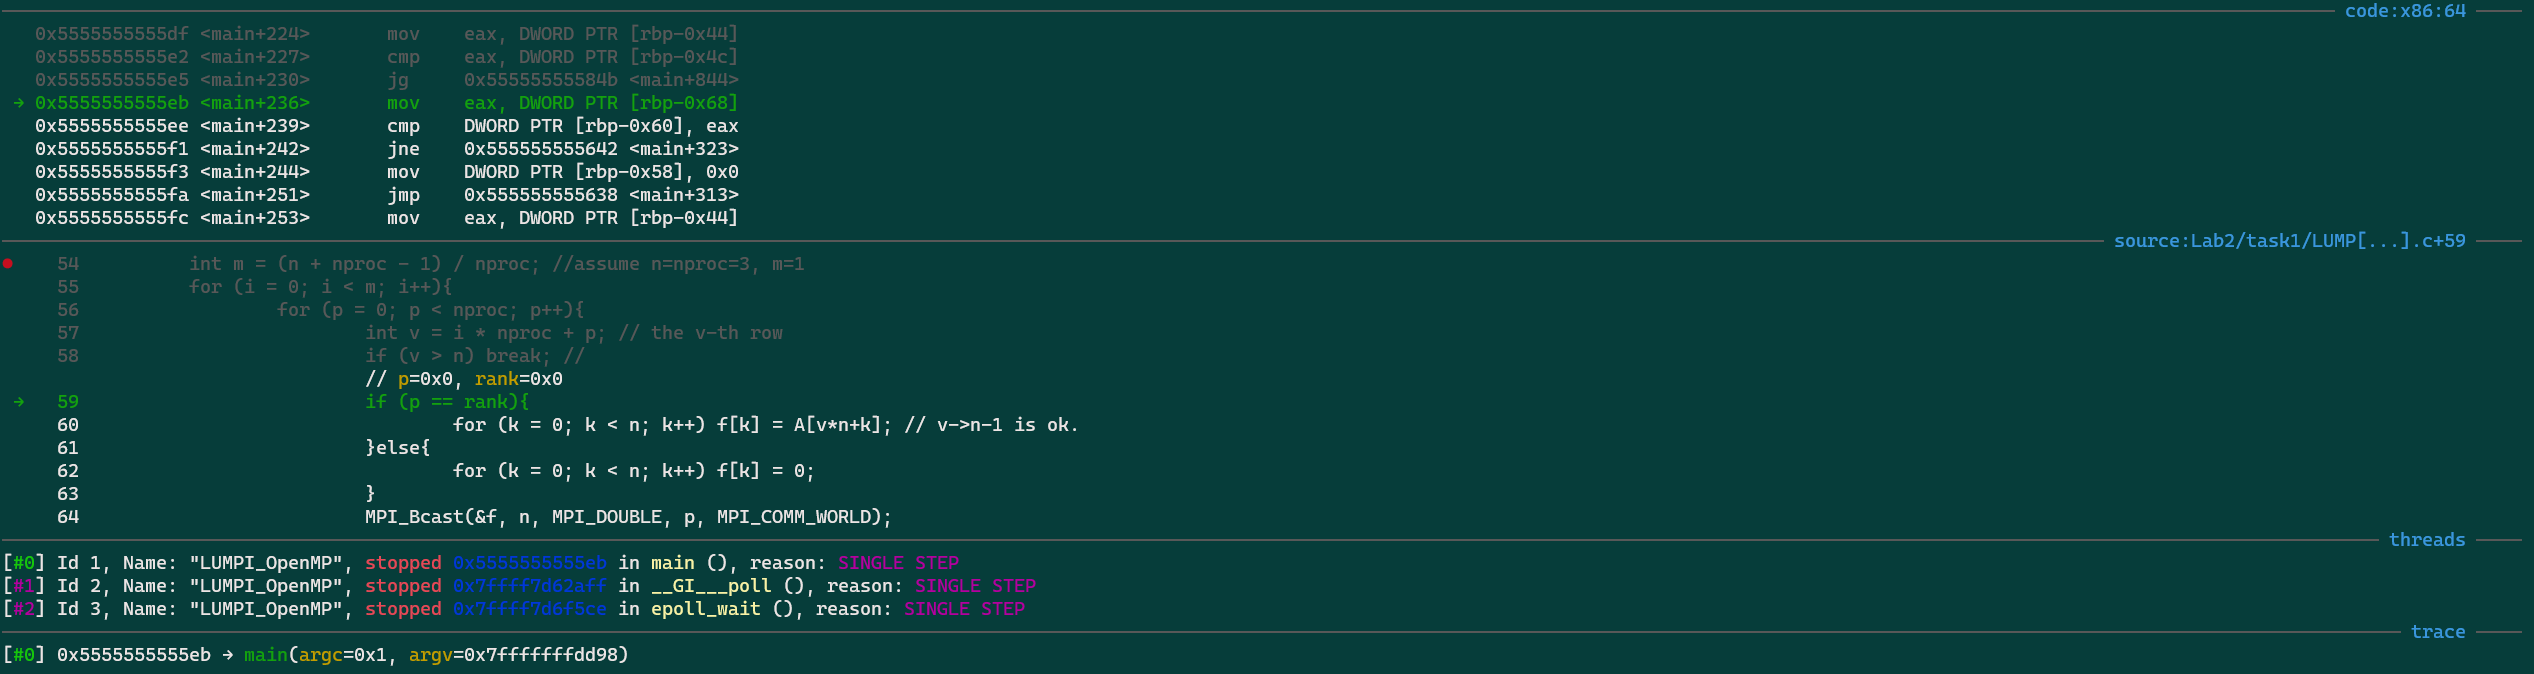
bash -c "$(curl -fsSL http://gef.blah.cat/sh)"

# 没有网,手动下 https://gef.blah.cat/py ,替换
$ wget -O ~/.gdbinit-gef.py -q https://gef.blah.cat/py
$ echo source ~/.gdbinit-gef.py >> ~/.gdbinit
注意:gdbtui 与 gef 不太兼容
导言
我想写关于 linux 网络命令 ip iptables ufw 的相关文档来全面表述linux网络的构成和如何控制管理
基本是基于Linux的时间片轮转机制。A process/thread is woken up by inserting it in the queue of processes/threads to be scheduled.
CFS(Completely Fair Scheduler)是一种用于 Linux 操作系统的调度算法,它旨在实现对 CPU 时间的公平分配。CFS 是 Linux 内核中默认的调度器,自 Linux 2.6.23 版本以来就成为了标准调度器。
CFS 调度算法的主要目标是确保各个任务在相同的时间片内能够获得公平的CPU时间,不会因为优先级等因素而造成资源争夺不均。以下是 CFS 调度算法的一些关键特点和原则:
虚拟化时钟: CFS 使用了一种称为虚拟化时钟(virtual runtime)的概念,而不是传统的时间片。每个任务都有一个虚拟运行时间,调度器根据虚拟运行时间来决定哪个任务应该被调度。
权重: CFS 引入了权重的概念,用于调整不同任务的相对优先级。较高权重的任务会在相同时间间隔内获得更多的虚拟运行时间,从而实现按比例分配CPU资源。
累积虚拟运行时间: 调度器会根据每个任务的权重和已累积的虚拟运行时间,计算出每个任务的应有的虚拟运行时间片。任务在使用完它的时间片后,会根据虚拟运行时间进行重新排队。
红黑树结构: CFS 使用红黑树来管理任务队列,这种数据结构使得在插入、删除和搜索任务时的时间复杂度保持在对数级别。
除了 CFS,Linux 内核还有其他调度算法,如:
实时调度器(Real-Time Scheduler): 用于实时任务,提供硬实时和软实时的调度策略,确保实时任务在指定的时间内执行完成。
O(1) 调度器(O(1) Scheduler): 是 Linux 2.4 内核中使用的调度器,它的时间复杂度为常数级别。然而,随着多核系统的出现,O(1) 调度器在多核环境下的性能表现受到限制,因此被 CFS 替代。
这些调度算法在不同的场景和需求下,对于多任务操作系统的调度提供了不同的方法和策略。选择适合的调度算法可以根据系统的应用和性能要求来进行。
在高强度竞争之后,有些进程陷入长期sleep,并且在核空闲的时候,也不再重新运行?为什么?
原因可能是程序逻辑阻塞了,或者在等待IO
首先 计算机对一个进程是如何判断sleep的,是某时间内的计算占比低于某个阈值吗?
htop s 可以查看kernel 是不是阻塞, l 可以查看是不是读写同一个文件导致阻塞了。
Sleep的瓶颈在哪里
sleep for what, waiting for what?
strace -p PID 可以显示一些信息
$ strace -p 4005042
  wait4(-1, # 等待任意子进程结束

# check subprocess
$ pstree -p 4005042
pinbin(4005042)---BC_Compute(4005082)-+-{BC_Compute}(4005187)
                                      |-{BC_Compute}(4005188)
                                      |-{BC_Compute}(4005252)
                                      |-{BC_Compute}(4005296)
                                      |-{BC_Compute}(4005299)
                                      `-{BC_Compute}(4005302)

$ strace -p 4005082
strace: Process 4005082 attached
futex(0x7fffe52de1b8, FUTEX_WAIT, 2, NULL
# futex - fast user-space locking(seems to be used in OpenMP)
# It is typically used as a blocking construct in the context of shared-memory synchronization.


$ strace -p 4005188
nanosleep({tv_sec=0, tv_nsec=2000000}, 0x7fffe5368bc0) = 0 # repeat
nanosleep({tv_sec=0, tv_nsec=2000000}, 0x7fffe536dbc0) = 0
It seems this is a subprocess repeating sleep leading to all other process to wait in the synchronization.
Use gdb -p PID to attach the process to locate the infinite loop (need Debug Symbols).
futex 是 Linux 下的一个系统调用,用于实现用户空间线程间的同步和通信。让我们逐个解释这个系统调用中的每个参数的含义:
0x7fffe52de1b8: 这是一个指向内存地址的指针(或称为地址),通常是用于表示需要同步的资源或变量的地址。在这里,它表示需要等待的共享资源或变量的地址。FUTEX_WAIT: 这是一个指定 futex 要执行的操作的标志。FUTEX_WAIT 表示线程正在等待 futex 的值发生变化,即等待条件满足。当某个线程执行 FUTEX_WAIT 操作时,如果 futex 的值与预期不符,则该线程将被置于休眠状态,直到 futex 的值发生变化或超时。2: 这是一个表示期望的 futex 值的参数。当调用 FUTEX_WAIT 时,线程将检查 futex 的当前值是否等于此参数指定的值。如果不等于,则线程将休眠等待。NULL: 这是一个指向 timespec 结构的指针,用于设置超时。这里为 NULL 表示调用没有设置超时,即线程将一直等待,直到 futex 的值发生变化。总的来说,futex(0x7fffe52de1b8, FUTEX_WAIT, 2, NULL) 表示线程正在等待位于内存地址 0x7fffe52de1b8 的 futex 变量的值等于 2。如果 futex 的值不是 2,则线程将一直等待直到 futex 的值变为 2 或者超时。这样的同步机制在多线程编程中用于等待条件满足后再执行某些操作,从而避免资源竞争和提高程序的并发性能。
这是一个系统调用 nanosleep 的输出,通常用于让线程休眠一段时间。让我们逐个解释这个系统调用的含义:
nanosleep: 这是 Linux 下的一个系统调用,用于使线程休眠一段指定的时间。
{tv_sec=0, tv_nsec=2000000}: 这是传递给 nanosleep 的第一个参数,是一个指向 timespec 结构的指针。timespec 结构用于表示时间间隔,包括秒(tv_sec)和纳秒(tv_nsec)。
在这里,tv_sec=0 表示秒数为 0,tv_nsec=2000000 表示纳秒数为 2000000。因此,这个 nanosleep 调用将会使线程休眠 2 毫秒(1 秒 = 1000000000 纳秒,所以 2000000 纳秒就是 2 毫秒)。
0x7fffe5368bc0: 这是传递给 nanosleep 的第二个参数,表示一个 timespec 结构的指针。这个参数用于存放未休眠完成的剩余时间,如果 nanosleep 被中断(例如收到信号),它将在这个指针中返回剩余的时间。在这个输出中,剩余时间被存储在内存地址 0x7fffe5368bc0 处。
= 0: 这是 nanosleep 的返回值,表示成功完成。返回值为 0 表示 nanosleep 成功休眠了指定的时间。
综上所述,这个输出表示线程成功休眠了 2 毫秒。
程序直接执行正常,zsim模拟直接sleep?
$ strace -p 303359
read(10,

$ pstree -p 303359                                                                                 │
gups_vanilla(303359)-+-gups_vanilla(303449)-+-orted+                                               │
                     |                      `-{gups+                                               │
                     |-{gups_vanilla}(303360)                                                      │
                     |-{gups_vanilla}(303361)

$ pstree -p 303449                                                                                 │
gups_vanilla(303449)-+-orted(303451)-+-{orted}(303452)                                             │
                     |               |-{orted}(303642)                                             │
                     |               |-{orted}(303643)                                             │
                     |               `-{orted}(303644)                                             │
                     `-{gups_vanilla}(303450)
这是一个 Open MPI(Message Passing Interface)的启动命令,用于启动一个 MPI 程序,并配置一些运行时参数。让我们逐个解释这个命令中的每个选项和参数的含义:
orted --hnp --set-sid --report-uri 11 --singleton-died-pipe 12 -mca state_novm_select 1 -mca ess hnp -mca pmix ^s1,s2,cray,isolated
部分参数含义如下:
orted: 这是 Open MPI 的一个工具,用于启动和管理 MPI 进程。-mca state_novm_select 1: 这是一个 MCA(Modular Component Architecture)选项,用于指定某个模块或组件的参数设置。在这里,state_novm_select 设置为 1,可能是指定某个组件或模块在运行时的选项。-mca pmix ^s1,s2,cray,isolated: 这是另一个 MCA 选项,用于配置 PMIx(Process Management Interface for Exascale)的相关设置。^s1,s2,cray,isolated 表示排除 s1、s2、cray 和 isolated 这些模块,可能是禁用某些特定的组件或功能。| pid | strace output | explanation |
|---|---|---|
| 303451 | restart_syscall(<... resuming interrupted read ...> | |
| 303452 | futex(0xabba001ec8, FUTEX_WAIT, 2, NULL | |
| 303642 | epoll_wait(18, ... | epoll_wait 系统调用,用于等待文件描述符18上的事件 |
| 303643 | select(50, [48 49], NULL, NULL, | 如下 |
| 303644 | select(53, [51 52], NULL, NULL, |
restart_syscall表示系统调用被中断后重新启动的过程。它通常出现在系统调用的执行过程中,当某个信号(例如 SIGSTOP 或 SIGCONT)中断了系统调用的执行,然后系统调用在信号处理完成后被重新启动。The only way to “wake it up” is to arrange for the condition to be met. 用户是无法更改的状态的。
暂无
暂无
上面回答部分来自ChatGPT-3.5,没有进行正确性的交叉校验。
无
have merged 2 topdown site
login to free SMTP server(qq, google) to send email to others.
ping mail.ustc.edu.cnAccording to ref1.
sudo apt-get install mailutils
$ echo "Hello world" | mail -s "Test" [email protected]
send but the same, more crazy thing is the -v and -d flag is not supported. and --debug-level=trace0 isn't recognized. many same question in StackOverflow
sudo tail -n 30 /var/log/mail.log or mail.error show more info.
We try ref2 ssmtp, sudo vim /etc/ssmtp/ssmtp.conf
TLS_CA_FILE=/etc/pki/tls/certs/ca-bundle.crt
root=[email protected]
mailhub=smtp.gmail.com:587
rewriteDomain=gmail.com
AuthUser=shaojieemail
AuthPass={apppassword}
FromLineOverride=YES
UseSTARTTLS=Yes
UseTLS=YES
hostname=snode6
The config get work but not well configed, e.g., TLS_CA_FILE
sending a email using gmail took about 13 mins.
$ ssmtp 943648187@qq.com < mail.txt
......
[->] Received: by snode6 (sSMTP sendmail emulation); Wed, 06 Sep 2023 15:42:05 +0800
[->] From: "Shaojie Tan" <[email protected]>
[->] Date: Wed, 06 Sep 2023 15:42:05 +0800
[->] test server email sending
[->]
[->] .
[<-] 250 2.0.0 OK  1693986323 5-20020a17090a1a4500b0026b4ca7f62csm11149314pjl.39 - gsmtp
[->] QUIT
[<-] 221 2.0.0 closing connection 5-20020a17090a1a4500b0026b4ca7f62csm11149314pjl.39 - gsmtp
$ sendmail [email protected] < mail.txt
sendmail: Authorization failed (535 5.7.8  https://support.google.com/mail/?p=BadCredentials e7-20020a170902b78700b001c0c79b386esm8725297pls.95 - gsmtp)
get to work after well config gmail setting.
| command | snode6 time(mins) | icarus1 |
|---|---|---|
| 4 | 1s | |
| ssmtp | 13 | |
| sendmail | 6 |
ref using QQ apppassword and python.
cpu_check.sh:#!/bin/bash
# Get CPU usage percentage
cpu_usage=$(top -b -n 1 | grep '%Cpu(s):' | awk '{print $2}' | cut -d'.' -f1)
echo "cpu_usage : ${cpu_usage} on $(hostname)"
# Check if CPU usage is below 30%
if [ "$cpu_usage" -lt 30 ]; then
echo "beyond threshold : ${cpu_usage} on "
# Send an email
echo "CPU usage is ${cpu_usage} below 30% on $(hostname)" | mail -s "Low CPU Usage Alert on $(hostname)" [email protected]
fi
Make the script executable:
Modify [email protected] with your actual email address.
cron scheduler to run the script at regular intervals. Edit your crontab by running:Add an entry to run the script, for example, every 5 minutes:
*/5 * * * * /staff/shaojiemike/test/cpu_check.sh >> /staff/shaojiemike/test/cpu_check.log
# Run every 15 minutes during working hours (9 am to 7 pm)
*/15 9-19 * * * /path/to/your/script.sh
Replace /path/to/cpu_check.sh with the actual path to your Bash script.
Now, the script will run every 5 minutes (adjust the cron schedule as needed) and send an email notification if the CPU usage is below 50%. You should receive an email when the condition is met.
Please note that this is a basic example, and you can modify the script to include more details or customize the notification further as needed. Additionally, ensure that your server is configured to send emails; you may need to configure SMTP settings for the mail or sendmail command to work correctly.
暂无
暂无
上面回答部分来自ChatGPT-3.5,没有进行正确性的交叉校验。
无
Anaconda和Miniconda都是针对数据科学和机器学习领域的Python发行版本,它们包含了许多常用的数据科学包和工具,使得安装和管理这些包变得更加简单。
解决了几个痛点:
Anaconda是一个全功能的Python发行版本,由Anaconda, Inc.(前称Continuum Analytics)提供。
Miniconda是Anaconda的轻量级版本(50MB),它也由Anaconda, Inc.提供。
According to the official website,
wget https://repo.anaconda.com/miniconda/Miniconda3-latest-Linux-x86_64.sh
bash Miniconda3-latest-Linux-x86_64.sh
# choose local path to install, maybe ~/.local
# init = yes, will auto modified the .zshrc to add the miniconda to PATH

# If you'd prefer that conda's base environment not be activated on startup,
#    set the auto_activate_base parameter to false:
conda config --set auto_activate_base false
you need to close all terminal(all windows in one section including all split windows), and reopen a terminal will take effect;
Python on windows1
CondaHTTPError: HTTP 000 CONNECTION FAILED for url <https://repo.anaconda.com/pkgs/main/linux-64/repodata.json>面对如下报错
> conda create -n opensora-t00906153 python=3.8 -y
Channels:
- defaults
Platform: linux-64
Collecting package metadata (repodata.json): failed

CondaHTTPError: HTTP 000 CONNECTION FAILED for url <https://repo.anaconda.com/pkgs/main/linux-64/repodata.json>
Elapsed: -

An HTTP error occurred when trying to retrieve this URL.
HTTP errors are often intermittent, and a simple retry will get you on your way.

If your current network has https://repo.anaconda.com blocked, please file
a support request with your network engineering team.

'https//repo.anaconda.com/pkgs/main/linux-64'
修改~/.condarc
ssl_verify: true
show_channel_urls: true

channels:
  - https://mirrors.tuna.tsinghua.edu.cn/anaconda/pkgs/main/
  - https://mirrors.tuna.tsinghua.edu.cn/anaconda/pkgs/free/
  - conda-forge
如果还是有超时错误,多半是下载多了被拦截
通过 curl -v http://mirrors.tuna.tsinghua.edu.cn/anaconda/pkgs/free/ 检查是不是请求被阻拦了。
可以换成科大源或者default 源。
# 激活环境(base),路径为指定的 conda 安装路径下的 `bin/activate` 文件
source /home/m00876805/anaconda3/bin/activate
# 或者 conda init zsh

# 使用以下命令创建一个名为"myenv"的虚拟环境(您可以将"myenv"替换为您喜欢的环境名称):
conda create --name myenv python=3.8

# list existed env
conda env list
/home/m00876805/anaconda3/bin/conda env list

# 查看具体环境的详细信息
conda env export --name <env_name>

# 激活,退出
conda activate name
conda deactivate name
conda packconda pack 用于将现有的 Conda 环境打包成一个压缩文件(如 .tar.gz),便于在其他系统上分发和安装。conda-unpack 来修复路径,使其在新环境中正常工作。conda-pack 可以将 Conda 环境打包成一个 .tar.gz 文件,以便于跨机器或系统移动和还原环境。以下是使用 conda-pack 打包和还原环境的步骤:
假设要打包的环境名为 my_env:
这会在当前目录生成一个 my_env.tar.gz 文件。你可以将这个文件复制到其他系统或机器上解压还原。
在一个特定的 conda 环境目录(例如 /home/anaconda3)下还原和激活打包的环境,可以按以下步骤操作:
假设场景
conda 激活路径:/home/anaconda3/bin/activatemy_env.tar.gzmy_env步骤
conda 环境目录首先,将打包文件解压到指定的 conda 环境目录下的 envs 目录:
mkdir -p /home/anaconda3/envs/my_env
tar -xzf my_env.tar.gz -C /home/anaconda3/envs/my_env --strip-components 1
这里的 --strip-components 1 会去掉 tar.gz 包中的顶层目录结构,使内容直接解压到 my_env 文件夹内。
激活该环境,并运行 conda-unpack 来修复路径:
现在,my_env 环境已在 /home/anaconda3 目录下的 envs 文件夹中完成还原,可以正常使用。
conda env exportconda env export > freeze.yml 用于导出当前 Conda 环境的配置,包括所有安装的包和它们的版本信息,以 YAML 格式保存。conda env create -f freeze.yml 可以根据导出的 YAML 文件创建一个新环境。conda list -e > requirements.txt 和 conda env export > freeze.yml
conda list -e > requirements.txt 和 conda env export > freeze.yml 都是用于记录和管理 Conda 环境中安装的包,但它们之间有一些关键的区别:
conda list -e
requirements.txt)。conda install --yes --file requirements.txt 可以尝试使用 Conda 安装这些列出的包。这种方式适合简单的包管理,但可能在处理复杂依赖时存在问题。conda env export
freeze.yml),它包含了当前环境的完整配置,包括所有包、版本、渠道等信息。conda env create -f freeze.yml 可以根据 YAML 文件创建一个新的环境,确保与原环境一致。关系与总结
conda env export 更加全面和可靠,适合重建相同的环境;而 conda list -e 更简单,适合快速记录包。freeze.yml 是更好的选择;而对于简单的包列表管理,requirements.txt 可能足够用。因此,如果你的目标是确保环境的一致性,使用 conda env export 和 freeze.yml 是推荐的做法;如果只是想快速记录并安装一组包,requirements.txt 是一个方便的选择。
在conda命令无效时使用pip命令来代替
while read requirement; do conda install --yes $requirement || pip install $requirement; done < requirements.txt
The double pipe (“||”) is a control operator that represents the logical OR operation. It is used to execute a command or series of commands only if the previous command or pipeline has failed or has returned a non-zero status code.
conda create -n 新环境名称 --clone 原环境名称 --copy
虽然是完全复制,但是pip install -e安装的包会因为源文件的改动而失效
pip install -e 是用于在开发模式下安装 Python 包的命令,允许你在不复制包文件的情况下,将项目源代码直接安装到 Python 环境中,并保持源代码与环境中的包同步更新。这对于开发过程中频繁修改和测试代码非常有用。
以下是 pip install -e 的使用方法:pip install -e /path/to/project
详细解释:
通过 pip freeze 命令更好地查看
pip freeze 命令更好地查看:如果你想明确区分哪些包是通过 pip install -e 安装的,可以使用 pip freeze 命令。与 pip list 不同,pip freeze 会将包的版本和安装源显示出来。对于 -e(editable mode)安装的包,pip freeze 会有特殊标记。
运行以下命令:
输出示例:
在这里,带有 -e 标记的行表示这个包是通过 pip install -e 安装的,后面跟的是包的源代码路径(例如 Git 仓库 URL 或本地路径),而不是直接列出包的版本号。
输出解析:
-e 标记:表示这个包是以开发模式安装的。
pip install 安装的包(不是开发模式),它们会以 包名==版本号 的形式列出。git URL 或本地路径:开发模式下安装的包会指向源代码的路径,通常是 git 仓库 URL 或本地路径(如果是通过本地文件系统安装的)。导言
对程序员来说,一个好用、易用的terminal,就是和军人手上有把顺手的好枪一样。
用户的环境变量和配置文件
在Linux系统中,用户的环境变量和配置文件可以在不同的节点生效。以下是这些文件的功能和它们生效的时机:
/etc/environment:
/etc/profile:
/etc/profile.d/:
/etc/profile读取和执行。/etc/profile相同,登录shell时执行。它使得系统管理员可以将不同的配置分散到多个文件中管理。/etc/bash.bashrc:
~/.profile:
~/.bashrc:
总结:
/etc/environment 和 /etc/profile 主要用于系统范围的环境变量设置,前者不会执行shell命令,后者会执行。/etc/profile.d/ 中的脚本作为 /etc/profile 的扩展,用于更灵活的管理配置。/etc/bash.bashrc 适用于所有用户的bash配置,但只针对非登录shell。~/.profile 和 ~/.bashrc 适用于单个用户,前者用于登录shell,后者用于非登录shell。通过这些文件,系统和用户可以灵活地设置和管理环境变量和shell配置,以满足不同的需求和使用场景。
| 符号 | ASCII码 | 意义 |
|---|---|---|
| \n | 10 | 换行NL: 本义是光标往下一行(不一定到下一行行首),n的英文newline,控制字符可以写成LF,即Line Feed |
| \r | 13 | 回车CR: 本义是光标重新回到本行开头,r的英文return,控制字符可以写成CR,即Carriage Return |
在不同的操作系统这几个字符表现不同:
在任意层级的SHELL配置文件里添加
写成bashrc的脚本命令
#YJH proxy
export proxy_addr=localhost
export proxy_http_port=7890
export proxy_socks_port=7890
function set_proxy() {
   export http_proxy=http://$proxy_addr:$proxy_http_port #如果使用git 不行,这两个http和https改成socks5就行
   export https_proxy=http://$proxy_addr:$proxy_http_port
   export all_proxy=socks5://$proxy_addr:$proxy_socks_port
   export no_proxy=127.0.0.1,.huawei.com,localhost,local,.local
}
function unset_proxy() {
   unset http_proxy
   unset https_proxy
   unset all_proxy
}
function test_proxy() {
   curl -v -x http://$proxy_addr:$proxy_http_port https://www.google.com | egrep 'HTTP/(2|1.1) 200'
   # socks5h://$proxy_addr:$proxy_socks_port
}
# set_proxy # 如果要登陆时默认启用代理则取消注释这句
鼠标滚轮输出乱码
滚轮乱码,是tmux set mouse on的原因
进入tmux后退出,并运行reset即可
sudo后找不到命令
当你使用sudo去执行一个程序时,处于安全的考虑,这个程序将在一个新的、最小化的环境中执行,也就是说,诸如PATH这样的环境变量,在sudo命令下已经被重置成默认状态了。
添加所需要的路径(如 /usr/local/bin)到/etc/sudoers文件"secure_path"下
解决办法如下: