1: Target2chase
have merged 2 topdown site
have merged 2 topdown site
现实中的困难挫折、不如意、或者突如其来的变故/变化 会消磨和摧毁人的信念,让人变得失望难过。想逃避或者麻木自己,通常会在幻想 或者虚拟世界里寻求解脱。
暂无
暂无
上面回答部分来自ChatGPT-3.5,没有进行正确性的交叉校验。
无
运行卡拉比丘时,报错 Anti-Cheat Expert (ACE)
暂无
暂无
上面回答部分来自ChatGPT-3.5,没有进行正确性的交叉校验。
无
导言
VSCODE 是 windows 项目开发的桥梁


: to change mode?/ to search? to up search* to search cursor current word1,3表示替换第一行至第三行,1,$表示替换第一行到最后一行,也可以直接用%表示。c: confirm,每次替换前都会询问 e:不显示error g: globe,不询问,整个替换 i: ignore,即不区分大小写:new[CTRL] [W] s[CTRL] [W] v:split [FILENAME] #或 :sp [FILENAME]:vsplit [FILENAME] #或 :vs [FILENAME]:only[CTRL] W o:q #或者: :quitsudo apt-get install exuberant-ctagsctags -R . /path/another/include will generate tags fileecho "set tags=$PWD/tags" >> ~/.vimrc
# or
vim ~/.vimrc
# set tags=~/Download/llvm-project-main/llvm/tags
huawei programming : dev machine 使用tmux和zsh可以实现统一的开发环境
导言
作为程序员,最经常遇到的问题就是无法访问github,这无异于和世界断开连接。
linux下通过按照如下修改.ssh/config设置账号密码,并 ssh -vT [email protected],成功后输出Hi Kirrito-k423! You've successfully authenticated, but GitHub does not provide shell access.。
# .ssh/config
Host github.com
  User 943648187@qq.com
  Hostname ssh.github.com
  PreferredAuthentications publickey
  ProxyCommand nc -X 5 -x 127.0.0.1:7890 %h %p #如果通过代理需要这句话
  IdentityFile ~/.ssh/id_rsa
  Port 443

Host *
  # Win报错取消下面三行 getpeername failed: Not a socket getsockname failed: Not a socket
  ControlMaster auto
  ControlPath /tmp/sshcontrol-%C
  ControlPersist 1d
  ServerAliveInterval 30
nc: invalid option -- 'X'
使用 yum install nmap-ncat -y
假如是windows下,如果安装了git bash,会有connect.exe的程序

配置如下1
Host github.com
  User git
  Port 22
  Hostname github.com
  # 注意修改路径为你的路径
  IdentityFile "C:\Users\Administrator\.ssh\id_rsa"
  TCPKeepAlive yes
  # 这里的 -a none 是 NO-AUTH 模式,参见 https://bitbucket.org/gotoh/connect/wiki/Home 中的 More detail 一节
  ProxyCommand E:\\commonSoftware\\Git\\mingw64\\bin\\connect.exe -S 127.0.0.1:7890 -a none %h %p

Host ssh.github.com
  User git
  Port 443
  Hostname ssh.github.com
  # 注意修改路径为你的路径
  IdentityFile "C:\Users\Administrator\.ssh\id_rsa"
  TCPKeepAlive yes
ssh-git 与 https-git的不同
git config --global http.proxy localhost:7890 # PowerShell proxy
git config --global http.proxy "http://127.0.0.1:7890"
git config --global https.proxy "http://127.0.0.1:7890"
GIT_CURL_VERBOSE=1 GIT_TRACE=1 git clone [email protected]:Kirrito-k423/autoUpdateIpconfigPushGithub.git

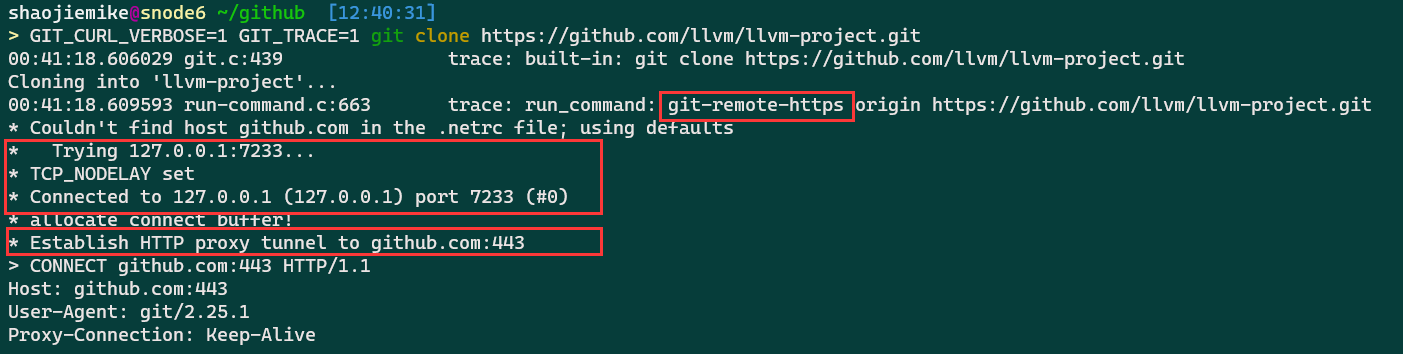
不同于linux平台的GIT_TRACE=1 git push,Windows PowerShell 平台应该如下设置:
没使用上指定config文件,git操作需要明确指定。
There are tons of identical solutions over the internet for defining proxy tunnel for git's downloads like this one, which all is by setting git's https.proxy & http.proxy config. but those answers are not working when you try to clone/push/pull etc. over the ssh protocol!
For example, by setting git config --global https.proxy socks5://127.0.0.1:9999 when you try to clone git clone [email protected]:user/repo.git it does not go through the defined sock5 tunnel!
环境实在是只有https代理, 可以利用github_token的https协议
# Method 1. git http + proxy http
git config --global http.proxy "http://127.0.0.1:1080"
git config --global https.proxy "http://127.0.0.1:1080"

# Method 2. git http + proxy shocks
git config --global http.proxy "socks5://127.0.0.1:1080"
git config --global https.proxy "socks5://127.0.0.1:1080"

# to unset
git config --global --unset http.proxy
git config --global --unset https.proxy

# Method 3. git ssh + proxy http
vim ~/.ssh/config
Host github.com
HostName github.com
User git
ProxyCommand socat - PROXY:127.0.0.1:%h:%p,proxyport=1087

# Method 4. git ssh + proxy socks
vim ~/.ssh/config
Host github.com
HostName github.com
User git
ProxyCommand nc -v -x 127.0.0.1:1080 %h %p
%h %p 是host和post的意思
或者
After some visiting so many pages, I finally find the solution to my question:
# [step 1] create a ssh-proxy
  ssh -D 9999 -qCN [email protected]

# [step 2] make git connect through the ssh-proxy
  # [current script only]
  export GIT_SSH_COMMAND='ssh -o ProxyCommand="connect -S 127.0.0.1:9999 %h %p"'
  # OR [git global setting]
  git config --global core.sshCommand 'ssh -o ProxyCommand="connect -S 127.0.0.1:9999 %h %p"'
  # OR [one-time only use]
  git clone -c=core.sshCommand 'ssh -o ProxyCommand="connect -S 127.0.0.1:9999 %h %p"' [email protected]:user/repo.git
  # OR [current repository use only]
  git config core.sshCommand 'ssh -o ProxyCommand="connect -S 127.0.0.1:9999 %h %p"'
To install connect on Ubuntu:
ssh -vT -o "ProxyCommand connect -S 127.0.0.1:7890 %h %p" [email protected]
ssh -vT -o "ProxyCommand nc -X 5 -x 127.0.0.1:7890 %h %p" [email protected]
# 使用HTTP 代理
ssh -o ProxyCommand='corkscrew proxy.net 8888 %h %p' [email protected]
ssh -o ProxyCommand='proxytunnel -p proxy.net:8888 -P username -d %h:%p' [email protected]
post request forward is an all-in-one solution.
interface: warp
  public key: fcDZCrGbcpz3sKFqhBw7PtdInygUOtEJfPAs08Wwplc=
  private key: (hidden)
  listening port: 51825

peer: bmXOC+F1FxEMF9dyiK2H5/1SUtzH0JuVo51h2wPfgyo=
  endpoint: [2606:4700:d0::a29f:c001]:1701
  allowed ips: 172.16.0.0/24, 0.0.0.0/0, ::/0
  latest handshake: 89 days, 23 hours, 15 minutes, 28 seconds ago
  transfer: 3.51 GiB received, 1.71 GiB sent
  persistent keepalive: every 25 seconds
latest handshake: 89 days ago demonstrate wg is done for a long time. At the same time mtr github.com shows no output prove the bad situation.
STEP1: first try is to bring the wg-proxy up again
python register.py #自动生成warp-op.conf,warp.conf和warp-helper
mv warp-helper /etc/default
vim /etc/config/network #填写warp-op.conf内容,修改只用替换option private_key 和 ipv6 的 list addresses 即可
ifup warp #启动warp, 代替wg-quick up warp.conf
and test brainiac machine is back online
Sometimes,it‘s the big log fault.
# find file
find . -type f -name "zsim.log.0" -size +10M
# find the most repeated lines
head -n 10000 your_file.txt | sort | uniq -c | sort -nr | head
# delete partten line in files
sed -i '/\[S 0\] WARN: \[6\] ContextChange, reason SIGRETURN, inSyscall 1/d' /staff/shaojiemike/github/PIA_huawei/log/zsim/chai-n/hsti/1000/cpu_tlb/zsim.log.0

# conbine two command
find . -type f -name "zsim.log.0" -size +10M -print0 | xargs -0 sed -i '/字符串模式/d'
# or just save the tail (sth wrong needed test)
find . -type f -name "zsim.log.0" -size +1M -exec bash -c 'tail -n 2000 "$1" > "$1"_back ' _ {} \;
t00906153@A2305023964 MINGW64 ~/github
$ git clone https://github.com/jeremy-rifkin/cpptrace.git
Cloning into 'cpptrace'...
fatal: unable to access 'https://github.com/jeremy-rifkin/cpptrace.git/': SSL certificate problem: self-signed certificate in certificate chain
error: RPC failed; curl 18 transfer closed with outstanding read data remaining
出现于使用https协议,下载大仓库时,出现该错误。
depth=1参数,只下载最新提交。之后下好后能适应unshallow复原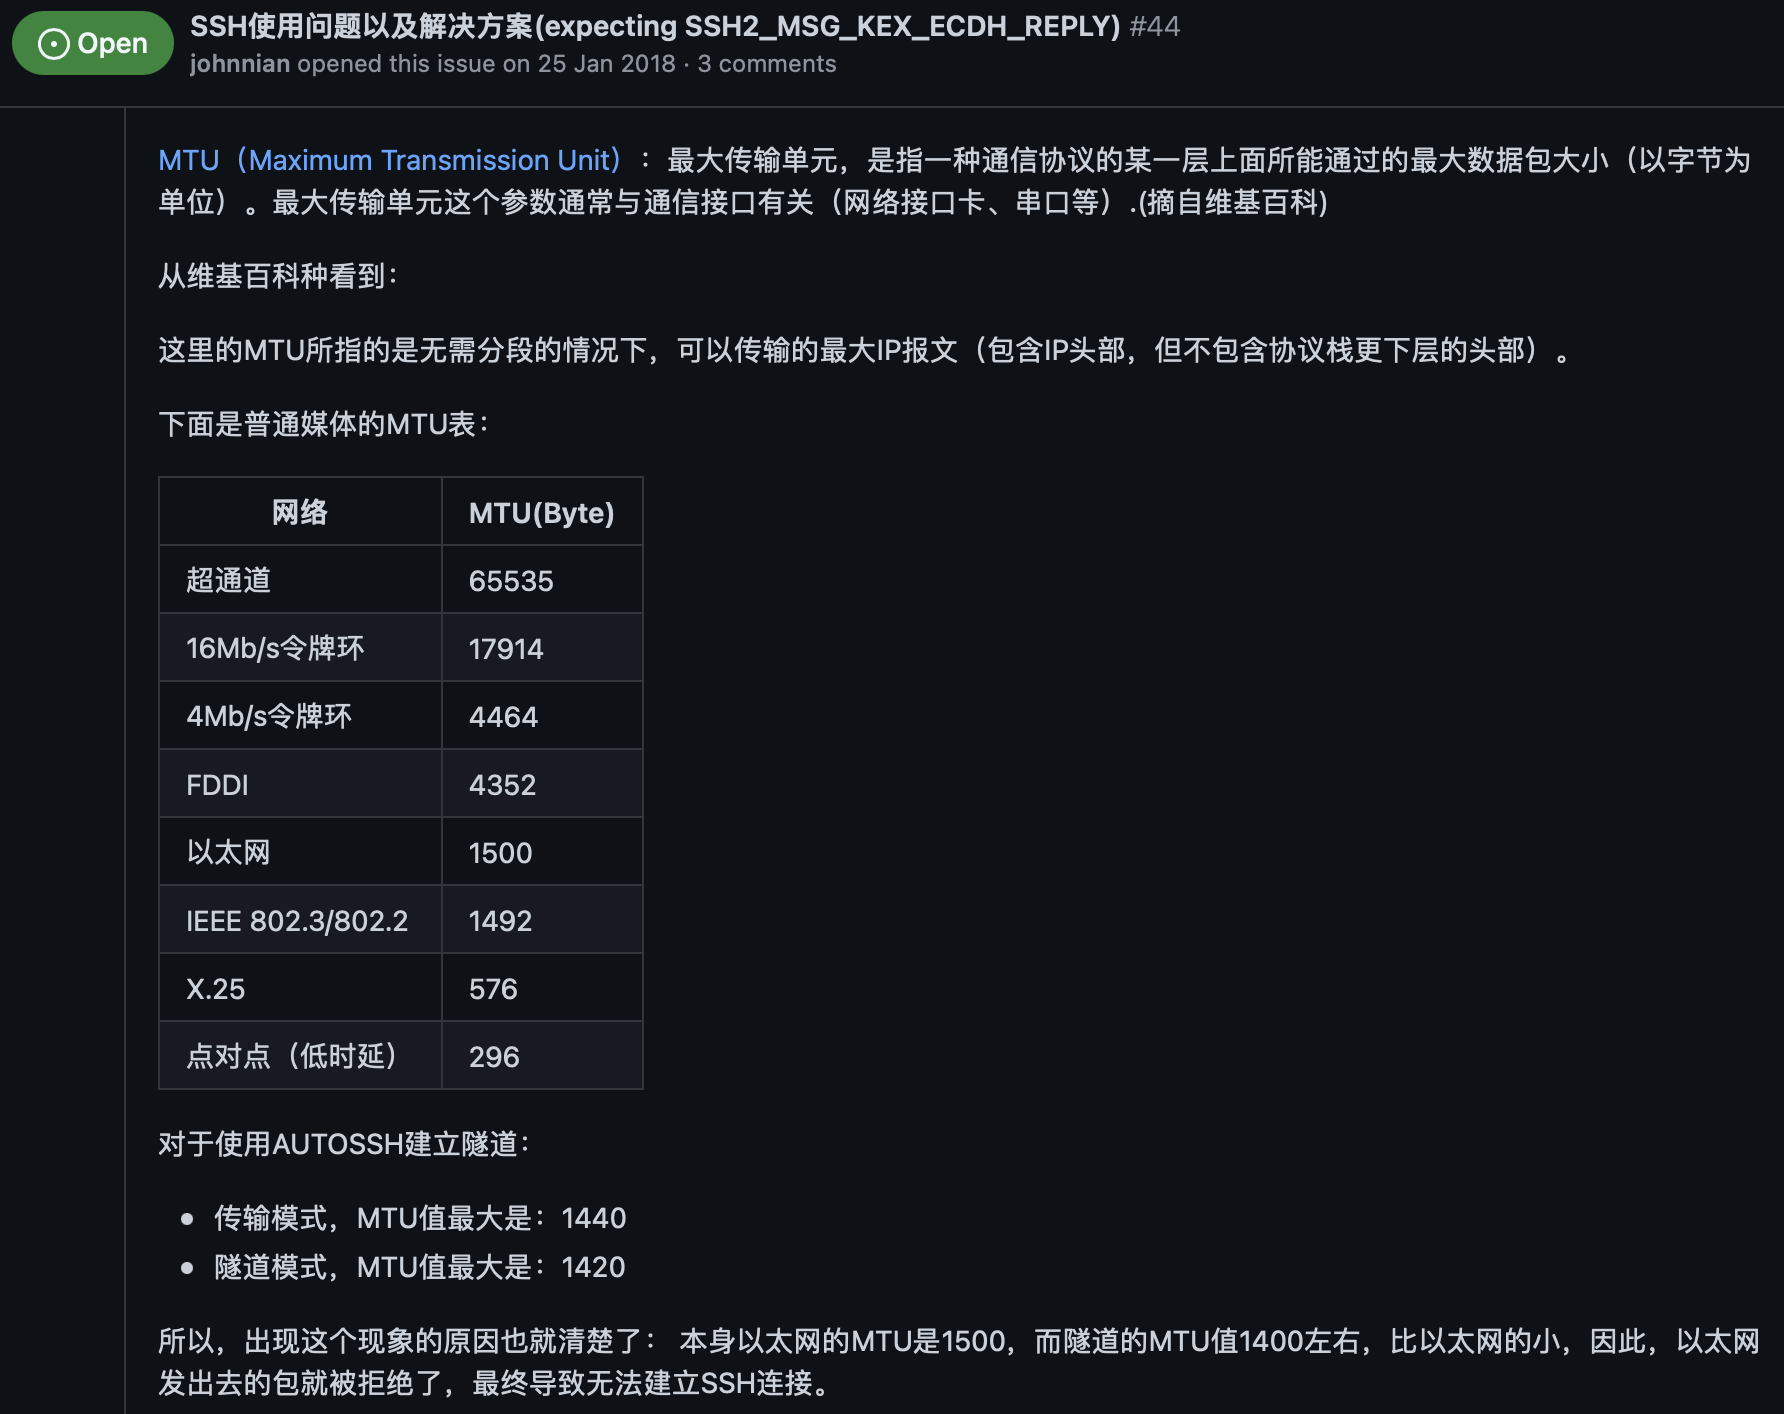
设置mtu解决:
STEP1:
eno0: flags=4163<UP,BROADCAST,RUNNING,MULTICAST>  mtu 1500
        inet 202.38.73.217  netmask 255.255.255.0  broadcast 202.38.73.255
        inet6 fe80::ae1f:6bff:fe8a:e4ba  prefixlen 64  scopeid 0x20<link>
        inet6 2001:da8:d800:811:ae1f:6bff:fe8a:e4ba  prefixlen 64  scopeid 0x0<global>
        inet6 2001:da8:d800:730:ae1f:6bff:fe8a:e4ba  prefixlen 64  scopeid 0x0<global>
        ether ac:1f:6b:8a:e4:ba  txqueuelen 1000  (以太网)
        RX packets 12345942  bytes 2946978044 (2.9 GB)
        RX errors 0  dropped 1438318  overruns 0  frame 0
        TX packets 4582067  bytes 675384424 (675.3 MB)
        TX errors 0  dropped 0 overruns 0  carrier 0  collisions 0
STEP2:
STEP3:
内存为两根8GB DDR4-3200内存组成双通道。 如果要拓展,需要全部升级为 16GB * 2。 拓展视频和图文教程
可以加装一条2280的固态, 但是无法加机械了。
PCIe 3.0的数据传输速度每通道1GB/s,PCIe 2.0是其一半
B450迫击炮有两个M2插槽,一个是满速pcie3.0×4(4GB/s) 一个是半速的pcie2.0×4(2GB/s)。价格差不多的话还是用M2 nvme协议 的SSD
一点没人提过的,b450m迫击炮装上第二个m2以后,第二个pcie2.0*16的扩展(pcie_4)是没法用的。
暂无
暂无
上面回答部分来自ChatGPT-3.5,没有进行正确性的交叉校验。
无
导言
Git命令的基本使用。
暂无
暂无
周报是一周的总结和思考,
上面回答部分来自ChatGPT-3.5,没有进行正确性的交叉校验。
无
AI相关的基础知识。 可以参考华为昇腾架构师的博客。