跳转至

Tutorials

oneApi

安装

命令行安装

Intel OneAPI base toolkit

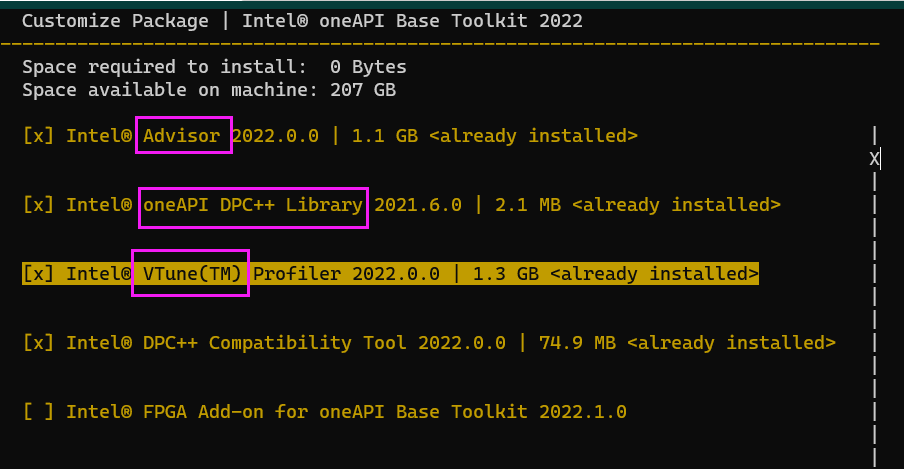
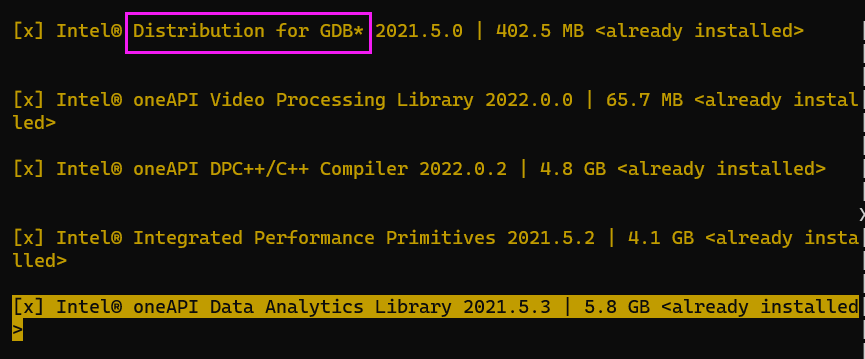
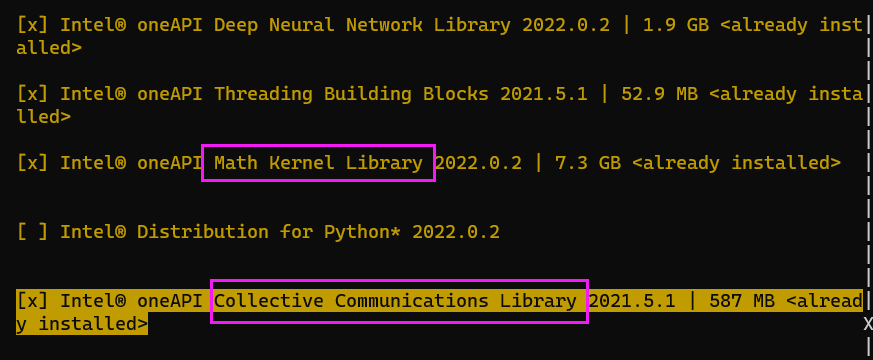
必须先安装base,可以看到默认安装的内容

这个GDB好像可以分析多进程

Intel OneAPI HPC toolkit

Intel OneAPI HPC toolkit包括了icc,icpc,ifort和OpenMP,IntelMPI还有MKL(Intel® oneAPI Math Kernel Library (oneMKL))

Download界面选择版本, 选择online或者offline会有推荐指令,如下

wget https://registrationcenter-download.intel.com/akdlm/irc_nas/18679/l_HPCKit_p_2022.2.0.191.sh

sudo sh ./l_HPCKit_p_2022.2.0.191.sh

icx icpx

> icx -v
Intel(R) oneAPI DPC++/C++ Compiler 2022.0.0 (2022.0.0.20211123)
Target: x86_64-unknown-linux-gnu
Thread model: posix
InstalledDir: /opt/intel/oneapi/compiler/2022.0.2/linux/bin-llvm
Found candidate GCC installation: /usr/lib/gcc/x86_64-linux-gnu/8
Found candidate GCC installation: /usr/lib/gcc/x86_64-linux-gnu/9
Selected GCC installation: /usr/lib/gcc/x86_64-linux-gnu/9
Candidate multilib: .;@m64
Selected multilib: .;@m64
Found CUDA installation: /usr/local/cuda-11.5, version

> icpx --help
OVERVIEW: Intel(R) oneAPI DPC++/C++ Compiler

USAGE: clang++ [options] file...

需要进一步的研究学习

暂无

遇到的问题

暂无

开题缘由、总结、反思、吐槽~~

参考文献

https://www.intel.com/content/www/us/en/develop/documentation/installation-guide-for-intel-oneapi-toolkits-linux/top/prerequisites/install-intel-gpu-drivers.html

Tar Zip Rar

各种指令的对比

命令 压缩空间效果 压缩时间效果 解压时间 说明
tar -cf 2.9G 13.8s 3.3s tar -cf archive.tar foo归档文件,没有压缩功能
tar -zcf 823M 1:44 19s tar -zcf archive.tar.gz foo归档并使用gzip压缩文件,gzip是zip的GNU实现,是最老的公开压缩方法
zip -1r 856M 48.6s 23.3s zip -1qr intel.zip intel, -1 compress faster,unzip解压
zip -9r 824M 11:19 24s 压缩这也太慢了吧
rar a 683M 2:02 46s unrar x解压

上述测试基于大小3GB的文件夹

关于rar

虽然说好像有专利的软件,但是sudo apt install rar貌似就可以安装。但是空间效果确实还行多压1/3,但是时间要多两倍。

还是建议tar.gz

  • 因为 7z 和 zip 压缩格式都不能保留 unix 风格的文件权限,比如解压出个可执行文件要重新 chmod chown 才能恢复正常。
  • 而 tar 格式可以。而 tar 本身不提供压缩,无非就是把包括所有文件的內容和权限拼成一个文件而己,所以用另外如 gzip 格式压缩。为什么是 gzip,因为几乎所有 linux 都支持而已。

参考文献

Module Command

基本使用

命令 作用
module avail 或 module av 查看系统中可用的软件
module add 或 module load 加载模块
module rm 或 unload 卸载模块
module list 或 module li 显示已加载模块
module purge 卸载所有模块
module show 显示模块配置文件
module swap 或 module switch 将模块1 替换为 模块2
module help 查看具体软件的信息
source /public1/soft/modules/module.sh 
source /public1/soft/modules/init/zsh 

$ cat module.sh 
#!/bin/sh
source /public1/soft/modules/init/bash
export MODULEPATH=/public1/soft/modulefiles

$ module list
No Modulefiles Currently Loaded.

$ module show intel/2022.1
-------------------------------------------------------------------
/public1/soft/modulefiles/intel/2022.1:

module-whatis   loads the environment of intel oneAPI 2022.1
unsetenv        MKLROOT
setenv          MKLROOT /public1/soft/oneAPI/2022.1/mkl/latest
prepend-path    MANPATH /public1/soft/oneAPI/2022.1/inspector/latest/man
unsetenv        INTEL_LICENSE_FILE
prepend-path    LIBRARY_PATH /public1/soft/oneAPI/2022.1/ipp/latest/lib
prepend-path    LD_LIBRARY_PATH /public1/soft/oneAPI/2022.1/ipp/latest/lib
prepend-path    CPATH /public1/soft/oneAPI/2022.1/ipp/latest/include
prepend-path    NLSPATH /public1/soft/oneAPI/2022.1/mkl/latest/lib/intel64/locale
prepend-path    PATH /public1/soft/oneAPI/2022.1/compiler/latest/linux/bin
setenv          TBBROOT /public1/soft/oneAPI/2022.1/tbb/latest
setenv          DAALROOT        /public1/soft/oneAPI/2022.1/dal/latest

需要进一步的研究学习

暂无

遇到的问题

暂无

开题缘由、总结、反思、吐槽~~

参考文献

SlurmCommand

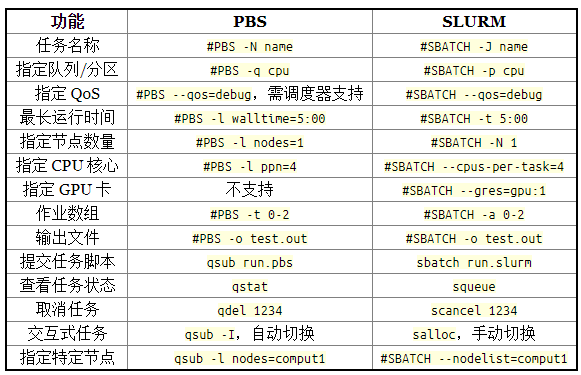
PBS vs SLURM

更详细在这里

查看仍在运行作业7454119的详细信息

scontrol show job 7454119
squeue -u USERNAME #来查看目前处于运行中的作业。

sacct查询已经结束作业的相关信息

format=jobid,jobname,partition,nodelist,alloccpus,state,end,start,submit
sacct --format=$format -j 7454119
[sca3190@ln121%bscc-a5 ~]$ sacct -D -T -X -u sca3190 -S 2021-11-10T00:00:00 -E 2021-11-30T00:00:00 --format "JobID,User,JobName,Partition,QOS,Elapsed,Start,NodeList,State,ExitCode,workdir%70"
JobID             User    JobName  Partition        QOS    Elapsed               Start        NodeList      State ExitCode                                                                WorkDir 
------------ --------- ---------- ---------- ---------- ---------- ------------------- --------------- ---------- -------- ---------------------------------------------------------------------- 
1050223        sca3190       LQCD    amd_256     normal 19-23:25:24 2021-11-10T00:34:36   fa[0208,0211]  NODE_FAIL      0:0                             /public1/home/sca3190/VEC_REORDER_LQCD/src 

[sca3190@ln121%bscc-a5 ~]$ sacct -D -T -X -u sca3190 -S 2021-11-10T00:00:00 -E 2021-11-30T00:00:00 --format "JobID,User,JobName,Partition,QOS,Elapsed,Start,NodeList,State,ExitCode,workdir%70,Timelimit,Submitline%20,Submit,Layout"
JobID             User    JobName  Partition        QOS    Elapsed               Start        NodeList      State ExitCode                                                                WorkDir  Timelimit           SubmitLine              Submit    Layout 
------------ --------- ---------- ---------- ---------- ---------- ------------------- --------------- ---------- -------- ---------------------------------------------------------------------- ---------- -------------------- ------------------- --------- 
1050223        sca3190       LQCD    amd_256     normal 19-23:25:24 2021-11-10T00:34:36   fa[0208,0211]  NODE_FAIL      0:0                             /public1/home/sca3190/VEC_REORDER_LQCD/src  UNLIMITED                      2021-11-10T00:11:29           

OpenMP申请

1个task 64核

#SBATCH --nodes=1
#SBATCH --ntasks-per-node=1
#SBATCH --cpus-per-task=64

问题

IPCC比赛耗时特别多

建议sbatch 加入-t, --time=minutes time limit #SBATCH -t 5:00

第二年参加IPCC发现去年的一个程序跑了很久。

导出excel 获得jobID 1050223

$ sacct -D -T -X -u sca3190 -S 2021-11-10T00:00:00 -E 2021-11-30T00:00:00 --format "JobID,JobName,State,workdir%70"
JobID           JobName      State                                                                WorkDir 
------------ ---------- ---------- ---------------------------------------------------------------------- 
1050223            LQCD  NODE_FAIL                             /public1/home/sca3190/VEC_REORDER_LQCD/src 

NODE_FAIL - Job terminated due to failure of one or more allocated nodes.

查看提交脚本,没有什么问题。

#!/bin/bash
#SBATCH -o ./slurmlog/job_%j_rank%t_%N_%n.out
#SBATCH -p amd_256
#SBATCH -J LQCD
#SBATCH --nodes=2
#SBATCH --ntasks-per-node=64
#SBATCH --exclude=
#SBATCH --cpus-per-task=1
#SBATCH --mail-type=FAIL
#SBATCH [email protected]

source /public1/soft/modules/module.sh
module purge
CC=mpiicc
CXX=mpiicpc
CXX_FLAGS=""
raw_flags="-fPIC -I../include  -std=c++11 -march=core-avx2"

MPIOPT=
computetimes="ibug_buffer"
taskname=so_${CC}_${CXX}_${CXX_FLAGS}

export OMP_NUM_THREADS=$SLURM_CPUS_PER_TASK
module load intel/20.4.3
module load mpi/intel/20.4.3

make clean
make CC=$CC CXX=$CXX CXX_FLAGS="${CXX_FLAGS}${raw_flags}" TARGET=$taskname
mpirun ./$taskname 0.005  ../data/ipcc_gauge_48_96  48 48 48 96  12 24 24 12 > ./log/3_$taskname$computetimes.log
查看Log文件
sca3190@ln121%bscc-a5 src]$ cat slurmlog/job_1050223_rank0_fa0208_0.out 
rm -rf liblattice.so dslash.o lattice_fermion.o lattice_gauge.o invert.o  check.o load_gauge.o main
mpiicpc -fPIC -I../include  -std=c++11 -march=core-avx2 -o dslash.o -c dslash.cpp
mpiicpc -fPIC -I../include  -std=c++11 -march=core-avx2 -o lattice_fermion.o -c lattice_fermion.cpp
mpiicpc -fPIC -I../include  -std=c++11 -march=core-avx2 -o lattice_gauge.o -c lattice_gauge.cpp
mpiicpc -fPIC -I../include  -std=c++11 -march=core-avx2 -o invert.o -c invert.cpp
mpiicpc -fPIC -I../include  -std=c++11 -march=core-avx2 -o check.o -c check.cpp
mpiicpc -fPIC -I../include  -std=c++11 -march=core-avx2 -o load_gauge.o -c load_gauge.cpp
mpiicpc --shared dslash.o lattice_fermion.o lattice_gauge.o invert.o check.o load_gauge.o -o liblattice.so 
mpiicpc -fPIC -I../include  -std=c++11 -march=core-avx2 -Wl,-rpath=./ -lmpi -o so_mpiicc_mpiicpc_  main.cpp -L./ -llattice
slurmstepd: error: *** JOB 1050223 ON fa0208 CANCELLED AT 2022-04-20T14:45:43 DUE TO NODE FAILURE, SEE SLURMCTLD LOG FOR DETAILS ***
[[email protected]] check_exit_codes (../../../../../src/pm/i_hydra/libhydra/demux/hydra_demux_poll.c:121): unable to run bstrap_proxy (pid 59376, exit code 256)
[[email protected]] poll_for_event (../../../../../src/pm/i_hydra/libhydra/demux/hydra_demux_poll.c:159): check exit codes error
[[email protected]] HYD_dmx_poll_wait_for_proxy_event (../../../../../src/pm/i_hydra/libhydra/demux/hydra_demux_poll.c:212): poll for event error
[[email protected]] HYD_bstrap_setup (../../../../../src/pm/i_hydra/libhydra/bstrap/src/intel/i_hydra_bstrap.c:772): error waiting for event
[[email protected]] main (../../../../../src/pm/i_hydra/mpiexec/mpiexec.c:1938): error setting up the boostrap proxies
猜测原因是: 卡在编译了。

以后最好不要在sbatch脚本里编译

需要进一步的研究学习

暂无

遇到的问题

暂无

开题缘由、总结、反思、吐槽~~

参考文献

Git Push 2 Homepage

ibug的网站部署思路

  1. 基于ibug.github.io
  2. 图片markdown两个仓库
  3. 对于acsa的网站
  4. 设置了action产生public/*.html
  5. 通过webhook来实现,服务器接收仓库的event信息。
    1. acsa的nginx接收location转发snode5
    2. snode5的nginx转发到127.0.0.2:9000上
    3. webhook.service接收到信息,然后git clone。并返回信息

hugo网站的action文件

根据公开的仓库,hugo的html文件会产生在gh-pages分支下

name: build

on:
  push:
    branches: [master]

jobs:
  build:
    runs-on: ubuntu-latest
    steps:
      - uses: actions/checkout@v2
        with:
          #submodules: true  # Fetch Hugo themes (true OR recursive)
          fetch-depth: 0    # Fetch all history for .GitInfo and .Lastmod

      - name: Setup Hugo
        uses: peaceiris/actions-hugo@v2
        with:
          hugo-version: 'latest'
          #extended: true

      - name: Build
        run: hugo --minify

      - name: Deploy
        uses: peaceiris/actions-gh-pages@v3
        if: github.ref == 'refs/heads/master'
        with:
          github_token: ${{ secrets.GITHUB_TOKEN }}
          publish_dir: ./public

webhook的实现

接收端转发到内网的机器上(通过修改vim /etc/nginx/sites-enabled/default

server{
   location /_webhook/ {
                proxy_pass http://snode5.swangeese.fun;
                proxy_set_header Host $http_host;
    }
}
记得reload systemctl reload nginx

Nginx中location的作用是根据Url来决定怎么处理用户请求(转发请求给其他服务器处理或者查找本地文件进行处理)。location支持正则表达式,配置十分灵活。我们可以在一个虚拟主机(nginx中的一个server节点)下配置多个location以满足如动静分离,防盗链等需求。

在snode5上nginx也需要转发

 location /_webhook/ {
         proxy_pass http://127.0.0.2:9000;
     }

需要进一步的研究学习

暂无

遇到的问题

暂无

开题缘由、总结、反思、吐槽~~

参考文献

Game Streaming & Video Streaming

视频传输编码

在初步接触了视频传输编码之后,我开始好奇Streaming采用的哪种视频编码呢?

详见 Streaming Protocol一文

Moonlight for IPAD

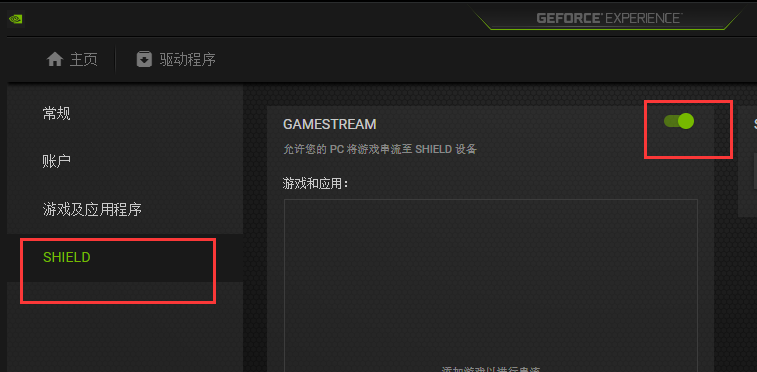
Nvidia Geforece界面

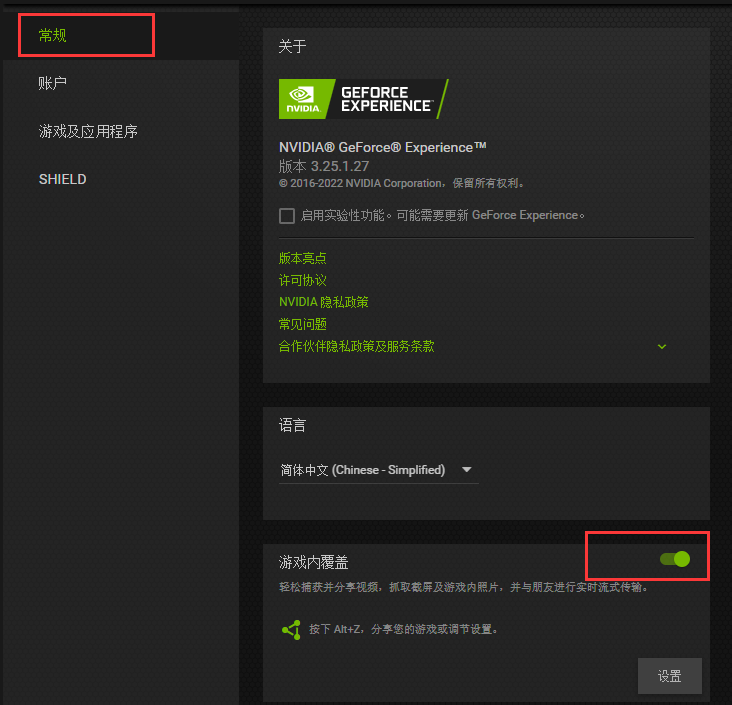
  1. 常规中开启分享
  2. SHEILD 开启
  3. 添加,按照C:\Windows\System32\mstsc.exe这个地址,将mstsc.exe添加进去,mstsc.exe就是你的桌面,等会串流,可以用手机直接操控你的电脑桌面。

串流画面问题

moonlight找不到电脑

https://www.bilibili.com/read/cv10239020

netsh advfirewall firewall add rule name="GameStream UDP" dir=in protocol=udp localport=5353,47995,47998-48010 action=allow
netsh advfirewall firewall add rule name="GameStream TCP" dir=in protocol=tcp localport=47984,47989,47995,48010 action=allow

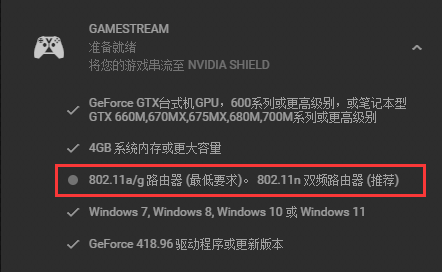
还是不行,猜测是

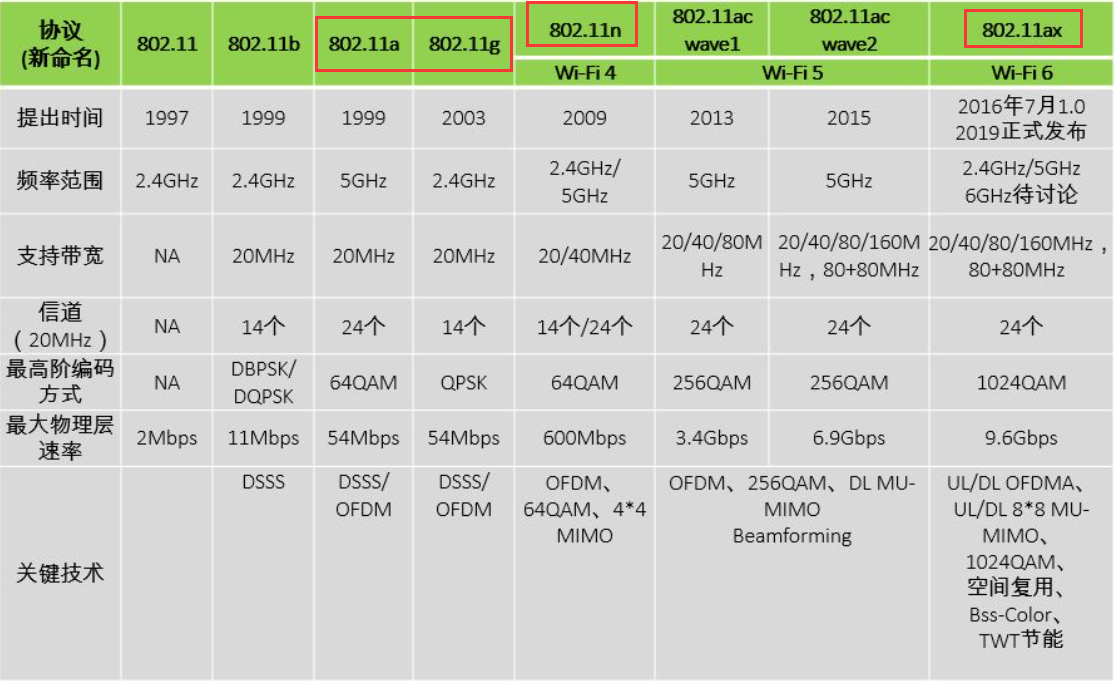
但是这个是wifi6 11ax

尝试安装Internet-Hosting-Tool,运行有提示失败,建议重装也不行。

sjf的解决办法

  1. 卸载当前版本,然后安装3.19
  2. 打开服务
  3. 找到属性 单击打开。找到登录 复选框 把里面的登录身份选择成 本地系统账户 运行服务与桌面交换。勾选然后应用
  4. moonlight可以搜索到电脑
  5. https://pan.baidu.com/s/1x83Uk4kkYQritiNAqg_vLg [/url]提取码:1111 获得NvContainerNetworkService服务注册表文件
  6. 官网下载更新GF到最新

实际解决

  1. 官网下载更新GF到最新
  2. 通过上面的注册表添加NvContainerNetworkService服务,启动
  3. 任务计划程序里设置, 设置开机启动moonlightNVNetStart任务
  4. 程序"C:\Program Files\NVIDIA Corporation\NvContainer\nvcontainer.exe"
  5. 参数-s NvContainerNetworkService -f "C:\ProgramData\NVIDIA\NvContainerNetworkService.log" -l 3 -d "C:\Program Files\NVIDIA Corporation\NvContainer\plugins\NetworkService" -r -p 30000 -st "C:\Program Files\NVIDIA Corporation\NvContainer\NvContainerTelemetryApi.dll"
  6. 成功
  7. 修改分辨率为ipad分辨率,全屏应用
  8. 修改英伟达控制面板的分辨率为IPAD 2388*1688 macbook 2560*1600

问题:Nvidia控制面板没有显示一项

  • 如果显卡驱动装好,且显卡都开了,但就是没有显示选项。
  • 打开服务,找到NVDisplay.ContainerLocalSystem,点登录项,将“允许服务与桌面交互(W)”前的勾打上,重启NVDisplay.ContainerLocalSystem服务,
  • 返回桌面,右键-显示设置,将分辩率任意改一个可用的-应用,
  • 桌面右键-N..控制面板,就有了显示选项,可以改2K分辩率啦。

IPAD moonlight 串流控制

type ESC and mouse scroll

对于实体键盘可以修改映射, 但是滚轮就不好用了。

与其这样不如换个思路,添加手柄,看其能不能支持滚轮和ESC。初步尝试,滚轮可以只是灵敏度有点低。AntiMicroX完美解决了这个问题,配置文件路径 I:\BT\GAME\x18Game\moonlightAntiMicroX.gamecontroller.amgp

体验十分丝滑,任意程序也可以添加。支持PS4手柄(长按PS和share键配对)

share时一定要登录steam

任意应用全屏

应用串流至少将某应用窗口转发,所以只需要停止流式传输,然后调整分辨率就行了。

晚上关闭屏幕,不休眠

  1. 方法一:管理员运行代码 @powercfg -h off

云原神测试

高画质60帧 1.6MB/s

最低画质30帧 500KB/s

需要进一步的研究学习

暂无

遇到的问题

暂无

开题缘由、总结、反思、吐槽~~

参考文献

Crawler

如何获取请求链接

这个api是怎么来的呢? lesson_info_url = "https://www.eeo.cn/saasajax/webcast.ajax.php?action=getLessonLiveInfo"

感谢大佬回答

输入

返回数据

PHP源文件

PHP是后端语言,前端是无法查看的,前端看到的是最终运算之后的结果,PHP源代码是无法查看的。

使用

header改一下就能用了,注意不要开代理

from requests import Session

session = Session()
lesson_info_url = "https://www.eeo.cn/saasajax/webcast.ajax.php?action=getLessonLiveInfo"

headers = {
    'Accept': 'text/html,application/xhtml+xml,application/xml;q=0.9,*/*;q=0.8',
    'Accept-Language': 'zh-CN,zh;q=0.9,zh-TW;q=0.8,en;q=0.7',
    'User-Agent': 'Mozilla/5.0 (Windows NT 10.0; Win64; x64) AppleWebKit/537.36 (KHTML, like Gecko) Chrome/80.0.3987.149 Safari/537.36'
}

data = {
    'lessonKey': lessonKey
}

resp = session.post(url=lesson_info_url, headers=headers, data=data)
text = resp.json()
CourseName = text['data']['courseName']

urllib.request下载视频

from urllib import request

base_url = 'https://f.us.sinaimg.cn/001KhC86lx07laEy0PtC01040200y8vC0k010.mp4?label=mp4_hd&template=640x360.28&Expires=1528689591&ssig=qhWun5Mago&KID=unistore,video'
#下载进度函数
def report(a,b,c):
    '''
    a:已经下载的数据块
    b:数据块的大小
    c:远程文件的大小
    '''
    per = 100.0 * a * b / c
    if per > 100:
        per = 100
    if per % 1 == 1:
        print ('%.2f%%' % per)
#使用下载函数下载视频并调用进度函数输出下载进度
request.urlretrieve(url=base_url,filename='weibo/1.mp4',reporthook=report,data=None)

例子一

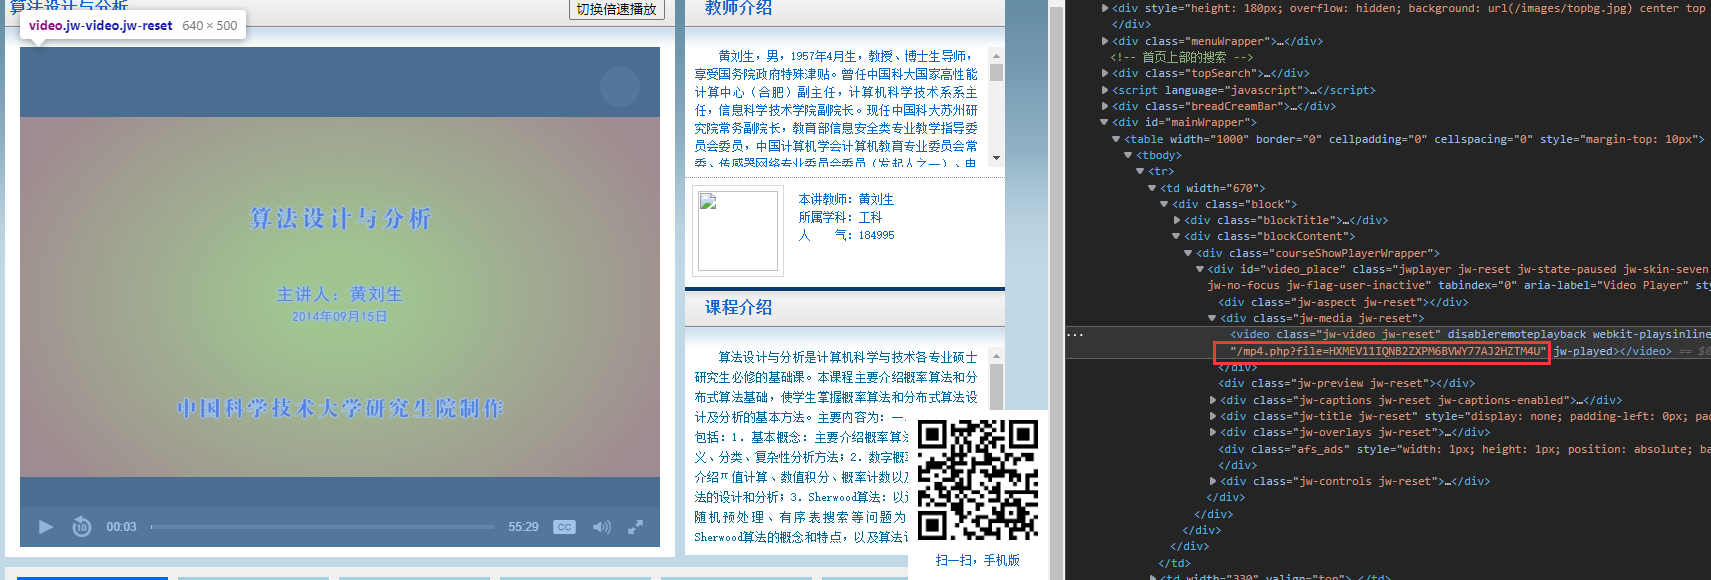
小白尝试 学校的资源网址(http://wlkt.ustc.edu.cn/)

爬取List读取

正则匹配video/detail出视频网址后缀

网页视频位置

正则匹配mp4.php得到视频位置http://wlkt.ustc.edu.cn/mp4.php?file=HXMEV11IQNB2ZXPM6BVWY77AJ2HZTM4U 但是不打开网站没有php返回,网页只能得到。 可通过下面API返回需要的, 可以见github代码

opener = urllib.request.FancyURLopener({})
f = opener.open(taskUrl)
content = f.read()

#1.得到beautifulsoup对象
soup = BeautifulSoup(content,'html.parser')

#通过指定的 属性获取对象
ic(soup.find(id=glv._get(taskType)["data1id"]).attrs['value'])#单个对象
data输入 返回数据

需要进一步的研究学习

暂无

遇到的问题

暂无

开题缘由、总结、反思、吐槽~~

科大BB clashIn 想爬录像。但是网上的两个都用不了了,想自学,改一下

https://github.com/aoxy/ClassIn-Video-Download

https://github.com/JiangGua/classin-downloader

参考文献

https://blog.csdn.net/qq_37275405/article/details/80780925

Cuda Optimize : Stencil

课程报告PPT

有对应的PPT,代码。

最终将1000ms程序优化到1~2ms

乔良师兄有根据知乎介绍如何利用寄存器文件缓存

SMEM难点: 跨线程访存

  1. 不仅每个线程需要访问自己划分对应区域之外的元素
  2. 而且访问的总个数也不是线程数对应的倍数

导致Embarrassingly Parallel Problems

1D 梯度计算 Stencil实例

计算某点的梯度,需要前后的function值。

Halo/Ghost Cells 光晕

问题: 对于边界上的cells,需要访问相邻区域的元素。

解决办法: 将他们也加入进当前block的SMEM

Indexing with Halo Cells

  1. Stencil问题的半径 radius (RAD) 是边缘元素需要的某方向的额外元素
  2. 在梯度的例子里是1
  3. SMEM声明的大小,需要在每个维度上都增加 2*RAD的个数
  4. 这导致SMEM的index的每个维度需要增加RAD. s_idx = threadIdx.x + RAD;

code

int main() {
    const float PI = 3.1415927;
    const int N = 150;
    const float h = 2 * PI / N;
    float x[N] = { 0.0 };
    float u[N] = { 0.0 };
    float result_parallel[N] = { 0.0 };
    for (int i = 0; i < N; ++i) {
        x[i] = 2 * PI*i / N;
        u[i] = sinf(x[i]);
    }
    ddParallel(result_parallel, u, N, h);
}

Kernel Launching

#define TPB 64
#define RAD 1 // radius of the stencil
void ddParallel(float *out, const float *in, int n, float h) {
    float *d_in = 0, *d_out = 0;
    cudaMalloc(&d_in, n * sizeof(float));
    cudaMalloc(&d_out, n * sizeof(float));
    cudaMemcpy(d_in, in, n * sizeof(float), cudaMemcpyHostToDevice);

    // Set shared memory size in bytes
    const size_t smemSize = (TPB + 2 * RAD) * sizeof(float);
    ddKernel<<<(n + TPB - 1)/TPB, TPB, smemSize>>>(d_out, d_in, n, h);
    cudaMemcpy(out, d_out, n * sizeof(float), cudaMemcpyDeviceToHost);
    cudaFree(d_in);
    cudaFree(d_out);
}

Kernel Definition

__global__ void ddKernel(float *d_out, const float *d_in, int size, float h) {
    const int i = threadIdx.x + blockDim.x * blockIdx.x;
    if (i >= size) return;

    const int s_idx = threadIdx.x + RAD;
    extern __shared__ float s_in[];

    // Regular cells
    s_in[s_idx] = d_in[i];
    // Halo cells
    if (threadIdx.x < RAD) {
        s_in[s_idx - RAD] = d_in[i - RAD];
        s_in[s_idx + blockDim.x] = d_in[i + blockDim.x];
    }
    __syncthreads();
    d_out[i] = (s_in[s_idx-1] - 2.f*s_in[s_idx] + s_in[s_idx+1])/(h*h);
}

需要进一步的研究学习

暂无

遇到的问题

暂无

开题缘由、总结、反思、吐槽~~

研一下USTC并行计算自己的选题

参考文献

https://dumas.ccsd.cnrs.fr/dumas-00636254/document

https://indico.fysik.su.se/event/6743/contributions/10338/attachments/4175/4801/4.CUDA-StencilsSharedMemory-Markidis.pdf