跳转至

Tutorials

Echart

echart

快速上手

  • 在github仓库dist目录下拷贝echart.js 和 echart.min.js到index.html目录下。

Vue-ECharts

参考中文文档

sudo apt-get install npm
npm install echarts vue-echarts

实践

简单柱状图

option = {
  title: {
    text: 'Percentage of page walk time overhead caused by data TLB misses',
    subtext: 'GUPS RandomAccess benchmark'
  },
  tooltip: {
    trigger: 'axis',
    axisPointer: {
      type: 'shadow'
    }
  },
  xAxis: {
    name: 'input-data \nsize',
    type: 'category',
    data: ['2^29', '2^30', '2^31', '2^32'],
  },
  yAxis: {
    // name: 'Percentage',
    type: 'value',
    title: 'align'
  },
  series: [
    {
      name: "Percentage",
      data: [13.20, 19.50, 45.22,66.81],
      type: 'bar',
      label: {
        show: true,
        position: 'top'
      },
    }
  ]
};

需要进一步的研究学习

暂无

遇到的问题

暂无

开题缘由、总结、反思、吐槽~~

参考文献

ssh config & X11 & jump-machine

ssh config常见设置

Host node5
  HostName node5.xydustc.me   #或者ip
  IdentityFile ~/.ssh/id_rsa  #windows: "C:\Users\Administrator\.ssh\id_rsa"
  IdentitiesOnly yes          #IdentitiesOnly指定ssh只能使用配置文件指定的identity和certificate文件或通过ssh命令行通过身份验证,即使ssh-agent或PKCS11Provider提供了多个identities。
  User shaojiemike
  Port 22
  ProxyCommand E:\\commonSoftware\\Git\\mingw64\\bin\\connect.exe -S 127.0.0.1:7890 -a none %h %p
  # 注意ProxyCommand不能写全局,会代理其他ssh。出现ctrl-c会中断ssh连接之类的错误

Host *
   ForwardAgent yes     #是否将本地SSH代理转发到远程主机。如果设置为“yes”,则可以在远程主机上使用本地SSH代理,而无需在远程主机上设置新的SSH连接。
   AddKeysToAgent yes   #是否将私钥添加到ssh-agent中。如果设置为“yes”,则在使用ssh连接时,ssh客户端会自动将私钥添加到ssh-agent中。
   ForwardX11 yes
   ForwardX11Trusted yes
   Compression yes
   TCPKeepAlive=yes
   ServerAliveInterval 60 # Client每隔 60 秒发送一次请求给 Server,然后 Server响应,从而保持连接
   ServerAliveCountMax 3 # Client发出请求后,服务器端没有响应得次数达到3,就自动断开连接,正常情况下,Server 不会不响应 

更安全但是更简单的加密 ed25519

Use new way

The error message "userauth_pubkey: key type ssh-rsa not in PubkeyAcceptedAlgorithms [preauth]" indicates that the SSH server is configured to accept specific public key algorithms, and the client attempted to use the "ssh-rsa" algorithm, which is not included in the accepted algorithms list.

To resolve this issue, you have a few options:

  1. Update SSH Key Algorithm: If you are generating a new key pair, consider using a more secure algorithm such as Ed25519 instead of the older RSA algorithm.

    ssh-keygen -t ed25519 -f /path/to/output/keyfile -C "Your Comment Here"
    
  2. Update Server Configuration: If you don't have control over the client's key type, you may need to update the server's SSH configuration to include support for the "ssh-rsa" algorithm. Open the SSH server configuration file (usually located at /etc/ssh/sshd_config), and add or modify the following line:

    PubkeyAcceptedAlgorithms +ssh-rsa
    

    After making the change, restart the SSH server.

    sudo service ssh restart
    

    Note: Adding "ssh-rsa" might reduce the security of your SSH server, as RSA is considered less secure than some newer algorithms.

  3. Check Key Types: Ensure that you are using the correct key type when attempting to authenticate. If you are using an existing key, make sure it's the right type (e.g., Ed25519) and not RSA.

Choose the option that best fits your security requirements and constraints. If possible, it's generally recommended to use more modern and secure key algorithms like Ed25519 over older ones like RSA.

查看 ssh 日志

sudo journalctl -u ssh --since "yesterday" |less

X11 forward GUI

windows use mobaxterm, mac use xquartz + iterms

跳板机

目的

在管理外网服务器时,出于安全等因素的考虑,我们一般不会把所有服务器都设置成可ssh直连,而是会从中挑选出一台机器作为跳板机,当我们想要连接外网服务器时,我们要先通过ssh登录到跳板机,再从跳板机登录到目标服务器。

密钥认证

  1. 开启ssh-agent,然后将我们的private key添加到ssh-agent中。
$ eval $(ssh-agent)
Agent pid 8350
$ ssh-add
Identity added: /home/yt/.ssh/id_rsa (yt@arch)
Identity added: /home/yt/.ssh/id_ed25519 (yt@arch)
  1. ssh登录到跳板机(不过此次加上了-A参数,表示开启agent forwarding)。

或者直接

这条命令将会首先连接到 [email protected] 的跳板机,然后再通过跳板机连接到 [email protected] 的目标服务器。

scp传递数据

scp -J [email protected] [email protected]:/path/to/source/file /path/to/destination/file

这个命令将会通过 [email protected] 的跳板机从源文件 /path/to/source/file 复制数据到 [email protected] 的目标文件 /path/to/destination/file

config配置

Host <name>
    HostName 127.0.0.1 #是不是写错了??不是目标ip吗?
    User <user>
    Port <port>
    ProxyCommand ssh <cloud-user>@<cloud-host> -W %h:%p

//example
Host xunfei-V100
   HostName 172.31.97.164
   User root
   ProxyCommand C:\Windows\System32\OpenSSH\ssh.exe node1 netcat -w 120 %h %p

如何判断当前ssh没用跳板机

check is ssh use direct connect not use jump host

基于跳板机的x11转发

google check ssh gui x11 use jump host

https://www.ibm.com/support/pages/how-forward-x11-client-through-jump-host-back-pc-x-emulator

  1. server side
  2. /etc/ssh/sshd_config
    1. X11Forwarding yes
    2. X11UseForwarding yes
  3. install xauth
    1. environment variables on the server. DISPLAY and XAUTHORITY will automatically be set to their proper values.
    2. if DISPLAY is not set, it means ssh is not forwarding the X11 connection.
  4. client side
  5. ForwardX11 yes in ~/.ssh/config
    1. X11UseLocalhost yes
  6. ssh -v -X name@ip # -v for debug

使用跳板机转发 vscode

vlab 能正常登录的情况下ssh -i D:\\PowerShell\\vlab-vm7096.pem [email protected]

有两种设置ssh config设置方法

Host jumpSnode6Ipv4W
  Hostname 202.38.72.23
  User shaojiemike
  Port 22
  ProxyCommand C:\\Windows\\System32\\OpenSSH\\ssh.exe -W %h:%p -i D:\\PowerShell\\vlab-vm7096.pem ubuntu@vlab.ustc.edu.cn

Host jumpSnode6Ipv4
  Hostname 202.38.72.23
  User shaojiemike
  Port 22
  ProxyCommand C:\\Windows\\System32\\OpenSSH\\ssh.exe -i D:\\PowerShell\\vlab-vm7096.pem ubuntu@vlab.ustc.edu.cn netcat -w 120 %h %p

参考文献

https://cloud.tencent.com/developer/article/1501977

package manager: apt

基本概念

Ubuntu 版本代号

都是动物, 都是两个词,并且两个词的首字母相同,从6.06开始,首字母从D开始递增。

中间版本也有代号 Ubuntu 14.10 (Utopic Unicorn) 以及 Ubuntu 14.04.5 LTS (Trusty Tahr) 官网可以查看

$ lsb_release -a
No LSB modules are available.
Distributor ID: Ubuntu
Description:    Ubuntu 20.04.5 LTS
Release:        20.04
Codename:       focal
各版本 代号

PPA(Personal Package Archive)

  • PPA 代表 个人包存档。
  • PPA 允许应用程序开发人员和 Linux 用户创建自己的存储库来分发软件。
  • 使用 PPA,您可以轻松获得更新的软件版本或无法通过官方 Ubuntu 存储库获得的软件。
  • 除了PPA之外,其他操作系统也有类似的概念,例如Debian的APT存储库、Fedora的DNF存储库等。

常见三板斧

sudo add-apt-repository ppa:dr-akulavich/lighttable
sudo apt-get update
sudo apt-get install lighttable-installer

DEB packages

DEB packages(Debian Binary Package)是Debian及其基于Debian的操作系统(如Ubuntu)中使用的软件包格式。它们是一种存档格式,包含软件的二进制文件、配置文件、依赖关系和其他必要的文件。DEB packages是一种用于软件分发和安装的标准格式。

  • 相比于PPA,大部分DEB的包没有source.list.不能自动更新。

repository

存储库是文件的集合,其中包含有关各种软件、其版本和其他一些详细信息(如校验和)的信息。每个 Ubuntu 版本都有自己的一套官方的四个存储库:

  • Main – Canonical-supported free and open-source software. 规范支持的免费和开源软件。
  • Universe – Community-maintained free and open-source software. 社区维护的自由和开源软件。
  • Restricted – Proprietary drivers for devices. 设备的专有驱动程序。
  • Multiverse – Software restricted by copyright or legal issues. 受版权或法律问题限制的软件。

Ubuntu 添加软件源

换源操作官方教程官方软件源

清华教程或者科大教程

sudo nano /etc/apt/sources.list
# add link
# ctrl+X y enter保存

清空缓存

sudo apt clean && sudo apt autoclean
sudo apt-get update /autoremove /upgrade

PPA vs repository

to read: https://itsfoss.com/ppa-guide/

实践

Ubuntu20.04 install old gcc4.8

寻找支持gcc-4.8的apt源,也就是xenial版本的一个源。

vim /etc/apt/sources.list

deb http://dk.archive.ubuntu.com/ubuntu/ xenial main
deb http://dk.archive.ubuntu.com/ubuntu/ xenial universe

sudo apt update
//会显示 Get:54 http://dk.archive.ubuntu.com/ubuntu xenial/main i386 Packages [1,196 kB]
sudo apt install gcc-4.8

Ubuntu20.04 install new glibc-2.35

Ubuntu 22.04 有对应的 glibc

deb https://mirrors.ustc.edu.cn/ubuntu/ jammy main restricted universe multiverse

原本的思路是安装gcc-11, 结果发现glibc需要增量安装。需要在node5进行测试。

Unpacking libc6:i386 (2.35-0ubuntu3) over (2.31-0ubuntu9.9) ...
Preparing to unpack .../6-libselinux1_3.3-1build2_amd64.deb ...
De-configuring libselinux1:i386 (3.0-1build2) ...
Unpacking libselinux1:amd64 (3.3-1build2) over (3.0-1build2) ...
tar: /lib/x86_64-linux-gnu/libc.so.6: version `GLIBC_2.33' not found (required by /lib/x86_64-linux-gnu/libselinux.so.1)
tar: /lib/x86_64-linux-gnu/libc.so.6: version `GLIBC_2.34' not found (required by /lib/x86_64-linux-gnu/libselinux.so.1)
dpkg-deb: error: tar subprocess returned error exit status 1
dpkg: error processing archive /tmp/apt-dpkg-install-b0waQ0/7-libselinux1_3.3-1build2_i386.deb (--unpack):
 dpkg-deb --control subprocess returned error exit status 2
tar: /lib/x86_64-linux-gnu/libc.so.6: version `GLIBC_2.33' not found (required by /lib/x86_64-linux-gnu/libselinux.so.1)
tar: /lib/x86_64-linux-gnu/libc.so.6: version `GLIBC_2.34' not found (required by /lib/x86_64-linux-gnu/libselinux.so.1)
dpkg-deb: error: tar subprocess returned error exit status 1
dpkg: error processing archive /tmp/apt-dpkg-install-b0waQ0/8-libc-bin_2.35-0ubuntu3_amd64.deb (--unpack):
 dpkg-deb --control subprocess returned error exit status 2
Errors were encountered while processing:
 /tmp/apt-dpkg-install-b0waQ0/4-libc6_2.35-0ubuntu3_amd64.deb
 /tmp/apt-dpkg-install-b0waQ0/7-libselinux1_3.3-1build2_i386.deb
 /tmp/apt-dpkg-install-b0waQ0/8-libc-bin_2.35-0ubuntu3_amd64.deb
/usr/bin/dpkg: /lib/x86_64-linux-gnu/libc.so.6: version `GLIBC_2.33' not found (required by /lib/x86_64-linux-gnu/libselinux.so.1)
/usr/bin/dpkg: /lib/x86_64-linux-gnu/libc.so.6: version `GLIBC_2.34' not found (required by /lib/x86_64-linux-gnu/libselinux.so.1)
/usr/bin/gdbus: /lib/x86_64-linux-gnu/libc.so.6: version `GLIBC_2.33' not found (required by /lib/x86_64-linux-gnu/libselinux.so.1)
/usr/bin/gdbus: /lib/x86_64-linux-gnu/libc.so.6: version `GLIBC_2.34' not found (required by /lib/x86_64-linux-gnu/libselinux.so.1)
E: Sub-process /usr/bin/dpkg returned an error code (1)
E: Sub-process dpkg --set-selections returned an error code (1)
E: Couldn't revert dpkg selection for approved remove/purge after an error was encountered!

Install newest gcc

https://gist.github.com/application2000/73fd6f4bf1be6600a2cf9f56315a2d91

update-alternatives 设置软件版本

sudo update-alternatives --install /usr/bin/clang clang /usr/bin/clang-6.0 1 --slave /usr/bin/clang++ clang++ /usr/bin/clang++-6.0
sudo update-alternatives --install /usr/bin/clang clang /usr/bin/clang-10 1 --slave /usr/bin/clang++ clang++ /usr/bin/clang++-10
sudo update-alternatives --install /usr/bin/gcc gcc /usr/bin/gcc-4.8 20

将某个版本加入gcc候选中,最后的数字是优先级.

运行下面命令切换

sudo update-alternatives --config gcc

代理 apt-get

apt不能使用export http_proxy的代理,需要额外设置

临时设置

如果只是暂时设置代理,一次性使用:

sudo -E http_proxy="http://proxy.example.com:port" apt-get update

# or -o 'xxx'
sudo apt -o Acquire::https::proxy="http://<proxy-url>:<port>/" update
sudo apt-get -o Acquire::http::proxy="http://<proxy-url>:<port>/" update

永久设置

Or add lines in /etc/apt/apt.conf

Acquire::http::proxy "http://<proxy>:<port>/";
Acquire::ftp::proxy "ftp://<proxy>:<port>/";
Acquire::https::proxy "https://<proxy>:<port>/";

Acquire::http::proxy "http://127.0.0.1:7233/";
Acquire::ftp::proxy "ftp://127.0.0.1:7233/";
Acquire::https::proxy "https://127.0.0.1:7233/";

This was the reason why you could reach proxy but couldn't get past it, since there is no username password information. So just put that info into it.

Acquire::http::proxy "http://<username>:<password>@<proxy>:<port>/";
Acquire::ftp::proxy "ftp://<username>:<password>@<proxy>:<port>/";
Acquire::https::proxy "https://<username>:<password>@<proxy>:<port>/";

save the file and you are done...

TIP: More better add these lines in another file, /etc/apt/apt.conf.d/80proxy. This will ensure that after a version upgrade changes won't be lost.

Could not handshake: The TLS connection was non-properly terminated.
Err:3 https://swupdate.openvpn.net/community/openvpn3/repos focal Release
Could not handshake: The TLS connection was non-properly terminated. [IP: 127.0.0.1 7233]
  • 直接将Acquire::https::proxy "https://<proxy>:<port>/";
  • 改成Acquire::https::proxy "http://<proxy>:<port>/";

有时候代理也解决不了,就只能手动安装deb

可以参考jellyfin的教程

问题

E: Could not open lock file

shaojiemike@snode6 ~/github/llvm-3.5/llvm-project  [01:59:12]
> apt update
Reading package lists... Done
E: Could not open lock file /var/lib/apt/lists/lock - open (13: Permission denied)
E: Unable to lock directory /var/lib/apt/lists/
W: Problem unlinking the file /var/cache/apt/pkgcache.bin - RemoveCaches (13: Permission denied)
W: Problem unlinking the file /var/cache/apt/srcpkgcache.bin - RemoveCaches (13: Permission denied)

sudo 解决, or sudo rm /var/lib/apt/lists/lock

etcd start fail
See "systemctl status etcd.service" and "journalctl -xe" for details.
invoke-rc.d: initscript etcd, action "start" failed.
 etcd.service - etcd - highly-available key value store
Loaded: loaded (/lib/systemd/system/etcd.service; disabled; vendor preset: enabled)
Active: failed (Result: exit-code) since Thu 2024-09-05 22:21:44 EDT; 10ms ago
    Docs: https://github.com/coreos/etcd
        man:etcd
Process: 71732 ExecStart=/usr/bin/etcd $DAEMON_ARGS (code=exited, status=1/FAILURE)
Main PID: 71732 (code=exited, status=1/FAILURE)

Sep 05 22:21:43 huawei systemd[1]: Starting etcd - highly-available key value store...
Sep 05 22:21:44 huawei etcd[71732]: etcd on unsupported platform without ETCD_UNSUPPORTED_ARCH=arm64 set.
Sep 05 22:21:44 huawei systemd[1]: etcd.service: Main process exited, code=exited, status=1/FAILURE
Sep 05 22:21:44 huawei systemd[1]: etcd.service: Failed with result 'exit-code'.
Sep 05 22:21:44 huawei systemd[1]: Failed to start etcd - highly-available key value store.
dpkg: error processing package etcd-server (--configure):
installed etcd-server package post-installation script subprocess returned error exit status 1
dpkg: dependency problems prevent configuration of etcd:
etcd depends on etcd-server; however:
Package etcd-server is not configured yet.

dpkg: error processing package etcd (--configure):
dependency problems - leaving unconfigured
Setting up zsh (5.4.2-3ubuntu3.2) ...
No apport report written because the error message indicates its a followup error from a previous failure.
                                                                                                        Processing triggers for man-db (2.8.3-2ubuntu0.1) ...
Errors were encountered while processing:
etcd-server
etcd
E: Sub-process /usr/bin/dpkg returned an error code (1)

这个错误的主要原因是 etcd 尝试在不受支持的架构上运行(即 arm64),并且你没有设置环境变量 ETCD_UNSUPPORTED_ARCH=arm64 来强制 etcd 运行。因此,etcd 服务启动失败。

要解决这个问题,你可以尝试以下步骤:

  1. 设置环境变量 ETCD_UNSUPPORTED_ARCH=arm64

编辑 etcd.service 的配置文件,使其在启动时包含该环境变量。

  1. 打开 /lib/systemd/system/etcd.service

    sudo nano /lib/systemd/system/etcd.service
    

  2. [Service] 部分添加以下行:

    Environment="ETCD_UNSUPPORTED_ARCH=arm64"
    

  3. 保存并关闭文件。

  4. 重新加载 systemd 配置并启动 etcd

完成修改后,执行以下命令来重新加载 systemd 配置并启动 etcd

sudo systemctl daemon-reload
sudo systemctl start etcd
  1. 检查服务状态

检查 etcd 服务是否正常启动:

sudo systemctl status etcd
  1. 查看日志

如果 etcd 服务仍未启动,可以查看 journalctl 以获取详细日志:

journalctl -xe

这些步骤应该能帮助你解决 etcd 服务在 arm64 架构上的启动问题。如果问题仍然存在,日志可能会提供进一步的线索。

参考文献

https://blog.csdn.net/feinifi/article/details/121793945

Disk

lsblk命令

MAJ:MIN 主:次 设备号

TYPE:块设备类型,比如disk磁盘,part分区,lvm逻辑卷,rom只读存储

$ lsblk -f # 查看磁盘分区格式,有格式才能挂载成功。
NAME   FSTYPE   LABEL UUID                                 FSAVAIL FSUSE% MOUNTPOINT
sda
├─sda1
└─sda2 ext4           9449ee1e-7cdb-4852-9c60-73959ce812c0   18.1G    93% /
sdb

lsblk显示 nvme2n1 什么意思

In the output of the lsblk command, nvme2n1 refers to a Non-Volatile Memory Express (NVMe) device. Here's a breakdown of the naming convention:

nvme: This prefix indicates that the device is an NVMe storage device, which is a type of high-performance, solid-state drive (SSD) that connects directly to the motherboard via the PCIe bus.

fdisk命令

blkid命令

使用blkid命令对查询设备上所采用文件系统类型进行查询。blkid主要用来对系统的块设备(包括交换分区)所使用的文件系统类型、LABEL、UUID等信息进行查询。要使用这个命令必须安装e2fsprogs软件包。

分区已有文件系统

直接使用blkid可列出当前系统中所以已挂载文件系统的类型。(或者 check /etc/fstab)

> blkid
/dev/sdb: UUID="2d900913-d0a4-4a15-7bd8-46dda015c95e" UUID_SUB="dc35a623-6a3e-f4fe-f9f7-05e102a9c7ec" LABEL="ubuntu-server:0" TYPE="linux_raid_member"
/dev/sdc: UUID="2d900913-d0a4-4a15-7bd8-46dda015c95e" UUID_SUB="7772d530-24d2-2064-29a3-9d61c0b6289e" LABEL="ubuntu-server:0" TYPE="linux_raid_member"
/dev/sda: UUID="2d900913-d0a4-4a15-7bd8-46dda015c95e" UUID_SUB="683c1101-69b1-f2c6-586b-155fbda91846" LABEL="ubuntu-server:0" TYPE="linux_raid_member"
/dev/sdd1: UUID="F51A-FBBA" TYPE="vfat" PARTUUID="f377e755-9c1e-41dd-b50b-cb50a095be4c"
/dev/sdd2: UUID="3df43f90-d64c-4061-bbca-2614ecc57f34" TYPE="ext4" PARTUUID="c599a2f0-9888-4f86-88fb-a49b9cde4666"
/dev/sdd3: UUID="f12ca879-4545-46b7-bb2e-bdcdf771cb96" TYPE="swap" PARTUUID="bb5ab1b6-f67b-46fc-aead-14b8b86972ad"
/dev/sdd4: UUID="07fbfa2a-6b48-4423-9260-dc36080b42c4" TYPE="ext4" PARTUUID="6b4f7a39-1c0f-4fcf-a407-b31e469a3cdc"
/dev/sdf: UUID="2d900913-d0a4-4a15-7bd8-46dda015c95e" UUID_SUB="86ffe123-2c7f-f7f1-40a0-57a12982fe17" LABEL="ubuntu-server:0" TYPE="linux_raid_member"
/dev/sdg: UUID="2d900913-d0a4-4a15-7bd8-46dda015c95e" UUID_SUB="36a06a4f-c84e-0684-8997-2997a68de012" LABEL="ubuntu-server:0" TYPE="linux_raid_member"
/dev/sdh: UUID="2d900913-d0a4-4a15-7bd8-46dda015c95e" UUID_SUB="369a926d-1f63-f397-ba4e-3118ef2ecf1d" LABEL="ubuntu-server:0" TYPE="linux_raid_member"
/dev/sde: UUID="2d900913-d0a4-4a15-7bd8-46dda015c95e" UUID_SUB="4dd3f6ca-1e73-2606-ec65-c98badcd77ad" LABEL="ubuntu-server:0" TYPE="linux_raid_member"
/dev/md0p1: UUID="c960e42b-f321-482d-aed4-c90f29e77291" TYPE="ext4" PARTUUID="d0949a94-c6e4-4621-890b-8d3f2d70fe57"
/dev/md0p2: UUID="addb8c13-8e34-4d8a-995b-101638f2dcbb" TYPE="ext4" PARTUUID="c6594348-58c5-49c2-9f40-82ce49653b7c"
/dev/md0p3: UUID="3354846e-7bec-45fb-8b59-4c6d60340d0d" TYPE="ext4" PARTUUID="8012f7e0-7dfa-46c5-b748-ef04d68a31ed"
/dev/md0p4: UUID="def8fb56-701e-4d6c-81d9-ecb765cc4d06" TYPE="ext4" PARTUUID="f6bb7944-fb1c-42de-af77-545c26303ad2"
/dev/md0p5: UUID="2f0590a9-6490-4758-999f-bdb5ef5954db" TYPE="ext4" PARTUUID="bbfe02f4-6b6a-4eeb-bb58-92b8b14b0997"
> blkid -o list
device                                                                       fs_type         label            mount point                                                                      UUID
------------------------------------------------------------------------------------------------------------------------------------------------------------------------------------------------------------------------------------
/dev/sdb                                                                                          linux_raid_member    ubuntu-server:0       (not mounted)                                                                                         2d900913-d0a4-4a15-7bd8-46dda015c95e
/dev/sdc                                                                                          linux_raid_member    ubuntu-server:0       (not mounted)                                                                                         2d900913-d0a4-4a15-7bd8-46dda015c95e
/dev/sda                                                                                          linux_raid_member    ubuntu-server:0       (not mounted)                                                                                         2d900913-d0a4-4a15-7bd8-46dda015c95e
/dev/sdd1                                                                                         vfat                                       /boot/efi                                                                                             F51A-FBBA
/dev/sdd2                                                                                         ext4                                       /                                                                                                     3df43f90-d64c-4061-bbca-2614ecc57f34
/dev/sdd3                                                                                         swap                                       [SWAP]                                                                                                f12ca879-4545-46b7-bb2e-bdcdf771cb96
/dev/sdd4                                                                                         ext4                                       /tmp                                                                                                  07fbfa2a-6b48-4423-9260-dc36080b42c4
/dev/sdf                                                                                          linux_raid_member    ubuntu-server:0       (not mounted)                                                                                         2d900913-d0a4-4a15-7bd8-46dda015c95e
/dev/sdg                                                                                          linux_raid_member    ubuntu-server:0       (not mounted)                                                                                         2d900913-d0a4-4a15-7bd8-46dda015c95e
/dev/sdh                                                                                          linux_raid_member    ubuntu-server:0       (not mounted)                                                                                         2d900913-d0a4-4a15-7bd8-46dda015c95e
/dev/sde                                                                                          linux_raid_member    ubuntu-server:0       (not mounted)                                                                                         2d900913-d0a4-4a15-7bd8-46dda015c95e
/dev/md0p1                                                                                        ext4                                       /home                                                                                                 c960e42b-f321-482d-aed4-c90f29e77291
/dev/md0p2                                                                                        ext4                                       /usr                                                                                                  addb8c13-8e34-4d8a-995b-101638f2dcbb
/dev/md0p3                                                                                        ext4                                       /boot                                                                                                 3354846e-7bec-45fb-8b59-4c6d60340d0d
/dev/md0p4                                                                                        ext4                                       /var                                                                                                  def8fb56-701e-4d6c-81d9-ecb765cc4d06
/dev/md0p5                                                                                        ext4                                       /srv                                                                                                  2f0590a9-6490-4758-999f-bdb5ef5954db

UUID

帮助使用者唯一的确定系统中的所有存储设备,不管它们是什么类型的。它可以标识DVD驱动器,USB存储设备以及你系统中的硬盘设备等。

使用原因包括:设备名并非总是不变的

df 命令

shaojiemike@brainiac1 ~/blockFrequency  [08:02:54]
> df -lh 
文件系统        容量  已用  可用 已用% 挂载点
udev             94G     0   94G    0% /dev
tmpfs            19G  4.3M   19G    1% /run
/dev/sdd2       984G   12G  923G    2% /
tmpfs            95G   88K   95G    1% /dev/shm
tmpfs           5.0M     0  5.0M    0% /run/lock
tmpfs            95G     0   95G    0% /sys/fs/cgroup
/dev/md0p3       20G  347M   19G    2% /boot
/dev/sdd4        53G  319M   50G    1% /tmp
/dev/md0p5       47G   53M   45G    1% /srv
/dev/sdd1       511M  3.6M  508M    1% /boot/efi
/dev/md0p4      590G  5.7G  554G    2% /var
/dev/md0p1      6.5T  5.1T  1.2T   82% /home
/dev/loop0       49M   49M     0  100% /snap/core18/2289
/dev/loop1       58M   58M     0  100% /snap/core20/1360
/dev/loop3       38M   38M     0  100% /snap/snapd/14982
/dev/loop4       38M   38M     0  100% /snap/snapd/15183
/dev/loop2       58M   58M     0  100% /snap/core20/1380
/dev/loop5       61M   61M     0  100% /snap/lxd/21843
/dev/loop7       49M   49M     0  100% /snap/core18/2349
/dev/loop6       62M   62M     0  100% /snap/lxd/22530
tmpfs            19G     0   19G    0% /run/user/1006
tmpfs            19G     0   19G    0% /run/user/1008
tmpfs            19G     0   19G    0% /run/user/1005

snap的机制

一种新的安装包管理方式。使用snapcraft将软件打包成snap格式的打包工具集。

+-----------+       +------------+      +------------+
| Developer +------>| Snapcraft  +----->| Snap Store |
+-----------+       +------------+      +-----+------+
                                              | update     
                                              v       
+-----------+       +------------+      +------------+
| End User  +------>|   Snap     +----->|   Snapd    |
+-----------+       +-----+------+      +-----+------+
                          | containerize      |       
                          v                   |       
                    +------------+            |       
                    |   Snaps    |<-----------+ manage
                    +------------+     

core

snap的每个版本软件会,占用一个/dev/loop

/snap/core18 代表ubuntu 18版本的软件所运行的环境
/snap/core20 代表ubuntu 20版本的软件所运行的环境

Snap应用运行在以Ubuntu 为核心的容器里,与各个发行版做到了解耦。因此Snap应用的开发者很开心了, 只需保证自己应用在[Ubuntu Core]欢快运行即可,不需要考虑其他发行版的适配。

snapd

Snap应用由snapd守护进程管理。snapd每天会去Snap Store查本地Snap应 用有没有可用更新,如果有,就把更新拿下来,应用到当前Snap应用上。自动更新不可关闭,但是可以设置延迟60天。

lxc/lxd

lxc是Linux Container的简写,它是一种内核虚拟化技术,可以提供轻量级的虚拟化,以便隔离进程和资源;它不需要提供指令解释机制,没有全虚拟化的复杂性,相当于C++中的NameSpace。 lxc容器能有效地把操作系统管理的资源划分到不同的组中,并能在不同的组之间平衡有冲突的资源使用需求,因此它可以在单一的主机节点上同时执行多个相互隔离的容器。

lxd是基于lxc构筑的容器管理进程,提供镜像、网络、存储、以及容器等能力。    大家可能有个疑问,为什么不用docker容器呢?docker容器原先也是我的首选,但实际操作过程中发现snap包安装所需要的squashfs文件系统在docker中无法mount,会出现如下错误:

system does not fully support snapd: cannot mount squashfs imag  

tmpfs

/dev/shm下的tmpfs是内存的一半,是一个临时文件系统,驻留在内存中,所以/dev/shm/这个目录不在硬盘上,而是在内存里。因为是在内存里,所以读写非常快,可以提供较高的访问速度。

/sys/fs/cgroup是systemd在代码里自动挂载的。cgroups(Control Groups) 是 linux 内核提供的一种机制,这种机制可以根据需求把一系列系统任务及其子任务整合(或分隔)到按资源划分等级的不同组内,从而为系统资源管理提供一个统一的框架。简单说,cgroups 可以限制、记录任务组所使用的物理资源。

/run/user是每个login的用户所需的一些数据

> ls /run/user -l
总用量 0
drwx------ 7 qcjiang     qcjiang     360 Jul 11 14:54 1005
drwx------ 7 shaojiemike shaojiemike 780 Jul 11 01:10 1006
drwx------ 7 zwcao       zwcao       360 Jul  9 15:48 1008
drwx------ 7 udfrt       udfrt       200 Jul 11 16:03 1010

利用tmpfs这个特性可以用来提高服务器性能,把一些对读写性能要求较高,但是数据又可以丢失的这样的数据保存在/dev/shm中,来提高访问速度。

tmpfs用途还是较广的,Linux中可以把一些程序的临时文件放置在tmpfs中,利用tmpfs比硬盘速度快的特点来提升系统性能。比如可以用来放squid程序的缓存文件。

# 临时调整大小,重启后会恢复正常,恢复为内存一半大小。
mount -o remount,size=777M tmpfs /dev/shm
# 永久修改
vim  /etc/fstab 
# 把tmpfs这一行改为:
tmpfs                   /dev/shm                tmpfs   defaults,size=777M     0 0

/etc/fstab 解析

/etc/fstab 是专门用配置挂载硬盘的文件

语法为:

[Device] [Mount Point] [File System Type] [Options] [Dump] [Pass]

[Device] 包含文件系统的device或者partition 
[Mount Point] 挂载的目录,从该目录可以访问设备/分区的内容(注意:swap没有装入点)
[File System Type] 文件系统类型
[Options] mount的选项,默认的defaults
[Dump] 是否开启备份,0 来表示不备份这个区
[Pass]  fsck是否会check该区域,0表示不检查。fsck (文件系统检查)是一种命令行程序,可让您在一个或多个Linux文件系统上执行一致性检查和交互式修复。 它用于检查指定类型文件系统。 在系统无法启动或无法安装分区的情况下,可以使用 fsck 命令修复损坏的文件系统。

Device

device 有两种表示方式,可以用/dev/xdx 之类的location 或者 硬件的UUID 来表示,硬件的UUID 可以用blkid 来查询

对于uuid

# / was on /dev/sdd2 during curtin installation  
/dev/disk/by-uuid/3df43f90-d64c-4061-bbca-2614ecc57f34 / ext4 defaults 0 0

> blkid |grep 3df
/dev/sdd2: UUID="3df43f90-d64c-4061-bbca-2614ecc57f34" TYPE="ext4" PARTUUID="c599a2f0-9888-4f86-88fb-a49b9cde4666"

对于id

# /home was on /dev/md0p1 during curtin installation                                            
/dev/disk/by-id/md-uuid-2d900913:d0a44a15:7bd846dd:a015c95e-part1 /home ext4 defaults 0 0
# /usr was on /dev/md0p2 during curtin installation
/dev/disk/by-id/md-uuid-2d900913:d0a44a15:7bd846dd:a015c95e-part2 /usr ext4 defaults 0 0
# /boot was on /dev/md0p3 during curtin installation
/dev/disk/by-id/md-uuid-2d900913:d0a44a15:7bd846dd:a015c95e-part3 /boot ext4 defaults 0 0
# /var was on /dev/md0p4 during curtin installation
/dev/disk/by-id/md-uuid-2d900913:d0a44a15:7bd846dd:a015c95e-part4 /var ext4 defaults 0 0
# /srv was on /dev/md0p5 during curtin installation
/dev/disk/by-id/md-uuid-2d900913:d0a44a15:7bd846dd:a015c95e-part5 /srv ext4 defaults 0 0
> blkid |grep a015c95e
/dev/sdb: UUID="2d900913-d0a4-4a15-7bd8-46dda015c95e" UUID_SUB="dc35a623-6a3e-f4fe-f9f7-05e102a9c7ec" LABEL="ubuntu-server:0" TYPE="linux_raid_member"
/dev/sdc: UUID="2d900913-d0a4-4a15-7bd8-46dda015c95e" UUID_SUB="7772d530-24d2-2064-29a3-9d61c0b6289e" LABEL="ubuntu-server:0" TYPE="linux_raid_member"
/dev/sda: UUID="2d900913-d0a4-4a15-7bd8-46dda015c95e" UUID_SUB="683c1101-69b1-f2c6-586b-155fbda91846" LABEL="ubuntu-server:0" TYPE="linux_raid_member"
/dev/sdf: UUID="2d900913-d0a4-4a15-7bd8-46dda015c95e" UUID_SUB="86ffe123-2c7f-f7f1-40a0-57a12982fe17" LABEL="ubuntu-server:0" TYPE="linux_raid_member"
/dev/sdg: UUID="2d900913-d0a4-4a15-7bd8-46dda015c95e" UUID_SUB="36a06a4f-c84e-0684-8997-2997a68de012" LABEL="ubuntu-server:0" TYPE="linux_raid_member"
/dev/sdh: UUID="2d900913-d0a4-4a15-7bd8-46dda015c95e" UUID_SUB="369a926d-1f63-f397-ba4e-3118ef2ecf1d" LABEL="ubuntu-server:0" TYPE="linux_raid_member"
/dev/sde: UUID="2d900913-d0a4-4a15-7bd8-46dda015c95e" UUID_SUB="4dd3f6ca-1e73-2606-ec65-c98badcd77ad" LABEL="ubuntu-server:0" TYPE="linux_raid_member"

这里可以看到这7个硬盘的UUID是一样的,说明属于同一个RAID文件系统卷,但是子卷UUID_SUB是不一样的

问题:

  1. 为什么8块盘里/dev/sdd1第四块被拆成了4份
  2. blkid里的
  3. UUID_SUB 什么意思
  4. /dev/md0p1
    1. 好像和GPT分区有关
  5. 为什么device里 /dev/md0p1 没和blkid的对应上

File System Type

auto, vfat( for FAT partition), ntfs or ntfs-3g( for NTFS partition), ext4 or ext3 or ext2 or jfs, udf or iso9660 ( for CD/DVD), swap

磁盘分区 MBR vs GPT

当服务器插入一块硬盘,如果我们想要使用该硬盘,需要先使用磁盘分区管理工具进行磁盘分区,然后格式化分区,把分区挂载到目录

上,才可以正式使用该硬盘存储文件。磁盘分区管理工具有很多,本文主要介绍fdisk,gdisk,parted,并进行比较。

判断分区是GPT还是MBR

fdisk -lgdisk -l /dev/sda都可以,下面介绍另一种

sudo parted -l
型号:TOSHIBA AL15SEB120N (scsi)                                                                                 磁盘 /dev/sdd: 1200GB
扇区大小 (逻辑/物理):512B/512B
分区表:gpt
磁盘标志:

编号  起始点  结束点  大小    文件系统        名称  标志
 1    1049kB  538MB   537MB   fat32                 启动, EFI 启动
 2    538MB   1074GB  1074GB  ext4
 3    1074GB  1143GB  68.7GB  linux-swap(v1)        交换
 4    1143GB  1200GB  57.2GB  ext4

型号:Linux 软件 RAID 数组 (md)
磁盘 /dev/md0: 8401GB
扇区大小 (逻辑/物理):512B/512B
分区表:gpt
磁盘标志:

编号  起始点  结束点  大小    文件系统  名称  标志
 1    1049kB  7147GB  7147GB  ext4
 2    7147GB  7684GB  537GB   ext4
 3    7684GB  7705GB  21.5GB  ext4
 4    7705GB  8349GB  644GB   ext4
 5    8349GB  8401GB  51.3GB  ext4

可以看出上面的普通硬盘和RAID0都是GPT。#显示Partition Table: msdos,则是MBR分区

MBR(Master Boot Record)

是传统的分区机制,应用于绝大多数使用BIOS引导的PC设备(苹果使用EFI的方式),很多Server服务器即支持BIOS也支持EFI的引导方式。MBR只支持不超过2TB的硬盘。

MBR分区分为:

  1. 主分区(一块硬盘最多只能创建4个主分区)、
  2. 扩展分区(一个扩展分区会占用一个主分区的位置)、
  3. 逻辑分区(逻辑分区是基于扩展分区创建出来的,
  4. 先有扩展分区,然后在扩展分区的基础上再创建逻辑分区;
  5. 也就是说我们要使用逻辑分区,必须先要创建扩展分区,扩展分区的空间是不能被直接使用的,
  6. 我们必须在扩展分区的基础上去建立逻辑分区,才能够被使用)。
  7. 在Linux上使用扩展分区和逻辑分区最多可以创建15个分区;

GPT(GUID Partition Table)分区

解决了MBR的很多缺点; ​1. 支持超过2TB的磁盘; ​2. 向后兼容MBR; 3. GPT分区只支持64位操作系统;

fdisk对/dev/sdb硬盘进行分区

必须先取消挂载,取消挂载后分区。不然分区结果重启后会消失,文件全没了。

sudo umount /mnt/ #挂载目录

创建一个主分区,一个扩展分区,其中扩展分区包含两个逻辑分区。

lsblk
sdb               8:16   0    1G  0 disk 
└─sdb1            8:17   0  200M  0 part 

sdb这块磁盘大小为1G。而且已有分区sdb1

# fdisk /dev/sdb
p              #打印分区表
d         #因为此磁盘只有一个分区sdb1,所以按d删除时候默认不会让选择要删除的分区,如果有多个分区会提示要删除的分区。
p        #打印分区表,再次查看分区表,发现/dev/sdb1已经被删除
Command (m for help): n                  #新建分区
Partition type:
   p   primary (0 primary, 0 extended, 4 free)             #主分区
   e   extended                                            #扩展分区
Select (default p): p                                      #选择新建主分区
Partition number (1-4, default 1):                         #主分区号,会生成/dev/sdb1
First sector (2048-2097151, default 2048):                  #开始扇区,回车默认从2048开始
Using default value 2048
Last sector, +sectors or +size{K,M,G} (2048-2097151, default 2097151): +50M     #分配主分区大小,在此为50M
Partition 1 of type Linux and of size 50 MiB is set

Command (m for help): n                    #新建分区
Partition type:
   p   primary (1 primary, 0 extended, 3 free)
   e   extended
Select (default p): e                      #选择创建扩展分区
Partition number (2-4, default 2):          #扩展分区编号,在此我们直接回车,默认为/dev/sdb2
First sector (104448-2097151, default 104448):               #默认回车,从当前扇区开始
Using default value 104448
Last sector, +sectors or +size{K,M,G} (104448-2097151, default 2097151): +500M    #分配扩展分区大小,在此为500M
Partition 2 of type Extended and of size 500 MiB is set

Command (m for help): n
Partition type:
   p   primary (1 primary, 1 extended, 2 free)
   l   logical (numbered from 5)
Select (default p): l                         #新建逻辑分区
Adding logical partition 5                    #默认逻辑分区编号为5
First sector (106496-1128447, default 106496):                 #逻辑分区起始位置
Using default value 106496
Last sector, +sectors or +size{K,M,G} (106496-1128447, default 1128447): +200M     #分配逻辑分区大小,在此为200M
Partition 5 of type Linux and of size 200 MiB is set

Command (m for help): n     
Partition type:
   p   primary (1 primary, 1 extended, 2 free)
   l   logical (numbered from 5)
Select (default p): l                   #新建第二个逻辑分区
Adding logical partition 6
First sector (518144-1128447, default 518144): 
Using default value 518144
Last sector, +sectors or +size{K,M,G} (518144-1128447, default 1128447):             #直接回车,默认分配剩余空间
Using default value 1128447
Partition 6 of type Linux and of size 298 MiB is set

Command (m for help): p
...
Disk label type: dos

   Device Boot      Start         End      Blocks   Id  System
/dev/sdb1            2048      104447       51200   83  Linux
/dev/sdb2          104448     1128447      512000    5  Extended
/dev/sdb5          106496      516095      204800   83  Linux
/dev/sdb6          518144     1128447      305152   83  Linux

#通过如上输出可知,/dev/sdb1为主分区,/dev/sdb2为扩展分区,扩展分区又包含两个逻辑分区/dev/sdb5和/dev/sdb6

Command (m for help): w            #保存分区信息并退出
[root@node5 ~]# lsblk
NAME            MAJ:MIN RM  SIZE RO TYPE MOUNTPOINT
sdb               8:16   0    1G  0 disk 
├─sdb1            8:17   0   50M  0 part 
├─sdb2            8:18   0    1K  0 part 
├─sdb5            8:21   0  200M  0 part 
└─sdb6            8:22   0  298M  0 part 

格式化分区

把/dev/sdb5格式化成ext4文件系统 [root@node5 ~]# mkfs.ext4 /dev/sdb5

挂载分区

mkdir /sdb5
mount /dev/sdb5 /sdb5

设置开机自动挂载分区

磁盘分区使用mount手动挂载之后,还需要把挂载信息写入/etc/fstab文件中,不然重启之后,需要重新挂载。

mount -a #重新加载内核

RAID - mdadm

mdadm是一个用于创建、管理、监控RAID设备的工具,它使用linux中的md驱动。mdadm程序是一个独立的程序,能完成所有软件RAID的管理功能。常见功能如下:

  1. mdadm --create device options...
  2. Create a new array from unused devices.
  3. mdadm --manage device options...
  4. make changes to an existing array.
  5. mdadm --misc options... devices
  6. report on or modify various md related devices.

配置文件

配置文件,默认是”/etc/mdadm.conf”或者是”/etc/mdadm/mdadm.conf”

> cat /etc/mdadm/mdadm.conf
ARRAY /dev/md0 metadata=1.2 name=ubuntu-server:0 UUID=2d900913:d0a44a15:7bd846dd:a015c95e
MAILADDR root

–metadata=定义组件设备上超级块的类型。对于–create,默认是0.90。

0,0.90 : 限制一个RAID中的设备数为28个,限制组件设备大小为2TB

1,1.0,1.1,1.2 :不同的子版本号标识在不同的地方存储超级块。1.0在设备的结尾,1.1在设备的开头,1.2在设备的4K处。

MAILADDR 使用monitor模式(同时也使–scan选项)时,警报事件发送到的Email地址。

sudo mdadm -Ds > /etc/mdadm/mdadm.conf

把查询出来的 RAID 信息写到 mdadm.conf 中

-s 或 --scan 扫描 RAID 设备;-D 或 --detail 查看 RAID 的详细信息

查看当前RAID

> cat /proc/mdstat
Personalities : [raid0] [linear] [multipath] [raid1] [raid6] [raid5] [raid4] [raid10]
md0 : active raid0 sdf[4] sde[3] sdh[6] sdg[5] sda[0] sdc[2] sdb[1]
      8203865600 blocks super 1.2 512k chunks

unused devices: <none>

RAID0的搭建

猜测命令

mdadm –create /dev/md0 –chunk=512 –metadata=1.2 –level=0 –raid-devices=7 /dev/sda /dev/sdb /dev/sdc /dev/sde /dev/sdf /dev/sdg /dev/sdh

说明:使用7块创建RAID0,条带大小是512KB。

创建完之后

> lsblk -l
md0     9:0    0  7.7T  0 raid0
md0p1 259:0    0  7.7T  0 md
fdisk /dev/md0 #分区
mount /dev/md0p1 /home/ #挂载
mount /dev/md0p2 /usr/ #挂载
mount /dev/md0p3 /boot/ #挂载
...
> lsblk -l
md0     9:0    0  7.7T  0 raid0
md0p1 259:0    0  6.5T  0 part  /home
md0p2 259:1    0  500G  0 part  /usr
md0p3 259:2    0   20G  0 part  /boot
md0p4 259:3    0  600G  0 part  /var
md0p5 259:4    0 47.8G  0 part  /srv

vi /etc/fstab #设置开机自动挂载

扩容,添加硬盘

增大RAID 的大小涉及按给定顺序执行下列任务:

  1. 增加所有组成 RAID 的所有分区的大小,
  2. 增加 RAID 本身的大小,
  3. 最后增加文件系统的大小。

第一步:

mdadm /dev/md0 --add /dev/sdc1

说明:给md0增加热备盘sdc1。运行cat /proc/mdstat等到 RAID 同步并一致,然后再继续下一个分区。

第二步: RAID 阵列配置将继续使用原始阵列大小,直到您强制其了解新的可用空间。您可以为 RAID 指定大小或使用最大可用空间。

查看大小

sudo mdadm -D /dev/md0 | grep -e "Array Size" -e "Dev Size"

将RAID大小增加到最大可用大小

sudo mdadm --grow /dev/md0 -z max

第三步: 不确定

更改 Ext2、Ext3 或 Ext4 文件系统的大小(先查看md0分区大小)

先fdisk删除part1分区,新建同名(同分区标号)的分区,First cylinder起始点相同,通过改变终点为最大值来扩容。

将文件系统大小扩展为名为 /dev/md0 的设备的最大可用大小,请输入

> sudo resize2fs /dev/md0p1
resize2fs 1.45.5 (07-Jan-2020)
文件系统已经为 1744830464 个块(每块 4k)。无需进一步处理!

如果未指定大小参数,大小将默认为该分区的大小。

loop机制

Loop设备是一种块设备,但是它并不指向硬盘或者光驱,而是指向一个文件块或者另一种块设备。

回环设备( 'loopback device')允许用户以一个普通磁盘文件虚拟一个块设备。设想一个磁盘设备,对它的所有读写操作都将被重定向到读写一个名为 disk-image 的普通文件而非操作实际磁盘或分区的轨道和扇区。(当然,disk-image 必须存在于一个实际的磁盘上,而这个磁盘必须比虚拟的磁盘容量更大。)回环设备允许你这样使用一个普通文件。

应用

将一个Loop设备指向一个文件系统文件,比如iso文件,紧接着就可以通过mount挂载该loop设备到主文件系统的一个目录下了,我们就可以正常访问该镜像中的内容,就像访问一个文件系统一样。

简单使用

losetup -a列出已使用的。

loop设备映射或者指向一个文件:

# 创建一个文件
dd if=/dev/zeroof=/var/loop.img bs=1M count=10240
# 使用losetup将文件转化为块设备,获得了一个磁盘
losetup /dev/loop0 /var/loop.img
# 在磁盘上构建文件系统
# 挂载
mkdir /myloopdev
mount /dev/loop0 /myloopdev
# 正常使用
# 卸载该磁盘
umount /myloopdev
# 接着删除该loop设备,
losetup –d  /dev/loop0

mount 硬盘

实际操作

物理挂盘

注意,推进插入的时候把卡扣打开

命令行处理

fdisk -l # 看不见新盘
lsblk # 也看不见
sudo reboot # 重启

还是找不到? 还是8块。

猜测:盘坏了吗?

额外找了其他类型的盘,还有160GB的固态插上。确实是四块坏盘。换了借口也无法识别。

sudo shutdown -h now # 热拔插还是有风险

总算整了5块

sdi         8:128  0 931.5G  0 disk  
└─sdi1      8:129  0 931.5G  0 part  
sdj         8:144  0 149.1G  0 disk  
├─sdj1      8:145  0   512M  0 part  
└─sdj2      8:146  0 148.6G  0 part  
sdk         8:160  0   1.8T  0 disk  
└─sdk1      8:161  0   1.8T  0 part  
sdl         8:176  0   1.8T  0 disk  
└─sdl1      8:177  0   1.8T  0 part  
sdm         8:192  0   1.8T  0 disk  
└─sdm1      8:193  0   1.8T  0 part 

尝试一: RAID0扩容

那sdk为例。

> sudo fdisk /dev/sdk #d 删除分区
> sudo mdadm /dev/md0 --add /dev/sdk
mdadm: add new device failed for /dev/sdk as 7: Invalid argument
# 没分区的结构

尝试分区后add分区

> sudo mdadm /dev/md0 --add /dev/sdk1
mdadm: add new device failed for /dev/sdk1 as 7: Invalid argument

第二种

mdadm --grow /dev/md0 --level=0 --raid-devices=8 --add /dev/sdk

理论上这样的,但是要reshape,而且和dev.raid.speed_limit_max速度有关。我不确定会不会丢失资料,所以没尝试。

所以没有扩容

尝试二: 普通挂载

先格式化各个分区

> blkid -o list                                                            
/dev/sdi1                                                                    ext4                                 (not mounted)                                                            
/dev/sdl1                                                                    LVM2_member                          (not mounted)                                                            
/dev/sdm1                                                                    LVM2_member                          (not mounted)                                                               
/dev/sdk1                                                                    LVM2_member                          (not mounted)   

sdi/l/m/k 全部格式化为ext4。blkid -o list不是实时的。挂载后通过df -Th查看

sudo mkfs.ext4 /dev/sdk1     
sudo mount /dev/sdk1 /addDisk/DiskNo4

修改权限,大家都可以访问(直接777算了

sudo chmod -R ogu+r+w+X /addDisk

配置开机启动,blkid -o list 获得uuid

/dev/sdk1                                                                    ext4                                 (not mounted)                                                                    ac862e68-9c6f-424a-b4ec-e44e62f7a330
/dev/sdj1                                                                    ext4                                 (not mounted)                                                                    8258b393-2e8e-41d1-9b84-0a7f88986443
/dev/sdl1                                                                    ext4                                 (not mounted)                                                                    5c2e1324-ecc5-40dd-a668-4ec682065d9f
/dev/sdi1                                                                    ext4                                 (not mounted)                                                                    0ae289c5-51f7-4ef2-a07c-6ec8d123e065

修改/etc/fstab

# /addDisk/DiskNo1 was on /dev/sdi1 during curtin installation  
/dev/disk/by-uuid/0ae289c5-51f7-4ef2-a07c-6ec8d123e065 /addDisk/DiskNo1 ext4 defaults 0 0
# /addDisk/DiskNo2 was on /dev/sdl1 during curtin installation  
/dev/disk/by-uuid/5c2e1324-ecc5-40dd-a668-4ec682065d9f /addDisk/DiskNo2 ext4 defaults 0 0
# /addDisk/DiskNo3 was on /dev/sdj1 during curtin installation  
/dev/disk/by-uuid/8258b393-2e8e-41d1-9b84-0a7f88986443 /addDisk/DiskNo3 ext4 defaults 0 0
# /addDisk/DiskNo4 was on /dev/sdk1 during curtin installation  
/dev/disk/by-uuid/ac862e68-9c6f-424a-b4ec-e44e62f7a330 /addDisk/DiskNo4 ext4 defaults 0 0

COW 文件系统

USB启动的系统,会挂载在COPY-ON-WRITE

ubuntu@ubuntu:/dev$ df -lh
Filesystem      Size  Used Avail Use% Mounted on
udev            126G     0  126G   0% /dev
tmpfs            26G  3.0M   26G   1% /run
/dev/sdc1        29G  2.1G   27G   8% /cdrom -- USB启动的设备
/dev/loop0      2.0G  2.0G     0 100% /rofs
/cow            126G  209M  126G   1% /

需要进一步的研究学习

  1. 查找未挂载的盘 lsblk
  2. 判断硬盘好坏,是否坏道
  3. 检测坏块sudo badblocks -v /dev/sda > badsectors.txt
  4. 综合评价sudo smartctl -H /dev/sda10
  5. 格式化硬盘
  6. 挂载新分区
  7. 查看已有盘挂载的分区
  8. 如何挂载已有分区

遇到的问题

暂无

开题缘由、总结、反思、吐槽~~

参考文献

https://forum.ubuntu.org.cn/viewtopic.php?t=487421

https://bbs.huaweicloud.com/blogs/197847

https://blog.csdn.net/dangelzjj/article/details/104200396

https://www.cnblogs.com/renshengdezheli/p/13941563.html

https://linux.cn/article-7961-1.html

NUMA perf

简介

NUMA使用的目的是为了每个进程能使用local内存来实现高性能。但是假如某进程的local内存提前用完了,会导致无法使用其他进程的内存,反而需要SWAP的问题。(一般小例子遇不到)

https://blog.51cto.com/quantfabric/2594323

https://www.cnblogs.com/machangwei-8/p/10402644.html

NUMA的内存分配策略

  1. 缺省(default):总是在本地节点分配(分配在当前进程运行的节点上);
  2. 绑定(bind):强制分配到指定节点上;
  3. 交叉(interleave):在所有节点或者指定的节点上交织分配;
  4. 优先(preferred):在指定节点上分配,失败则在其他节点上分配。

因为NUMA默认的内存分配策略是优先在进程所在CPU的本地内存中分配,会导致CPU节点之间内存分配不均衡,当某个CPU节点的内存不足时,会导致swap产生,而不是从远程节点分配内存。这就是所谓的swap insanity 现象。

$ numactl --hardware
available: 2 nodes (0-1)
node 0 cpus: 0 1 2 3 4 5 6 7 8 9 10 11 12 13 14 15 32 33 34 35 36 37 38 39 40 41 42 43 44 45 46 47
node 0 size: 64076 MB
node 0 free: 23497 MB
node 1 cpus: 16 17 18 19 20 21 22 23 24 25 26 27 28 29 30 31 48 49 50 51 52 53 54 55 56 57 58 59 60 61 62 63
node 1 size: 64503 MB
node 1 free: 37897 MB
node distances:
node   0   1
  0:  10  21
  1:  21  10

# shaojiemike @ node5 in ~/github/IPCC2022-preliminary/run on git:main o [10:41:54]
$ numactl --show
policy: default
preferred node: current
physcpubind: 0 1 2 3 4 5 6 7 8 9 10 11 12 13 14 15 16 17 18 19 20 21 22 23 24 25 26 27 28 29 30 31 32 33 34 35 36 37 38 39 40 41 42 43 44 45 46 47 48 49 50 51 52 53 54 55 56 57 58 59 60 61 62 63
cpubind: 0 1
nodebind: 0 1
membind: 0 1

常见命令

# 遇到内存不够时
numactl –interleave=all ./exe

# 使用local内存(默认的)
numactl --localalloc ./exe

查看程序的内存的 NUMA情况

在Linux系统上,可以通过以下常用方法来查看和分析程序的NUMA(非统一内存访问)情况:

numastat:查看进程和每个NUMA节点的内存分配和访问统计。
numactl: 查看进程NUMA policy和分配策略,可以手动设置策略。
numa_maps:查看进程在每个NUMA节点上的内存映射情况。
mpstat -P ALL:查看每个CPU核心的统计信息。
pidstat -t:查看进程在每个CPU上的执行时间。
perf stat:统计程序在不同CPU上周期数,检查是否均衡。
likwid-perfctr: 细粒度检测程序在不同内存节点的带宽和延迟。
VTune: Intel的性能分析工具,可以检测NUMA的影响。
代码插桩:统计程序对不同节点内存的访问。
numactl --hardware :查看系统NUMA拓扑结构。

通过综合使用这些工具,可以全面分析程序的NUMA性能,例如内存分布不均,访问模式导致的不均衡等,然后进行针对优化。

c++ malloc时能手动设置 内存位置

  1. libnuma: 直接调用libnuma提供的numa_alloc_onnode()numa_free()等API,在指定节点上分配释放内存。
  2. mmap

需要进一步的研究学习

暂无

遇到的问题

暂无

开题缘由、总结、反思、吐槽~~

参考文献

VtuneOptimize

vtune的安装和profile

使用

由于snode0有sudo

source /opt/intel/oneapi/setvars.sh
sudo vtune-gui

sudo后图形化界面 MobaXterm打不开的原因参考这个

Step1 : Performance Snapshot 参数说明

以IPCC2022 初赛 支撑点计算的baseline为例

Logical Core Utilization

Effective Logical Core Utilization: 3.8% (2.436 out of 64)
    Effective Physical Core Utilization: 6.4% (2.053 out of 32)

CPU利用率主要是指计算有效占比。为100%意味着所有逻辑CPU都是由应用程序的计算占用。

Microarchitecture Usage

微架构使用指标是一个关键指标,可以帮助评估(以%为单位)你的代码在当前微架构上运行的效率。

微架构的使用可能会受到

  1. long-latency memory长延迟访存、
  2. floating-point, or SIMD operations浮点或SIMD操作的影响;
  3. non-retired instructions due to branch mispredictions;由于分支错误预测导致的未退役指令;
  4. instruction starvation in the front-end.前端指令不足。

vtune的建议

Microarchitecture Usage: 37.7% of Pipeline Slots
    Retiring: 37.7%
    Front-End Bound: 16.9%
    Back-End Bound: 23.8%
    Memory Bound: 11.9%
    Core Bound: 11.9%
    Bad Speculation: 21.5%

针对Back-End Bound: 23.8%的建议如下:

A significant portion of pipeline slots are remaining empty. (??? 他是指有23.8% empty还是被使用了呢)

When operations take too long in the back-end, they introduce bubbles in the pipeline that ultimately cause fewer pipeline slots containing useful work to be retired per cycle than the machine is capable to support.

This opportunity cost results in slower execution.

  1. Long-latency operations like divides and memory operations can cause this,
  2. as can too many operations being directed to a single execution port (for example, more multiply operations arriving in the back-end per cycle than the execution unit can support).

针对Bad Speculation: 21.5%的建议如下:

A significant proportion of pipeline slots containing 21.5% useful work are being cancelled.

This can be caused by mispredicting branches or by machine clears. Note that this metric value may be highlighted due to Branch Resteers issue.

Retiring metric

Retiring metric represents a Pipeline Slots fraction utilized by useful work, meaning the issued uOps that eventually get retired. Retiring metric 表示有用工作所使用的Pipeline slot流水线管道的比例,所有发射的uOps最终都会retired。

Ideally, all Pipeline Slots would be attributed to the Retiring category. 理想情况下,所有的管道槽都应该归于退休类别。

Retiring of 100% would indicate the maximum possible number of uOps retired per cycle has been achieved. 100%的退役表明每个周期内退役的uop数量达到了可能的最大值。

Maximizing Retiring typically increases the Instruction-Per-Cycle metric. 最大化Retiring通常会增加IPC。

Note that a high Retiring value does not necessary mean no more room for performance improvement. For example, Microcode assists are categorized under Retiring. They hurt performance and can often be avoided.

Microcode assists根据Intel的解释是

当遇到特殊的计算(比如处理非常小的浮点值(所谓的逆法线)时),浮点单元并没有被设置为本机执行这些操作。为此需要在指令流中插入可能有数百个指令长的小程序,对性能会造成很大的影响。

Front-End Bound

Front-End Bound metric represents a slots fraction where the processor's Front-End undersupplies its Back-End. 该指标表示前端产生的指令是否足以支持后端处理。

Front-End denotes the first part of the processor core responsible for fetching operations that are executed later on by the Back-End part. 前端将指令分解成uops供后端处理。

Within the Front-End, a branch predictor predicts the next address to fetch, cache-lines are fetched from the memory subsystem, parsed into instructions, and lastly decoded into micro-ops (uOps). 在前端中,分支预测器预测下一个要获取的地址,缓存行从内存子系统中获取,解析为指令,最后解码为微操作(uOps)。

Front-End Bound metric denotes unutilized issue-slots when there is no Back-End stall (bubbles where Front-End delivered no uOps while Back-End could have accepted them). For example, stalls due to instruction-cache misses would be categorized as Front-End Bound

Front-End Bound指标表示当后端没有停顿时未使用的发射槽(bubbles: 前端没有交付uOps,而发射给后端的)。例如,由于指令缓存未命中而导致的暂停将被归类为Front-End Bound

Back-End Bound

metric represents a Pipeline Slots fraction where no uOps are being delivered due to a lack of required resources for accepting new uOps in the Back-End. 该指标表示后端uops是否出现了因为硬件资源紧张而无法处理的问题。

Back-End is the portion of the processor core where an out-of-order scheduler dispatches ready uOps into their respective execution units, and, once completed, these uOps get retired according to the program order. 后端的乱序执行,顺序Reire模型。

For example, stalls due to data-cache misses or stalls due to the divider unit(除法器?) being overloaded are both categorized as Back-End Bound. Back-End Bound is further divided into two main categories: Memory Bound and Core Bound.

Memory Bound

This metric shows how memory subsystem issues affect the performance. Memory Bound measures a fraction of slots where pipeline could be stalled due to demand load or store instructions. This accounts mainly for incomplete in-flight memory demand loads that coincide with execution starvation in addition to less common cases where stores could imply back-pressure on the pipeline.

Core Bound

This metric represents how much Core non-memory issues were of a bottleneck. 表明核心的非内存原因成为了瓶颈

  1. Shortage in hardware compute resources, 硬件资源的短缺
  2. or dependencies software's instructions are both categorized under Core Bound. 指令间的依赖

Hence it may indicate

  1. the machine ran out of an OOO resources,
  2. certain execution units are overloaded
  3. or dependencies in program's data- or instruction- flow are limiting the performance (e.g. FP-chained long-latency arithmetic operations).

Bad Speculation(分支预测错误)

represents a Pipeline Slots fraction wasted due to incorrect speculations.

This includes slots used to issue uOps that do not eventually get retired and slots for which the issue-pipeline was blocked due to recovery from an earlier incorrect speculation.

For example, wasted work due to mispredicted branches is categorized as a Bad Speculation category. Incorrect data speculation followed by Memory Ordering Nukes is another example.

这里的Nukes, 猜测是数据预取预测错误,带来的访存影响像核爆一样大吧.

Memory Bound

Memory Bound: 11.9% of Pipeline Slots
    L1 Bound: 7.9%
    L2 Bound: 0.2%
    L3 Bound: 2.5%
    DRAM Bound: 2.0%
    Store Bound: 0.3%
    NUMA: % of Remote Accesses: 13.2%

This metric shows how memory subsystem issues affect the performance. Memory Bound measures a fraction of slots where pipeline could be stalled due to demand load or store instructions. 该项表明了有多少流水线的slots因为load或者store指令的需求而被迫等待

This accounts mainly for incomplete in-flight memory demand loads that coincide with execution starvation 这是指不连续访存吗?

in addition to less common cases where stores could imply back-pressure on the pipeline.

L1 Bound

This metric shows how often machine was stalled without missing the L1 data cache. 在不发生L1 miss的情况下,指令stall的频率。(因为其他原因导致stall?)

The L1 cache typically has the shortest latency. However, in certain cases like loads blocked on older stores, a load might suffer a high latency even though it is being satisfied by the L1. 假设load了一个刚store的值,load指令也会遇到很大的延迟。

L2 Bound

This metric shows how often machine was stalled on L2 cache. Avoiding cache misses (L1 misses/L2 hits) will improve the latency and increase performance.

L3 Bound

This metric shows how often CPU was stalled on L3 cache, or contended with a sibling Core(与兄弟姐妹核竞争). Avoiding cache misses (L2 misses/L3 hits) improves the latency and increases performance.

DRAM Bound

This metric shows how often CPU was stalled on the main memory (DRAM). Caching typically improves the latency and increases performance.

DRAM Bandwidth Bound

This metric represents percentage of elapsed time the system spent with high DRAM bandwidth utilization. Since this metric relies on the accurate peak system DRAM bandwidth measurement, explore the Bandwidth Utilization Histogram and make sure the Low/Medium/High utilization thresholds are correct for your system. You can manually adjust them, if required.

Store Bound

This metric shows how often CPU was stalled on store operations. Even though memory store accesses do not typically stall out-of-order CPUs; there are few cases where stores can lead to actual stalls.

NUMA: % of Remote Accesses

In NUMA (non-uniform memory architecture) machines, memory requests missing LLC may be serviced either by local or remote DRAM. Memory requests to remote DRAM incur much greater latencies than those to local DRAM. It is recommended to keep as much frequently accessed data local as possible. This metric shows percent of remote accesses, the lower the better.

可以用之前的

Vectorization

This metric represents the percentage of packed (vectorized) floating point operations. 0% means that the code is fully scalar. The metric does not take into account the actual vector length that was used by the code for vector instructions. So if the code is fully vectorized and uses a legacy instruction set that loaded only half a vector length, the Vectorization metric shows 100%.

Vectorization: 23.7% of Packed FP Operations
    Instruction Mix: 
    SP FLOPs: 0.9%
    Packed: 99.9%
    128-bit: 0.1%
    256-bit: 99.8%
    512-bit: 0.0%
    Scalar: 0.1%
    DP FLOPs: 2.9%
    Packed: 0.0%
    Scalar: 100.0%
    x87 FLOPs: 0.0%
    Non-FP: 96.2%
    FP Arith/Mem Rd Instr. Ratio: 0.091
    FP Arith/Mem Wr Instr. Ratio: 0.308

针对Vectorization: 23.7%的建议

A significant fraction of floating point arithmetic instructions are scalar. Use Intel Advisor to see possible reasons why the code was not vectorized.

SP FLOPs

The metric represents the percentage of single precision floating point operations from all operations executed by the applications. Use the metric for rough estimation of a SP FLOP fraction. If FMA vector instructions are used the metric may overcount.

X87 FLOPs

The metric represents the percentage of x87 floating point operations from all operations executed by the applications. Use the metric for rough estimation of an x87 fraction. If FMA vector instructions are used the metric may overcount.

X87是X86体系结构指令集的浮点相关子集。 它起源于8086指令的扩展,以可选的浮点协处理器的形式与相应的x86 cpus配合使用。 这些微芯片的名称在“ 87”中结尾。

FP Arith/Mem Rd Instr. Ratio

This metric represents the ratio between arithmetic floating point instructions and memory write instructions. A value less than 0.5 indicates unaligned data access for vector operations, which can negatively impact the performance of vector instruction execution.

小于0.5的值表示向量操作的未对齐数据访问,这可能会对矢量指令执行的性能产生负面影响。

Step2 : Hotspots

User-Mode Sampling只能采集单核的数据,来分析算法的优化。

Hardware Event-Based Sampling硬件时间采集能采集全部核心,但是要少于几秒钟?

这个硬件采集慢,而且到一半报错了,发生什么事了?

网上说是root权限的原因,但是我是用root运行的

反而用普通用户能正常跑Hardware Event-Based Sampling和微架构分析

example

手动向量化该区域。

核心时间是 \(k*n^2\) 次绝对值和,取最大值

优化思路:

  1. 手动向量化(假设一次处理p个)

    第一个n层取出 k个 rebuilt[i*k+ki] 重复读取到向量寄存器里,

    第二个n层取出k 个 连续的p个,到向量寄存器里。最后不足补0特殊处理,但是一般n都是4的倍数,可能可以不处理。8就要处理了。

    做向量fabs的结果缓存在k个向量寄存器里。

    再对这个k个向量寄存器做横向的向量最大值操作到一个向量寄存器。不足的补0(取最大值不影响)

    最后这一个向量寄存器做寄存器内求和,再加到 chebyshevSum 里.

    这样就实现了p个元素的向量操作。这样一趟共需要3*k个向量寄存器。

  2. 手动数据预取

  3. __builtin_prefetch()
  4. 手动循环展开形成计算访存流水
  5. 怎么根据输入来规模来展开?
  6. 分块

访存分析

github对应项目与赛题

HPL-PL

复现机器

$ lscpu
Architecture:                    x86_64
CPU op-mode(s):                  32-bit, 64-bit
Byte Order:                      Little Endian
Address sizes:                   46 bits physical, 48 bits virtual
CPU(s):                          36
On-line CPU(s) list:             0-35
Thread(s) per core:              1
Core(s) per socket:              18
Socket(s):                       2
NUMA node(s):                    2
Vendor ID:                       GenuineIntel
CPU family:                      6
Model:                           79
Model name:                      Intel(R) Xeon(R) CPU E5-2695 v4 @ 2.10GHz
Stepping:                        1
CPU MHz:                         1296.157
CPU max MHz:                     3300.0000
CPU min MHz:                     1200.0000
BogoMIPS:                        4199.98
Virtualization:                  VT-x
L1d cache:                       1.1 MiB
L1i cache:                       1.1 MiB
L2 cache:                        9 MiB
L3 cache:                        90 MiB

baseline

$ gcc --version
gcc (Ubuntu 9.4.0-1ubuntu1~20.04.1) 9.4.0
$ gcc -std=c11 conway.c -o Conway
$ ./Conway
……
Iter 997...
Iter 998...
Iter 999...
136527.433000 ms

优化步骤

由于O3和并行会导致热点代码不可读

在可迭代优化的例子下,根据vtune最大化单核性能。

很明显不是计算密集的应用,怎么形成流水最大化带宽利用,划分重复利用元素提高Cache命中率是重点(向量化对计算加速明显)

  1. 替换if tmp[i][j] = (!(cnt^3))||((a[i][j]&1)&&(!(cnt^4)));
  2. 去除中间不必要的拷贝
  3. int 变 char
  4. OMP_PROC_BIND=true 绑定线程到对应local处理器和对应local内存

需要进一步的研究学习

暂无

遇到的问题

暂无

开题缘由、总结、反思、吐槽~~

  1. 实验室同学黄业琦参加了HPC-PL全明星。想复现一下效果
  2. 之前Nvidia Nsight用得很爽, 想到vtune的访存优化部分和汇编对应的分析,使用的很少。想从提高计算流水和访存连续流水的角度结合vtune优化。

参考文献

Optimization Outline

Sun's 常见超线性加速的情况

http://www.cs.iit.edu/%7Esun/cs546.html#materials

https://annals-csis.org/Volume_8/pliks/498.pdf

Superlinear Speedup in HPC Systems: why and when?

  1. Cache size increased 多核的cache总size增加
  2. 在大多数的并行计算系统中,每个处理器都有少量的高速缓存,当某一问题执行在大量的处理器上,而所需要的数据都放在高速缓存中时,由于数据的复用,总的计算时间趋于减少,如果由于这种高速缓存效应补偿了由于通信造成的额外开销,就有可能造成超线性加速比。
  3. Overhead reduced 锁减少,粒度变小
  4. Latency hidden 数据预取更多了
  5. Randomized algorithms
  6. 在某些并行搜索算法中,允许不同的处理器在不同的分支方向上同时搜索,当某一处理器一旦迅速的找到了解,它就向其余的处理器发出中止搜索的信号,这就会提前取消那些在串行算法中所做的无谓的搜索分枝,从而出现超线性加速比现象
  7. Mathematical inefficiency of the serial algorithm 改并行算法
  8. Higher memory consumption access cost for in sequantial processing

应用优化前提

  1. 迭代进行 :分析程序最大热点(perf,vtune工具)->优化该热点—>分析程序最大热点->……
  2. 自顶向下分析优化程序热点的思路

    1. 全局算法的调研、理解、总体设计改进
    2. 程序任务划分,并行各部分模块
    3. 仔细分析热点的kernel循环
  3. 基本了解物理数学背景公式

  4. 阅读代码,明白实现
  5. 从main函数开始看的都是大撒比,没错,说的就是我
  6. 带着问题看,才能快速抓住重点
  7. 建议串行直接用vtune判断算法热点和时间
  8. 粗略判断热点
  9. 加入各部分热点的时间输出 (必需的:积极的正向反馈,会提高积极性和理清思路)
  10. 寻找合适的大例子
#include <omp.h>
itime = omp_get_wtime();
printf("\nTime taken is %f",omp_get_wtime()-itime);
  1. 运行n次求得平均值; 或者对不同大小的例子在不同参数下的效果拉图对比
  2. 单机不同数量多核,同机器的不同编译器,不同核心kernel/CPU
  3. warmup=10 loop=50 先热身10次,然后循环10次
./SLIC_0805_3 |tee 3.log && ./SLIC_0805_3 |tee 3.log && ./SLIC_0805_3 |tee 3.log

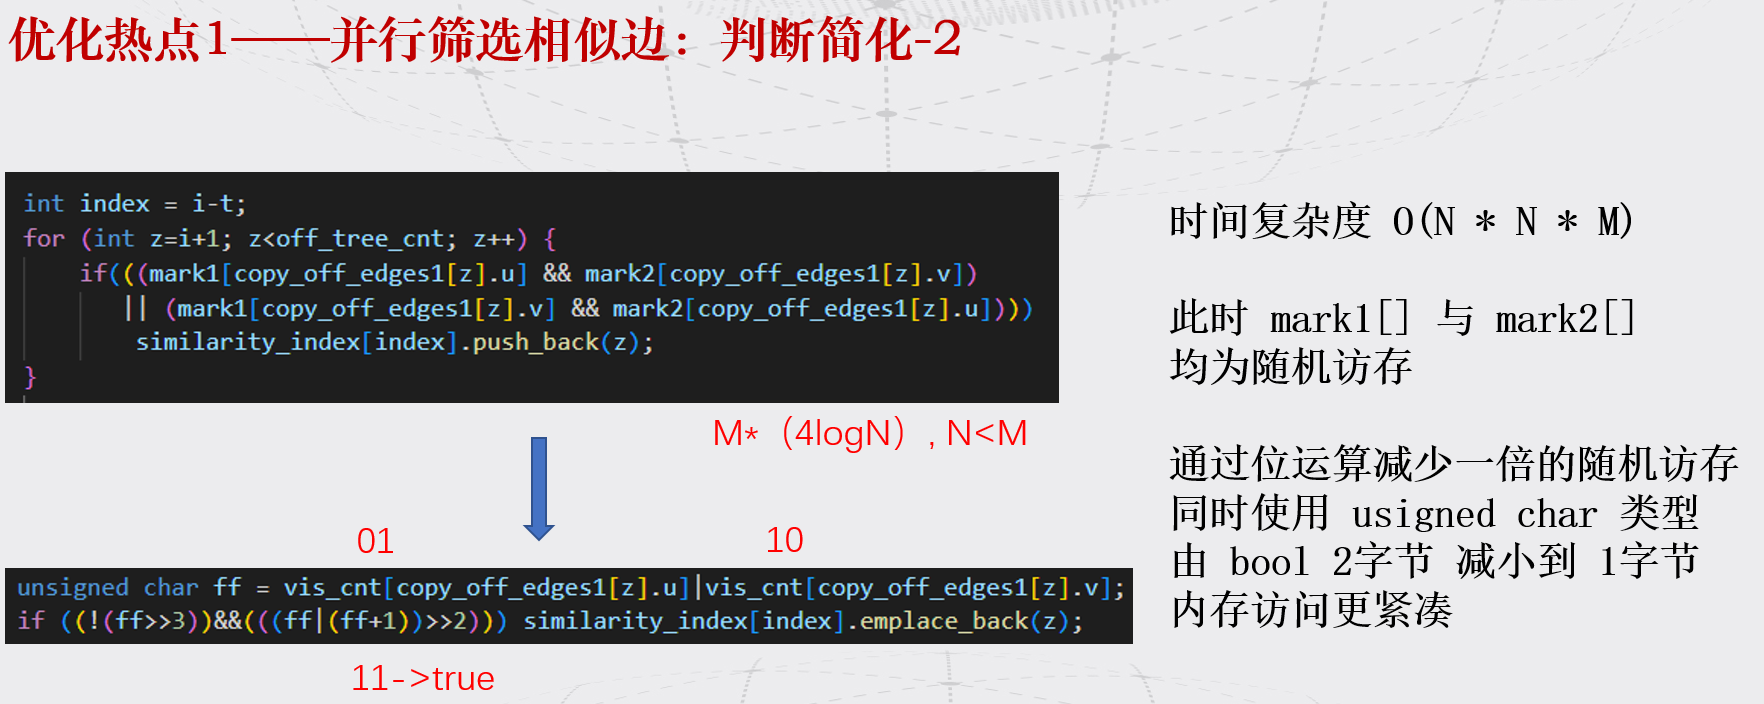
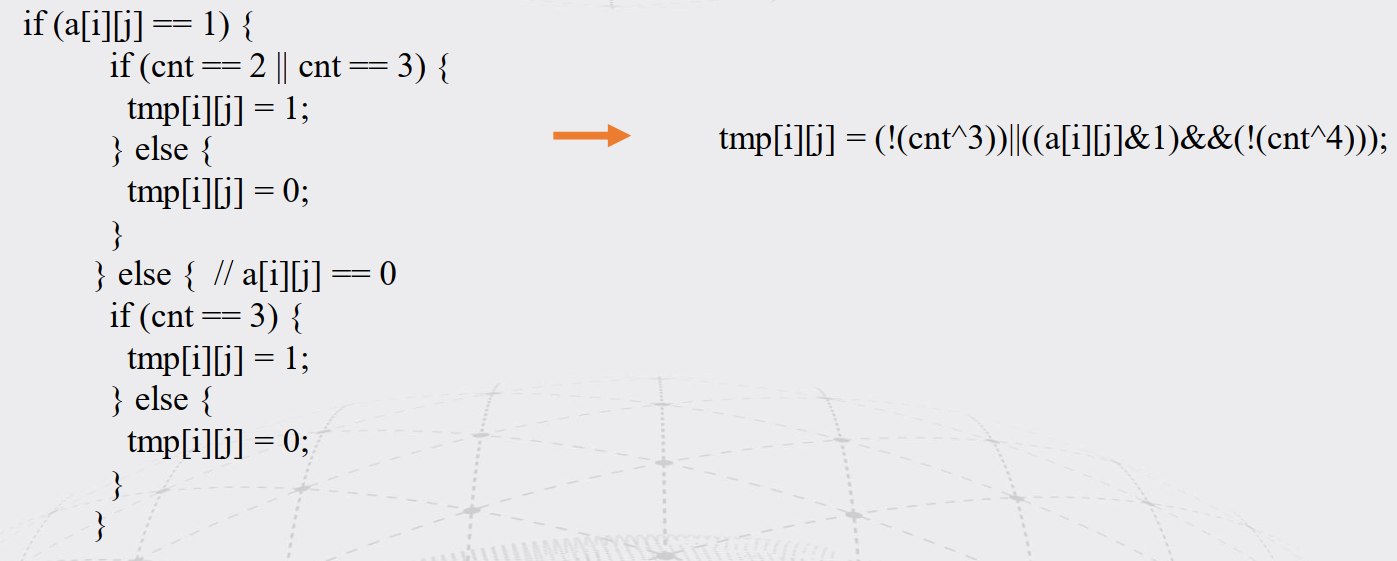
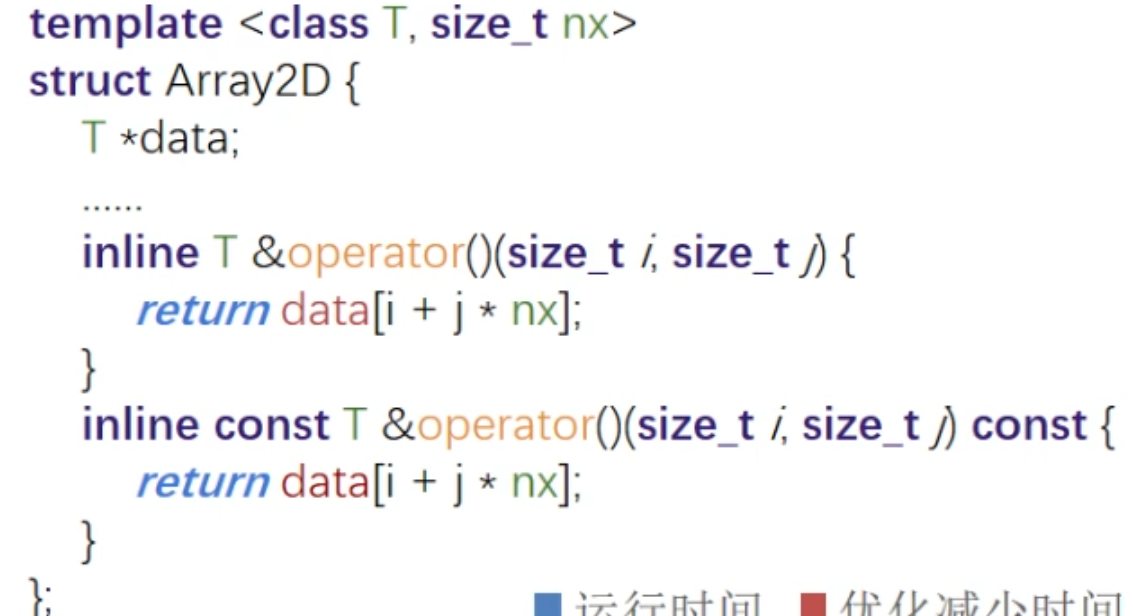
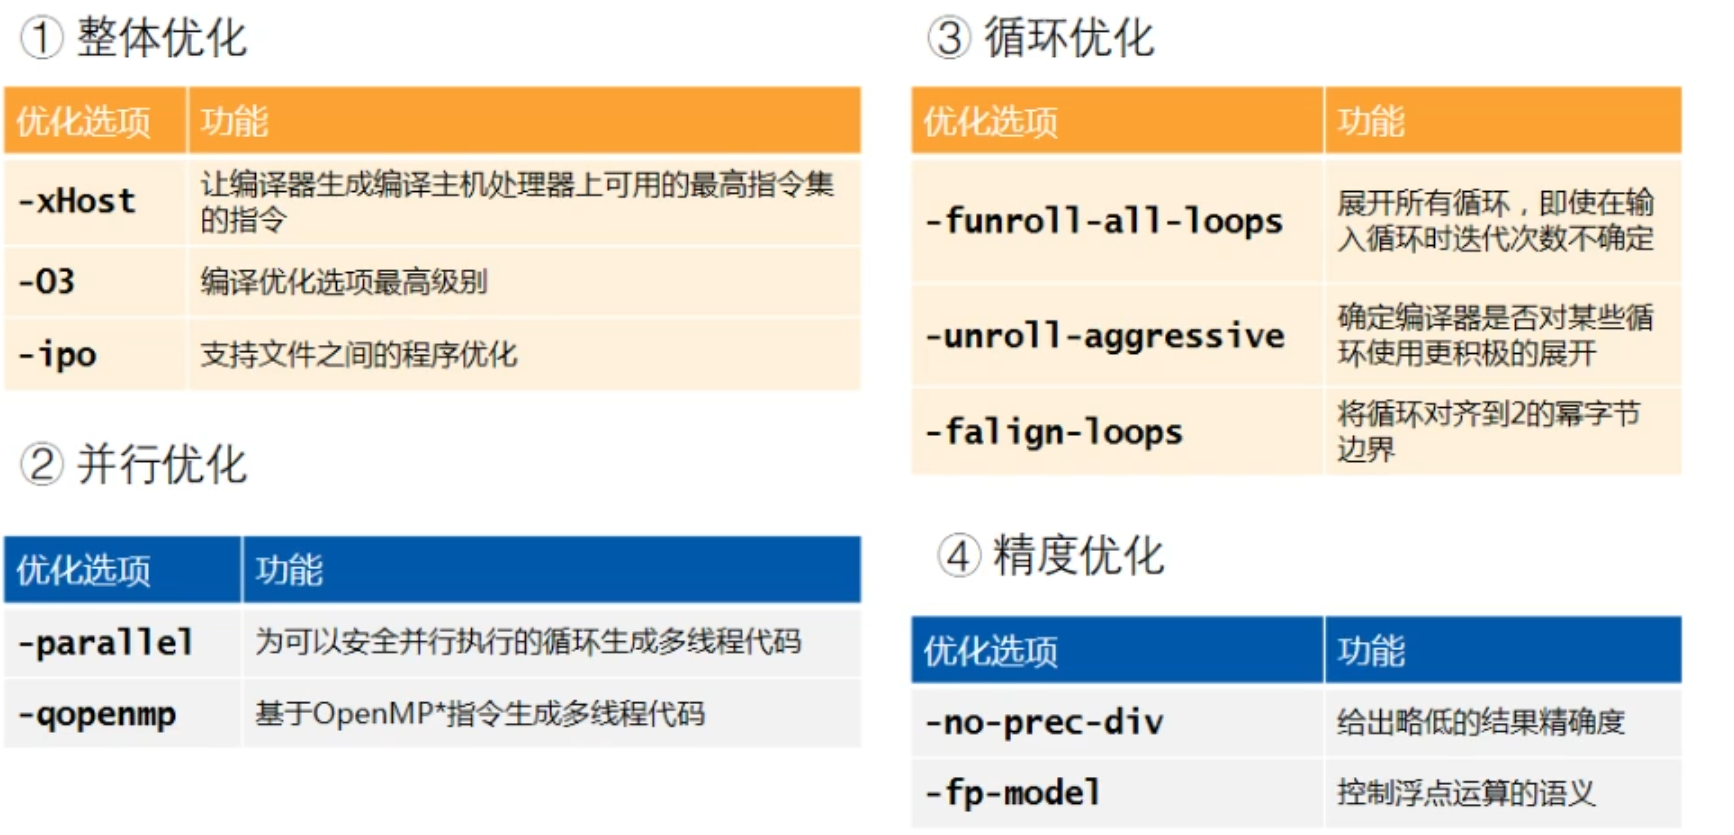
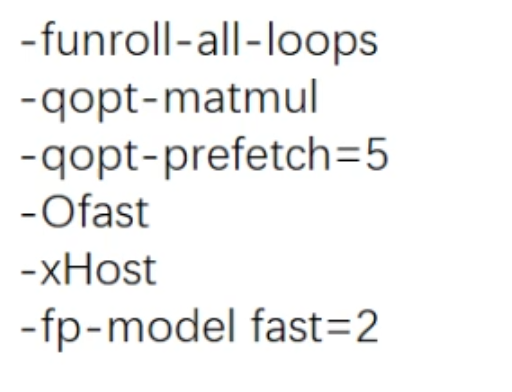
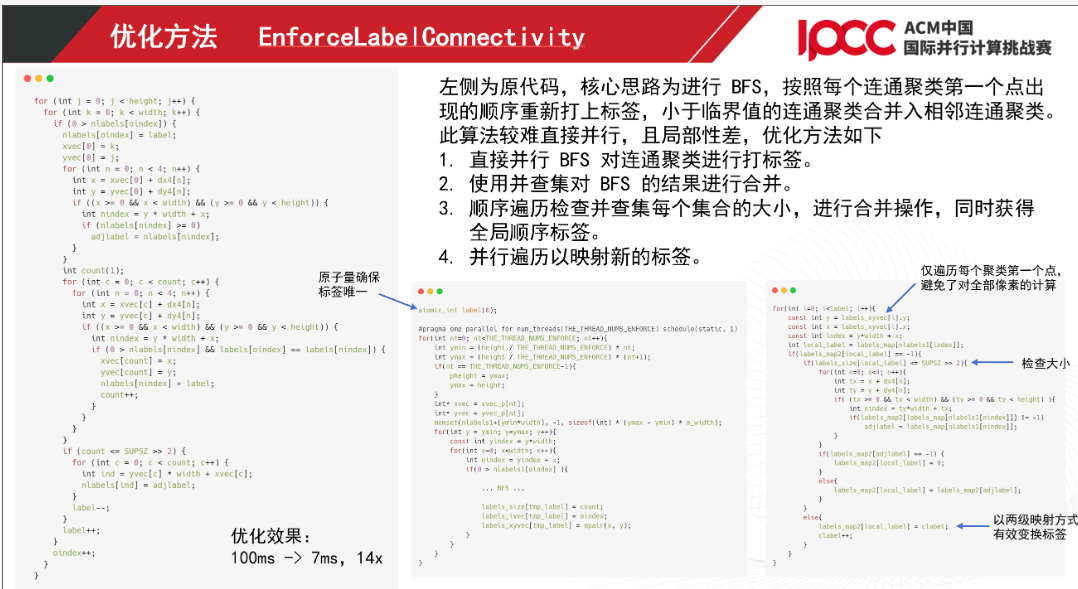
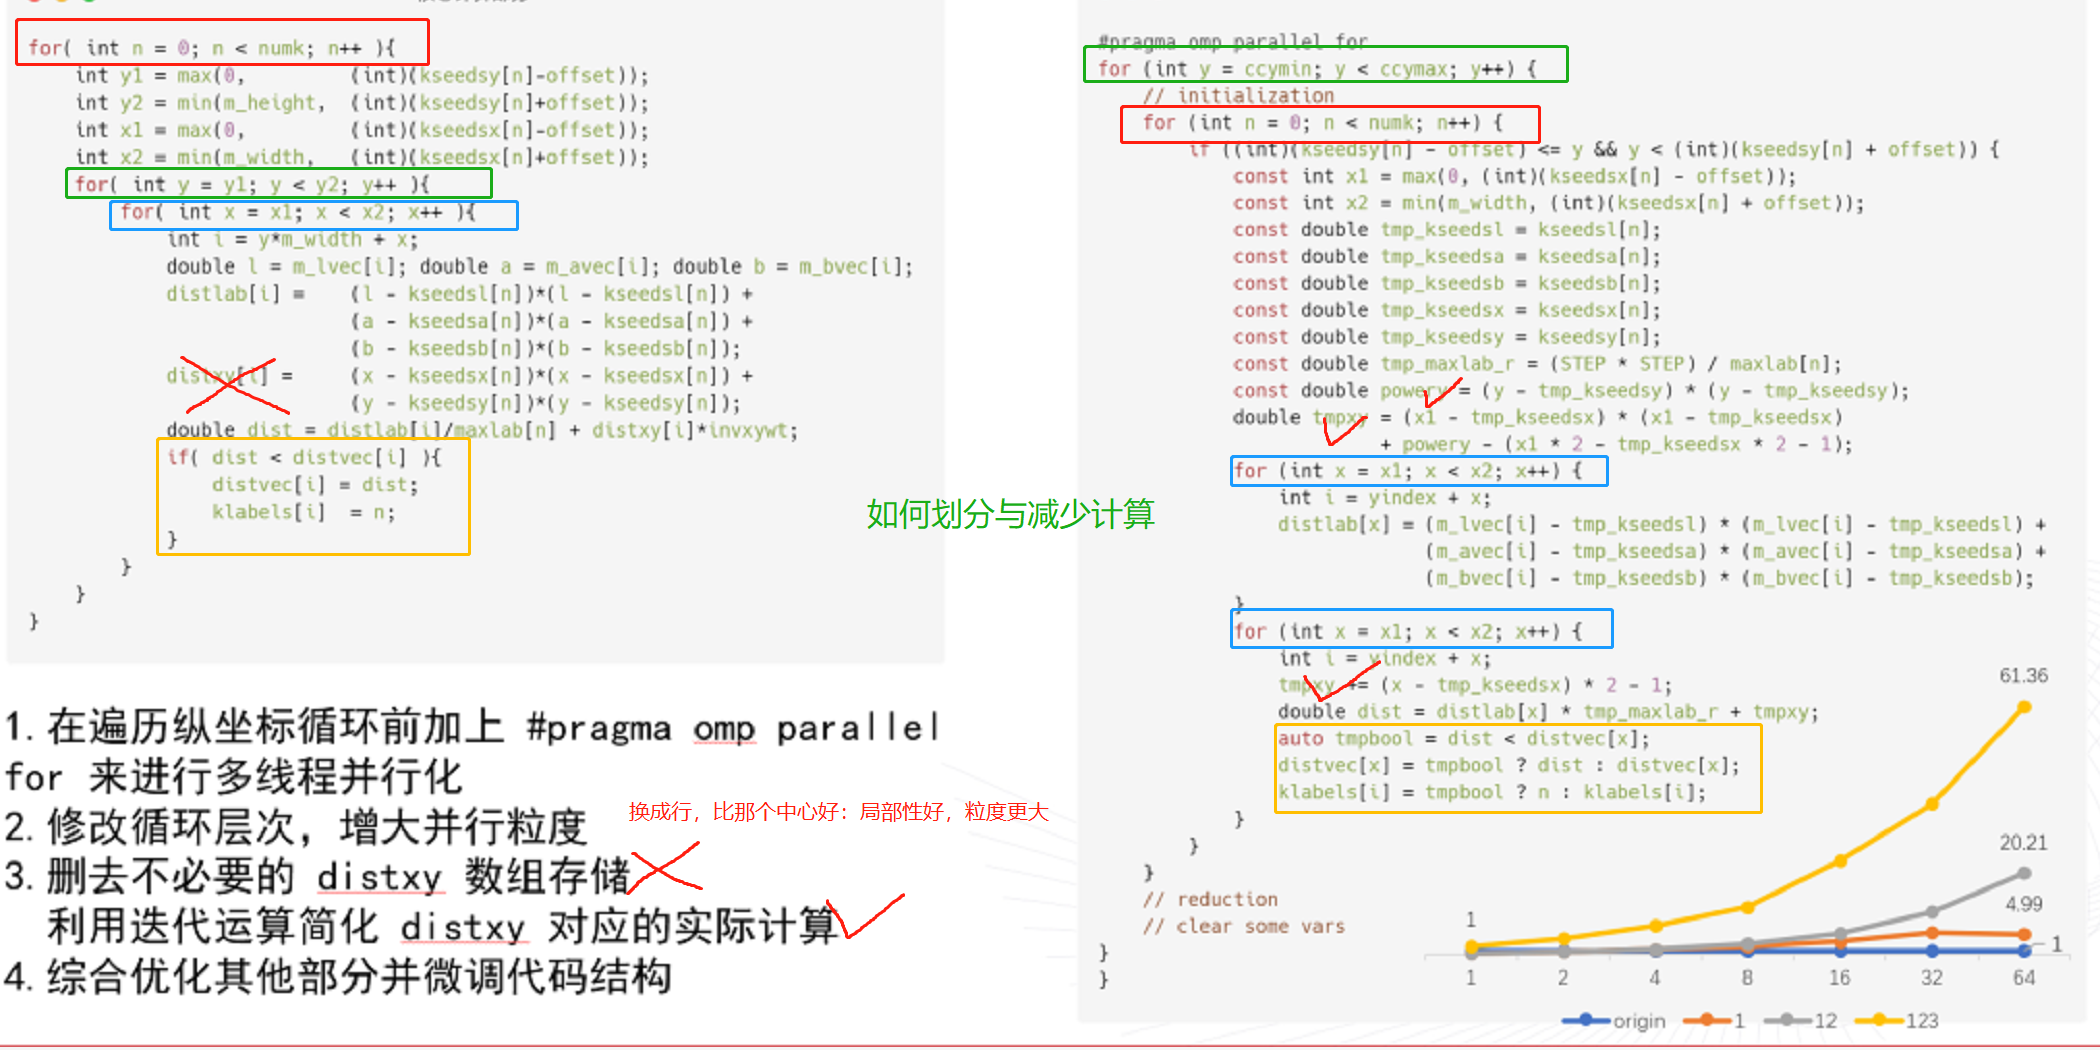
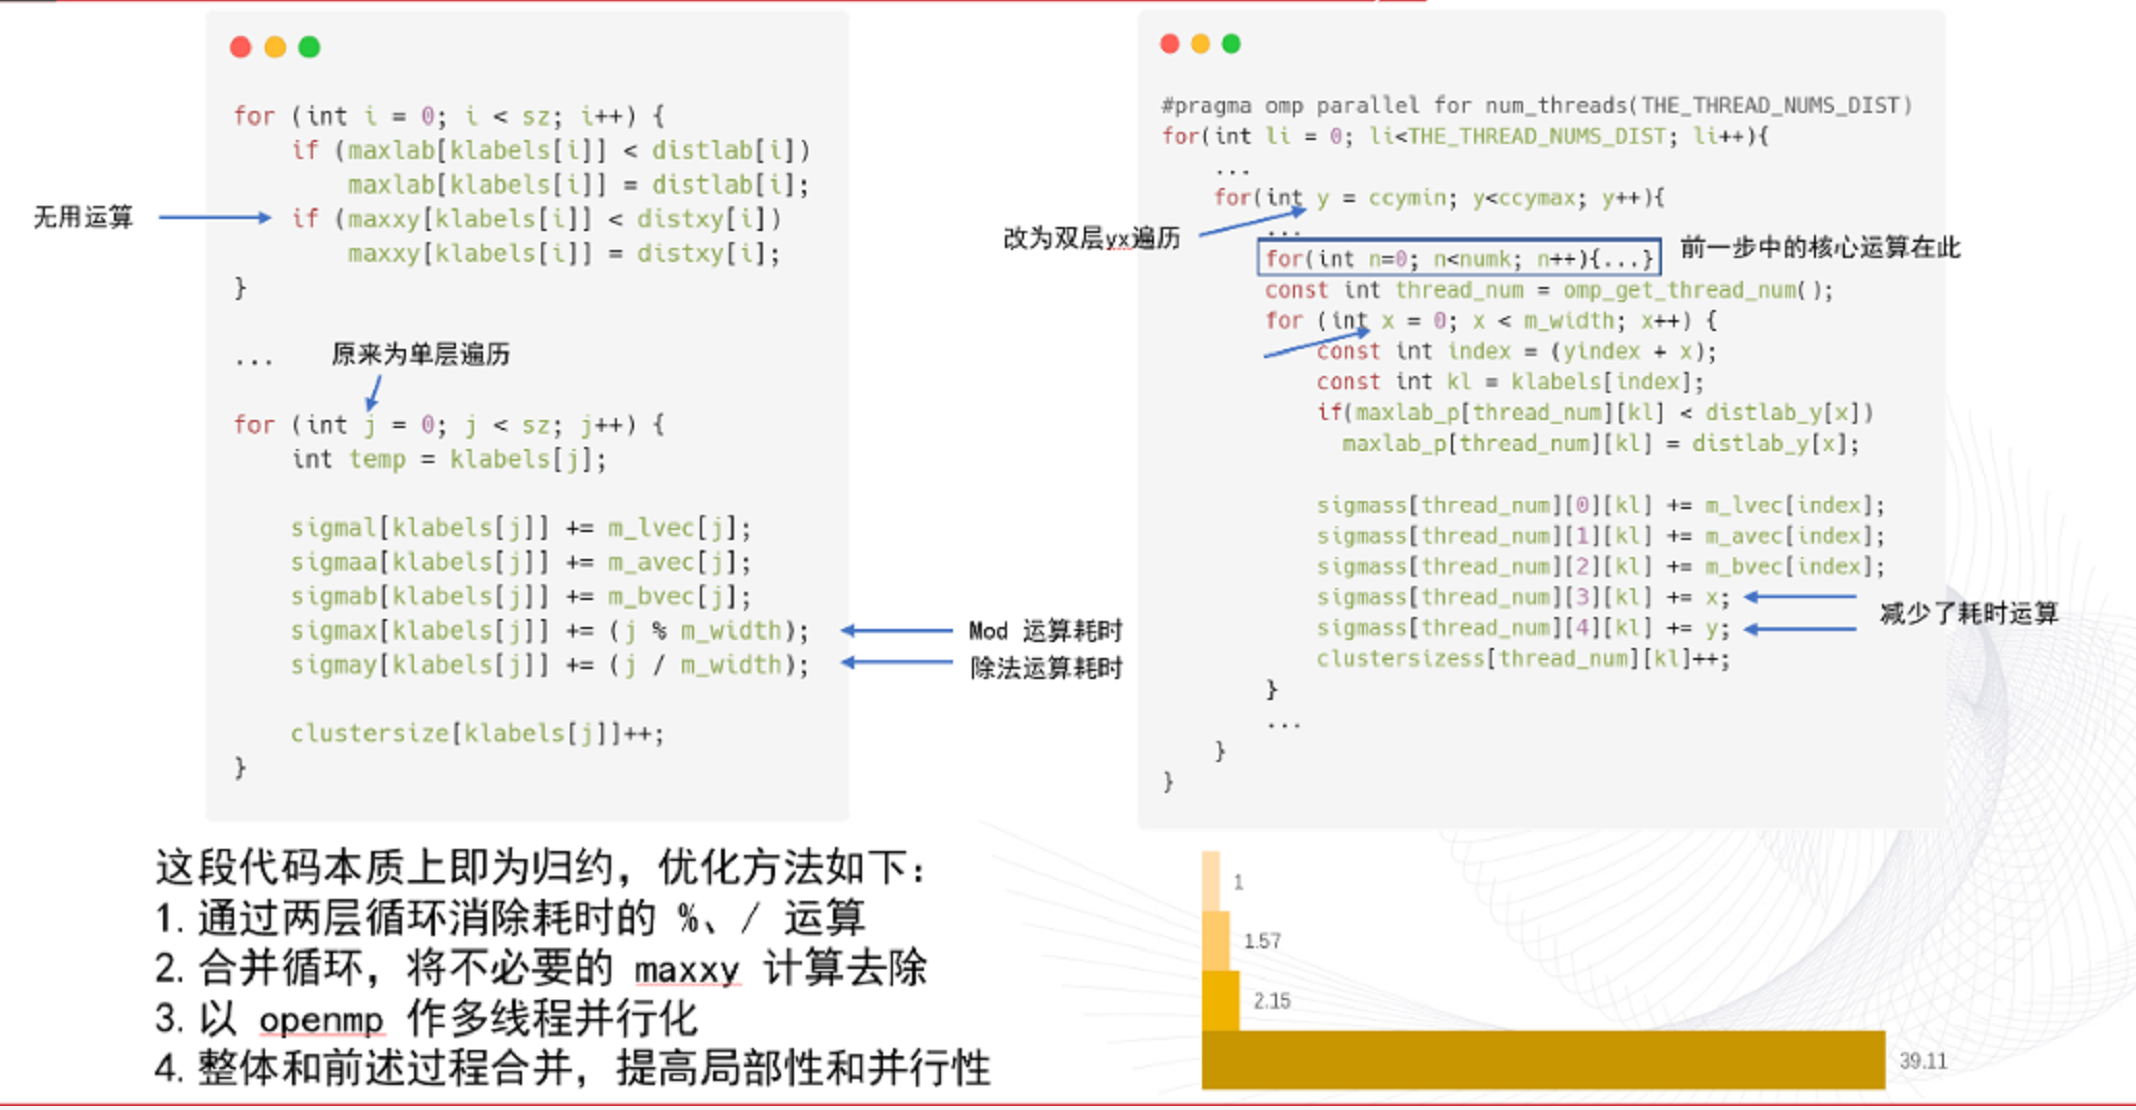
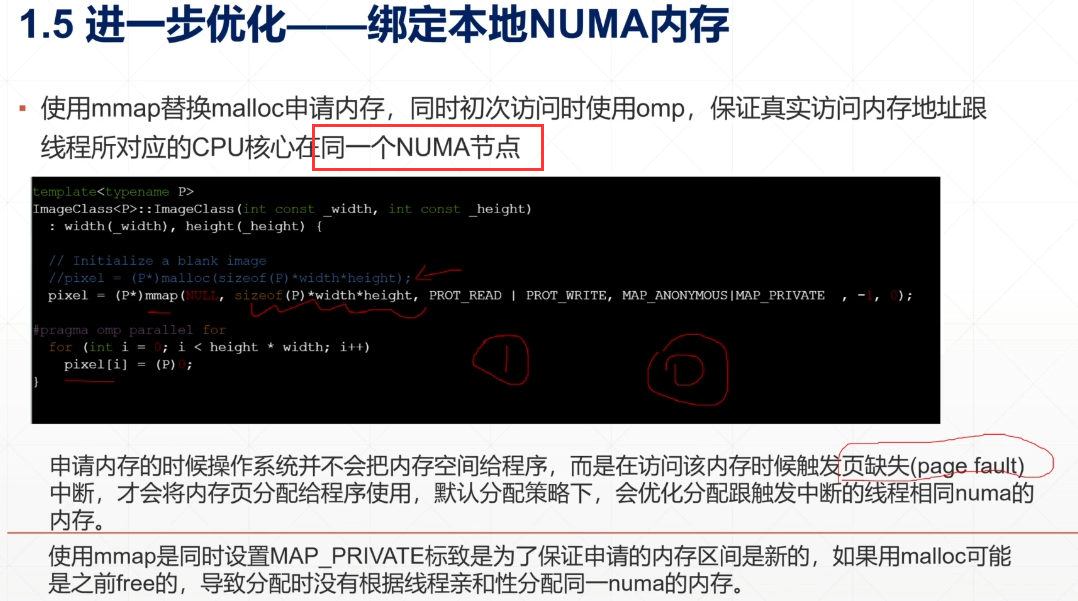
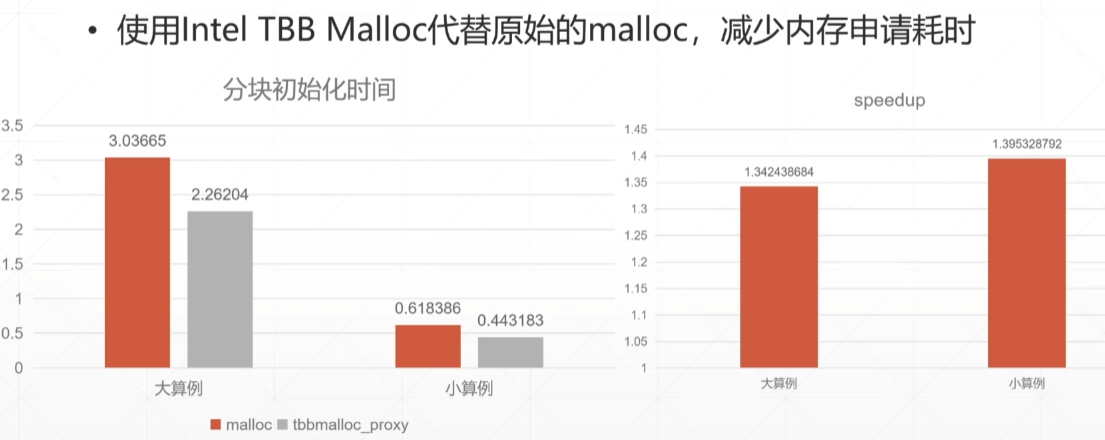
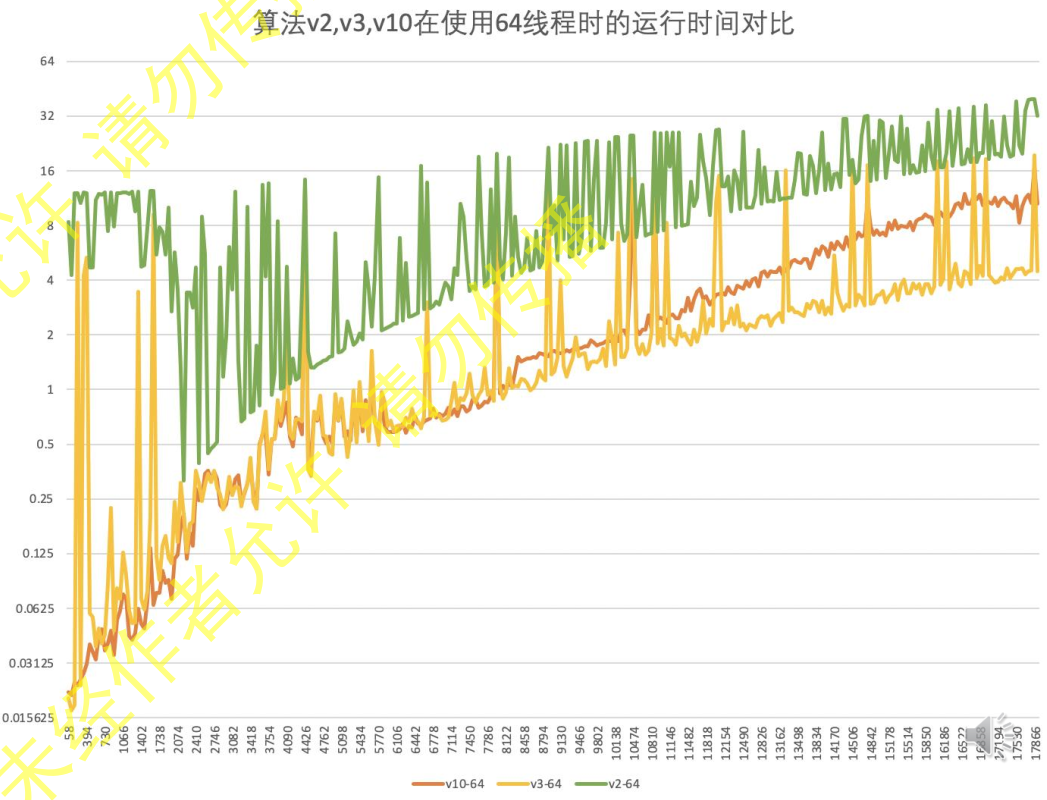
7. 每次优化基给予正确性的评价,并对负优化进行解释。
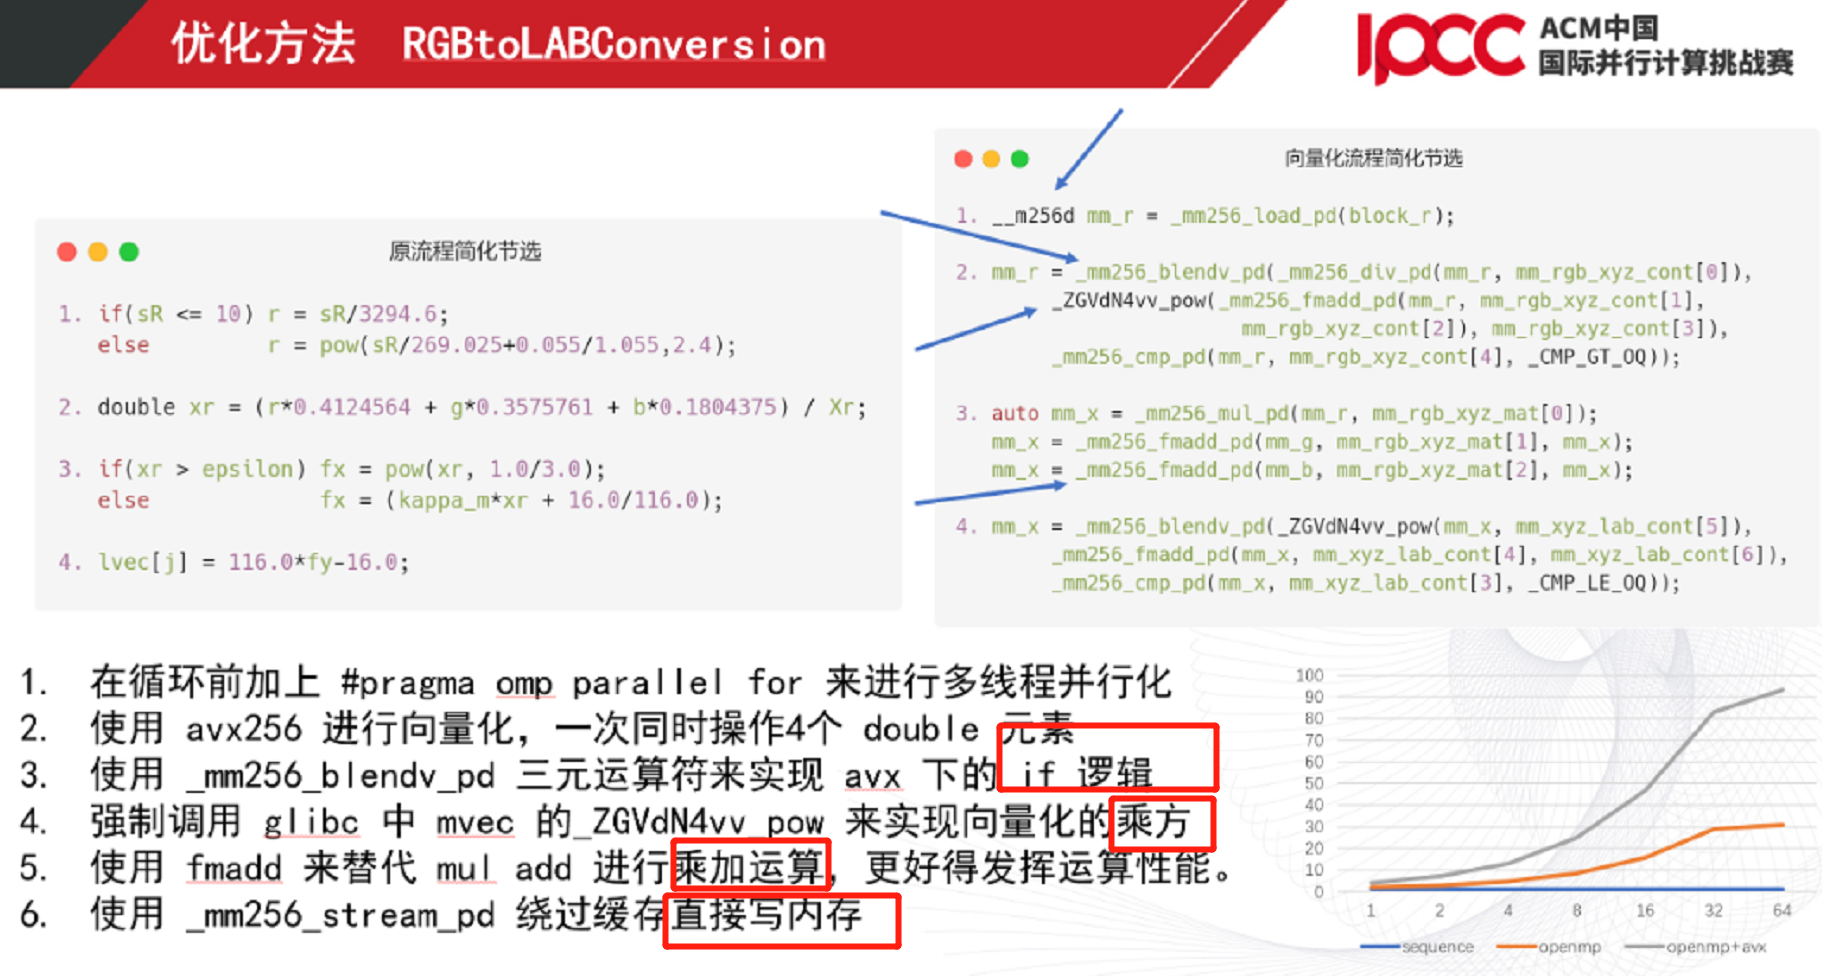
  1. 查看汇编
  2. 基本并行加速实现后,vtune检查访存,或者用Intel advisor的Roofline Model来分析。
  3. 新函数用 utils.cpputils.h

应用类型及其常见优化

  1. 计算密集
  2. 采用适合并行平台的算法
  3. CPU核数利用率
    1. 多进程
      1. 进程池动态调度
    2. 多线程(对于特别小的例子,一个cpu的核就够用了)
      1. 线程亲和性
      2. 线程动态调度
  4. 向量化率(提高单次计算量)SIMD
    1. 自动向量化提升有限吗?怎么写出好让编译器自动向量化的代码
      1. https://blog.csdn.net/zyl910/?type=blog SIMD测试比较
    2. pragma omp parallel for simd
    3. 循环展开,凑够无依赖计算,填满流水线avx512的宽度(8个float)
    4. intrins接口手动向量化
    5. 注意边界,不足8个单独计算
    6. 手动向量化avx2一般会快一些
  5. 降低计算量技巧
    1. 其他各种小技巧
    2. 使用掩码代替分支判断
      1. 增A:|A 删A:&(~A)判断:&A!=0
      2. https://blog.csdn.net/zyl910/article/details/7345655
    3. 替换if tmp[i][j] = (!(cnt^3))||((a[i][j]&1)&&(!(cnt^4)));
    4. 使用乘法代替除法
    5. 位运算实现整数绝对值
      1. 位运算实现浮点数绝对值
    6. 位运算实现整数MaxMin
    7. 位运算求二进制内1的个数
    8. 位运算代替乘除2运算
    9. 重新划分去除乘除,小代价是归约一下sigma
  6. 混合精度(降低部分精度,降低计算量)
  7. 数据重用(不重复计算,降低计算量)
  8. 访存密集
  9. vtune memory access分析,提高cpu访存带宽,优化2CPU通信
    1. store与load比stream慢很多
      1. 原因store是将要写的数据load到缓存里,然后修改。而stream是直接写内存。
  10. 计算分块
    1. 根据L1的大小设置块大小
      MiB = Mebibyte = 1024 KB,
      KiB = Kibibyte = 1024 Bytes,
      MB = Megabyte = 1,000 KB,
      KB = Kilobyte = 1,000 Bytes
      
    2. double 8 bytes
  11. 改变数据结构优化访存(提高cache命中率)
    1. 不合理的数据结构定义,导致数据存储不连续。通过改变数据结构,通过内存指针访问连续地址
  12. 强制使用静态链接库glibc
  13. 访存局部性原理(提高cache命中率)
    1. c语言先行后列
    2. 循环拆分、循环重组
  14. 根据cache空间,以及cache策略,进行cache数据预取,
  15. 计算融合(减少访存次数)
    1. 计算结果及时使用,去除中间结果的存储访问时间
    2. 将多个循环整合为一个
  16. 对于对同一个地址的连续读写依赖,采取pingpong-buffer来两个分治
  17. 申请空间
  18. 负载均衡(并行划分)
  19. 对不同的数据量进行不同的策略,比如数据特别少,单cpu反而最快。
  20. 二维的图,无脑按照y划分就行。
    1. 合并的时候,按照并查集(1.维护顺序 2.有代表性)
  21. 针对数据规模,是否要并行。
  22. IO密集
  23. 并行读取
  24. 内存硬盘化
  25. 通讯密集
  26. IB网通信
  27. 改变通信结构
  28. 打包发送
  29. 希尔伯特划分(一维二维)
  30. 编译选项
  31. O3优化,ipo过程优化,fp-model fast=2加速浮点计算
  32. 其他未分类

还没来得及看的优化

Software optimization resources :https://www.agner.org/optimize/

AMD 罗马米兰平台优化

https://www.bilibili.com/video/BV19q4y197uX?spm_id_from=333.999.0.0 https://www.bilibili.com/video/BV1vU4y1u7nL?spm_id_from=333.999.0.0

常见的参数

2 sockets cpu latency : 50/60

core memory bandwidth :20GB/s

样例图片

  1. 不合理数据结构,和合理的数据结构
  2. 编译选项

性能 功耗 与容错

陈子忠 教授( 美国加州大学河滨分校 ) 230616报告

  1. 多核的出现,单核能耗与频率三次方成正比,难以压住散热
  2. 在已知调度时间复杂度估计的情况下,降低频率DVFS延长执行能大幅度节约功耗。同理提升频率也行。
  3. 纠错:检查点机制,中间验证算法复杂度比计算算法复杂度低。

需要进一步的研究学习

https://johnysswlab.com/

遇到的问题

太糊了

开题缘由、总结、反思、吐槽~~

因为参加2021 IPCC,观看B站视频,学到很多特地总结一下

参考文献

https://www.bilibili.com/video/BV1Dv411p7ay

LLVM-MCA: docs

Introduction

LLVM Machine Code Analyzer 是一种性能分析工具,它使用llvm中可用的信息(如调度模型)静态测量特定CPU中机器代码的性能。

性能是根据吞吐量处理器资源消耗来衡量的。该工具目前适用于在后端中使用LLVM调度模型的处理器。

该工具的主要目标不仅是预测代码在目标上运行时的性能,还帮助诊断潜在的性能问题。

给定汇编代码,llvm-mca可以估计每个周期的指令数(IPC)以及硬件资源压力。分析和报告风格的灵感来自英特尔的IACA工具。

github

https://github.com/llvm/llvm-project/tree/main/llvm/tools/llvm-mca

docs

https://llvm.org/docs/CommandGuide/llvm-mca.html

options

architecture

-mtriple=<target triple>
    eg. -mtriple=x86_64-unknown-unknown
-march=<arch>
    Specify the architecture for which to analyze the code. It defaults to the host default target.
-march=<arch>
    Specify the architecture for which to analyze the code. It defaults to the host default target.
# 查看支持的arch
llc --version
# 查看具体支持的CPU Architecture
llc -march=x86 -mattr=help

output-report

-output-asm-variant=<variant id>
    为工具生成的报告指定输出程序集变量。???
-print-imm-hex
    优先16进制输出。
-json
    除了瓶颈分析,基本都支持json格式输出视图
-timeline
    打印指令流水线情况

runtime options

-dispatch=<width>
    为处理器指定不同的调度宽度。调度宽度默认为处理器调度模型中的“IssueWidth”字段。
-register-file-size=<size>
    指定寄存器文件的大小。指定时,该项会限制可用于寄存器重命名的物理寄存器的数量。此标志的值为零意味着“无限数量的物理寄存器”。
-iterations=<number of iterations>
    指定要运行的迭代次数。如果此标志设置为 0,则该工具会将迭代次数设置为默认值(即 100)。
-noalias=<bool>
    loads and stores don’t alias
-lqueue=<load queue size>
-squeue=<store queue size>
    在工具模拟的加载/存储单元中指定加载队列的大小。默认情况下,该工具假定加载队列中的条目数量不受限制。此标志的零值将被忽略,而是使用默认加载队列大小。
-disable-cb
    强制使用通用的 CustomBehaviour 和 InstrPostProcess 类,而不是使用目标特定的实现。通用类从不检测任何自定义危险或对指令进行任何后处理修改。

more values/Info

-resource-pressure
    Enable the resource pressure view. This is enabled by default.
-register-file-stats
    启用注册文件使用统计。
-dispatch-stats
-scheduler-stats
-retire-stats
-instruction-info
    启用额外的调度/发出/retire control unit统计。该视图收集和分析指令分派事件,以及静态/动态分派停顿事件。默认情况下禁用此视图。
-show-encoding
    打印指令16进制
-all-stats
-all-views
-instruction-tables
    这与资源压力视图不同,因为它不需要模拟代码。相反,它按顺序打印每个指令的资源压力的理论均匀分布。
-bottleneck-analysis
    打印有关影响吞吐量的瓶颈的信息。这种分析可能很昂贵,并且默认情况下是禁用的。瓶颈在摘要视图中突出显示。具有有序后端的处理器目前不支持瓶颈分析。???

实现逻辑

样例分析

quick overview of the performance throughput

Iterations:        300
Instructions:      900
Total Cycles:      610
Total uOps:        900

Dispatch Width:    2
uOps Per Cycle:    1.48
IPC:               1.48
Block RThroughput: 2.0
  1. IPC
  2. 理论最大值是\(\(\frac{OneLoopInstructions}{Block\_RThroughput}=(OneLoopInstructions)*(Block\_Throughput)\)\)
  3. uOps Per Cycle
  4. simulated micro opcodes (uOps)
  5. 每个周期的simulated micro opcodes数
  6. 在不考虑循环依赖的情况下,理论上最大值是\(\(\frac{OneLoopUOps}{Block\_RThroughput}=(OneLoopUOps)*(Block\_Throughput)\)\)
  7. A delta between Dispatch Width and this field is an indicator of a performance issue.
  8. The delta between the Dispatch Width (2.00), and the theoretical maximum uOp throughput (1.50) is an indicator of a performance bottleneck caused by the lack of hardware resources, and the Resource pressure view can help to identify the problematic resource usage.
  9. Dispatch Width
  10. 发射到乱序后端的最大微指令操作数(the maximum number of micro opcodes/uOps)?
  11. Block RThroughput (Block Reciprocal Throughput)
  12. 在不考虑循环依赖的情况下,理论上的每次循环的最大block或者iterations数
  13. 受限于dispatch rate和the availability of hardware resources.

Instruction info view

Instruction Info:
[1]: #uOps
[2]: Latency
[3]: RThroughput
[4]: MayLoad
[5]: MayStore
[6]: HasSideEffects (U)

[1]    [2]    [3]    [4]    [5]    [6]    Instructions:
 1      2     1.00                        vmulps      %xmm0, %xmm1, %xmm2
 1      3     1.00                        vhaddps     %xmm2, %xmm2, %xmm3
 1      3     1.00                        vhaddps     %xmm3, %xmm3, %xmm4
 ```

显示了指令里队列每条指令的**延迟**和**吞吐量的倒数**。

RThroughput是指令吞吐量的倒数。在不考虑循环依赖的情况下,吞吐量是**单周期能执行的同类型指令的最大数量**。

### Resource pressure view
Resources: [0] - JALU0 [1] - JALU1 [2] - JDiv [3] - JFPA [4] - JFPM [5] - JFPU0 [6] - JFPU1 [7] - JLAGU [8] - JMul [9] - JSAGU [10] - JSTC [11] - JVALU0 [12] - JVALU1 [13] - JVIMUL

Resource pressure per iteration: [0] [1] [2] [3] [4] [5] [6] [7] [8] [9] [10] [11] [12] [13] - - - 2.00 1.00 2.00 1.00 - - - - - - -

Resource pressure by instruction: [0] [1] [2] [3] [4] [5] [6] [7] [8] [9] [10] [11] [12] [13] Instructions: - - - - 1.00 - 1.00 - - - - - - - vmulps %xmm0, %xmm1, %xmm2 - - - 1.00 - 1.00 - - - - - - - - vhaddps %xmm2, %xmm2, %xmm3 - - - 1.00 - 1.00 - - - - - - - - vhaddps %xmm3, %xmm3, %xmm4 ```

每次循环或者每条指令执行,消耗的资源周期数。从而找到高资源占用的部分。

Timeline View

可打印流水线情况

Timeline view:
                    012345
Index     0123456789

[0,0]     DeeER.    .    .   vmulps   %xmm0, %xmm1, %xmm2
[0,1]     D==eeeER  .    .   vhaddps  %xmm2, %xmm2, %xmm3
[0,2]     .D====eeeER    .   vhaddps  %xmm3, %xmm3, %xmm4
[1,0]     .DeeE-----R    .   vmulps   %xmm0, %xmm1, %xmm2
[1,1]     . D=eeeE---R   .   vhaddps  %xmm2, %xmm2, %xmm3
[1,2]     . D====eeeER   .   vhaddps  %xmm3, %xmm3, %xmm4
[2,0]     .  DeeE-----R  .   vmulps   %xmm0, %xmm1, %xmm2
[2,1]     .  D====eeeER  .   vhaddps  %xmm2, %xmm2, %xmm3
[2,2]     .   D======eeeER   vhaddps  %xmm3, %xmm3, %xmm4


Average Wait times (based on the timeline view):
[0]: Executions
[1]: Average time spent waiting in a scheduler's queue
[2]: Average time spent waiting in a scheduler's queue while ready
[3]: Average time elapsed from WB until retire stage

      [0]    [1]    [2]    [3]
0.     3     1.0    1.0    3.3       vmulps   %xmm0, %xmm1, %xmm2
1.     3     3.3    0.7    1.0       vhaddps  %xmm2, %xmm2, %xmm3
2.     3     5.7    0.0    0.0       vhaddps  %xmm3, %xmm3, %xmm4
       3     3.3    0.5    1.4       <total>

影响因素包括:

  1. 数据冲突/依赖:读后写,写后读依赖 。无法指令级并行,也可以通过寄存器重命名解决
  2. 结构冲突:占用发射位 或者 同一硬件
  3. 控制冲突:分支?
  4. instructions must retire in program order, so [1,0] has to wait for [0,2] to be retired first

Bottleneck Analysis

  • 可以分析出数据冲突/依赖和结构冲突的影响大小
  • 准确性取决于模拟和是否有对应CPU模型。
  • 暂时不支持有序后端。
Cycles with backend pressure increase [ 91.52% ]
Throughput Bottlenecks:
  Resource Pressure       [ 0.01% ]
  - SBPort0  [ 0.01% ]
  - SBPort1  [ 0.01% ]
  - SBPort5  [ 0.01% ]
  Data Dependencies:      [ 91.51% ]
  - Register Dependencies [ 91.51% ]
  - Memory Dependencies   [ 10.76% ]
  • 端口信息来自TableGen llvm/lib/Target/X86/X86SchedSandyBridge.td
  • 鲲鹏920的来自 llvm/lib/Target/AArch64/AArch64SchedTSV110.td

额外信息

  1. Dynamic Dispatch Stall Cycles
  2. Dispatch Logic
  3. 可以看出流水线发射满带宽或几条指令的时间占比
  4. Schedulers
  5. 每个周期微指令发射数占比
  6. Scheduler's queue usage
  7. 执行时使用的平均或最大buffer entries (i.e., scheduler queue entries)
  8. AMD Jaguar

  9. JALU01 - A scheduler for ALU instructions. JFPU01 - A scheduler floating point operations. JLSAGU - A scheduler for address generation.

  10. Retire Control Unit

  11. 在一个周期里有多少指令retired的占比(好吧,感觉有语病)
  12. A re-order buffer (ROB) 的使用情况
  13. Register File statistics
  14. physical register file (PRF)
  15. floating-point registers (JFpuPRF)
  16. integer registers (JIntegerPRF)

Instruction Flow

llvm-mca 假设指令在模拟开始之前已经全部解码并放入队列中。因此,指令提取和解码阶段没有被计算。未考虑前端的性能瓶颈。此外,llvm-mca 不模拟分支预测。

Instruction Dispatch

处理器的默认 dispatch width值等于LLVM’s scheduling model里的IssueWidth值。

An instruction can be dispatched if:

  • The size of the dispatch group is smaller than processor’s dispatch width.
  • There are enough entries in the reorder buffer.
  • There are enough physical registers to do register renaming.
  • The schedulers are not full.

reorder buffer负责跟踪命令,使之按照程序顺序retired结束。其默认值为 MicroOpBufferSize 。

各种Buffered resources 被视作scheduler resources.

Instruction Issue

每个处理器调度器实现一个指令缓冲区。指令必须在调度程序的缓冲区中等待,直到输入寄存器操作数可用。只有在那个时候,指令才符合执行的条件,并且可能会被发出(可能是乱序的)以供执行。 llvm-mca 在调度模型的帮助下计算指令延迟。

llvm-mca 的调度器旨在模拟多处理器调度器。调度器负责跟踪数据依赖关系,并动态选择指令消耗哪些处理器资源。它将处理器资源单元和资源组的管理委托给资源管​​理器。资源管理器负责选择指令消耗的资源单元。例如,如果一条指令消耗了一个资源组的1cy,则资源管理器从该组中选择一个可用单元;默认情况下,资源管理器使用循环选择器来保证资源使用在组的所有单元之间均匀分配。

llvm-mca’s scheduler internally groups instructions into three sets:

  • WaitSet: a set of instructions whose operands are not ready.
  • ReadySet: a set of instructions ready to execute.
  • IssuedSet: a set of instructions executing.

Write-Back and Retire Stage

retire control unit

  1. When instructions are executed,the flags the instruction as “ready to retire.”
  2. Instructions are retired in program order
  3. free the physical registers

Load/Store Unit and Memory Consistency Model

load/store unit (LSUnit)用来模拟乱序memory操作

The rules are:

  1. A younger load is allowed to pass an older load only if there are no intervening stores or barriers between the two loads.
  2. A younger load is allowed to pass an older store provided that the load does not alias with the store.
  3. A younger store is not allowed to pass an older store.不能交换顺序的意思
  4. A younger store is not allowed to pass an older load.

假设 loads do not alias (-noalias=true) store operations.Under this assumption, younger loads are always allowed to pass older stores. ???

LSUnit不打算跑alias analysis来预测何时load与store不相互alias???

in the case of write-combining memory, rule 3 could be relaxed to allow reordering of non-aliasing store operations.???

LSUnit不管的其余三点:

  1. The LSUnit does not know when store-to-load forwarding may occur.
  2. The LSUnit does not know anything about cache hierarchy and memory types.
  3. The LSUnit does not know how to identify serializing operations and memory fences.
  4. The LSUnit does not attempt to predict if a load or store hits or misses the L1 cache(不考虑cache命中,默认是命中L1,产生the load-to-use latency的最乐观开销)

llvm-mca 不知道序列化操作或内存屏障之类的指令。 LSUnit 保守地假设同时具有“MayLoad”和未建模副作用的指令的行为类似于“软”load-barrier。这意味着,它在不强制刷新load队列的情况下序列化加载。类似地,“MayStore”和具有未建模副作用的指令被视为store障碍。完整的memory-barrier是具有未建模副作用的“MayLoad”和“MayStore”指令。LLVM的实现是不准确的,但这是我们目前使用 LLVM 中可用的当前信息所能做的最好的事情。

load/store barrier会占用在load/store 队列里占用一项。 当load/store barrier是其队列里oldest项时,其会被执行

In-order Issue and Execute

有序处理器被建模为单个 InOrderIssueStage 阶段。它绕过 Dispatch、Scheduler 和 Load/Store 单元。一旦它们的操作数寄存器可用并且满足资源要求,就会发出指令。根据LLVM的调度模型中IssueWidth参数的值,可以在一个周期内发出多条指令。一旦发出,指令就会被移到 IssuedInst 集,直到它准备好retire。 llvm-mca 确保按顺序提交写入。但是,如果 RetireOOO 属性for at least one of its writes为真,则允许指令提交写入并无序retire???

Custom Behaviour 自定义行为

某些指令在该模型中并不能被准确的模拟。为了几条指令而修改模型不是个好的选择,一般通过CustomBehaviour类对某些指令进行特殊建模:自定义数据依赖,以及规避、单独处理特殊情况。

为此,llvm-mca设置了一个通用的以及多个特殊的CustomBehaviour类。下面两种情况下会使用通用类:

  1. 开启了-disable-cb选项
  2. 不存在针对某目标的特殊类(通用类也做不了什么,我什么也做不到😥)

但是注意目前只有in-order流水线实现了CustomBehaviour类,out-order流水线将来也会支持。

该类主要通过checkCustomHazard()函数来实现,通过当前指令和真正流水线中执行的指令,来判断当前指令需要等待几个周期才能发射。

如果想对没有实现的目标添加CustomBehaviour类,可以参考已有的实现,比如在/llvm/lib/Target/AMDGPU/MCA/目录下。

Custom Views 自定义视图

关于自定义的视图的添加路径,如果没有输出从未在MC layer classes (MCSubtargetInfo, MCInstrInfo, etc.)里出现过的新后端值,请把实现加入/tools/llvm-mca/View/。相反,请加入/lib/Target/<TargetName>/MCA/目录。

关于Custom Views所需内容,需要写特殊的CustomBehaviour类来覆写CustomBehaviour::getViews()函数,根据位置的不同还有三种实现getStartViews(), getPostInstrInfoViews(),getEndViews()

影响准确性的因素

调度模型不仅用于计算指令延迟和吞吐量,还用于了解可用的处理器资源以及如何模拟它们。

llvm mca进行分析的质量不可避免地受到llvm中调度模型质量的影响。

功能(能估计的值

  1. IPC
  2. 硬件资源压力resource-pressure
  3. 一些额外Info? 1.

    register-file-stats
    -dispatch-stats
    -scheduler-stats
    -retire-stats
    -instruction-info
    instruction-tables
    
  4. 吞吐量瓶颈?

支持对特定代码块的分析

  1. 汇编代码,支持命名和嵌套

    # LLVM-MCA-BEGIN block-name
    add %eax, %eax
    # LLVM-MCA-END
    
  2. 高级语言,通过内联汇编实现

 int foo(int a, int b) {
     __asm volatile("# LLVM-MCA-BEGIN foo");
     a += 42;
     __asm volatile("# LLVM-MCA-END");
     a *= b;
     return a;
 }

但是,这会干扰循环矢量化等优化,并可能对生成的代码产生影响。具体影响请对比汇编代码。

相关论文

Google学术搜llvm-mca,一堆论文。但是不急着看,因为没有预备知识,没有问题的去看论文。效率和收获很低的,而且会看不懂。

相关项目

mc-ruler

mc-ruler是整合了llvm-mca的cmake,可以打印指定部分的代码分析信息。如果之后要测试可能用得上。

需要进一步的研究学习

  1. 具体功能
  2. llvm如何实现的,要看代码。

遇到的问题

  1. (llvm-mca detects Intel syntax by the presence of an .intel_syntax directive at the beginning of the input. By default its output syntax matches that of its input.)
  2. ???的地方
  3. 大概看了一下功能,但是性能怎么对比呢。准确值是多少呢?
  4. arm kunpeng pmu-tools 实现
  5. 每次的估计值会波动吗?

如何和大神交流呢+提问的艺术

开题缘由、总结、反思、吐槽~~

参考文献

Switch emulator on PC

合法使用

虽然 Ryujinx 模拟器项目本身是开源免费且合法的,但它默认情况下并不能直接运行市面上发行的各种商业游戏,因为它并不包含 Switch 系统固件,也没有游戏 ROM

而按照国外的法规,如果你用户购买了主机和游戏,将其内容 DUMP (提取) 出来自己使用是合法的。

所以,无论是 Ryujinx 还是 Yuzu 等模拟器,想要开玩都需要先完成

  • 安装系统固件和
  • prod.keys 密钥等步骤。
  • 如果游戏要求最新的key和firmware你需要去更新

基本流程

  1. 下载 Ryujinx 模拟器主程序
  2. 下载 prod.keys 密钥文件以及 Switch 的系统固件 (Firmware)
  3. 自行网上搜索下载你喜欢的任天堂游戏文件,支持 .NSP 或者 .XCI 格式

密钥文件以及 Switch 的系统固件

Ryujinx (龙神)模拟器

率先支持了ARM和苹果 M 系列芯片

简易步骤教程:

  1. 下载模拟器对应github
  2. 将 Ryujinx 模拟器主程序解压到「不包含中文的路径」下。
  3. 首次启动 Ryujinx 模拟器后,会提示找不到 key 文件的错误
  4. 点击菜单 文件 (File) → 打开 Ryujinx 文件夹 (Open Ryujinx Folder),会弹出模拟器数据所在的目录。
  5. prod.keys 文件放进到 Ryujinx 目录中的 system 文件夹里,重启模拟器
  6. 放置好 keys 文件之后就开始安装固件 (Firmware) 了,
  7. 点击菜单 工具 (Tools)→安装固件 (Install Firmware)→从 XCI 或 ZIP 安装固件 (Install a firmware from XCI or ZIP),选择你下载到的 Firmware 压缩包(不需解压),
  8. 模拟器就会开始安装,直到显示安装完成即可。
  9. 此时已经可以运行 Switch 游戏了,
  10. 点击菜单 选项 (Options) → 设置 (Settings),在 用户界面 (General) → 游戏目录 (Game Directories) 下点击 添加 (Add) 来「添加一个游戏 ROM 文件存放目录」。
  11. 此后,模拟器会自动加载出存放在这些文件夹里的游戏列表。

安装nsp DLC文件

不是

而是

性能优化

YUZU(柚子)模拟器

yuzu,奶刃2好像都是用这个

密钥缺失

将你原来的User文件夹和ROM文件夹拖到新版模拟器文件夹的根目录即可。

prod.keys 文件放在Yuzu\user\keys

更新密钥和固件

  • 下面两个目录的内容都可以删除,然后解压
  • keys解压到Yuzu\user\keys
  • 固件解压到Yuzu\user\nand\system\Contents\registered

YUZU模拟器使用教程

https://www.playdanji.com/yuzu

YUZU金手指

https://www.playdanji.com/yuzujinshouzhi

YUZU软件升级方法

Early Access版本是需要花钱订阅才能下载的。

github的release直接下载zip后解压替换即可。

YUZU存档位置

游戏右键,打开存档位置。

退出全屏

F11

YUZU 安装 nsp和xci文件

key和中文的问题,建议用之前好的文件

https://zhuanlan.zhihu.com/p/406048136

安装升级补丁nsp文件和DLC

导入NAND文件即可

异度之刃2

打包本体1

30帧720P

https://switch520.com/23050.html

推荐OpenGL模式

v模式,暗场景会过曝。

画质补丁

贴吧老哥的放入目录

E:\gamePojie\NaiRen2\A3285 v2.0.2_yuzuEA2077\user\sdmc\atmosphere\contents

但是没什么用。

ini配置原理是,如下图对应配置目录

放入如下修改的ini文件来修改画质

如下图成功

贴吧10楼:刚试了下,我把属性的mod选项关掉,然后把0100F3400332C000的画质mod删掉,效果一样有,所以效果应该只能在0100F3400332D001\画质mod\romfs\monolib\shader下的lib_nx.ini里改,其他的都没用

red_sclX=2.0
red_sclY=2.0
red_hdsclX=2.0
red_hdsclY=2.0


red_Auto=on
red_AtMaxX=2.0
red_AtMaxY=2.0
red_AtMinX=2.0
red_AtMinY=2.0
red_AtRate=100.0

2.0就是1440p,1.0就是原版720p。你们可以试试改其他的

帧数补丁

60帧补丁实际效果远没有60帧而且一堆副作用,不用浪费时间了

bug花屏

按照B站设置,主要改了GLSL

塞尔达-旷野之息

游侠论坛的cemu模拟的效果就不错

塞尔达-王国之泪

  • yuzu 1414以上
  • keys firmware 16.0.2以上

龙神模拟器,会经常闪退,暂时不知道解决办法(Cache PPTC rebuild?)。yuzu没有闪退的问题

需要进一步的研究学习

暂无

遇到的问题

暂无

开题缘由、总结、反思、吐槽~~

之前买了正版的switch,游戏也入了两三千。旷/荒野之息,奥德赛,奶刃2都通关了。可惜被妈妈没收了~

想研究一下,PC模拟,记录踩坑过程

参考文献

Services Systemd Systemclt

区别

Service

历史上,Linux 的启动一直采用init进程。 下面的命令用来启动服务。

$ sudo /etc/init.d/apache2 start
# 或者
$ service apache2 start
这种方法有两个缺点。

一是启动时间长。init进程是串行启动,只有前一个进程启动完,才会启动下一个进程。

二是启动脚本复杂。init进程只是执行启动脚本,不管其他事情。脚本需要自己处理各种情况,这往往使得脚本变得很长。

Systemd

Systemd 就是为了解决这些问题而诞生的。它的设计目标是,为系统的启动和管理提供一套完整的解决方案。

根据 Linux 惯例,字母d是守护进程(daemon)的缩写。 Systemd 这个名字的含义,就是它要守护整个系统。

使用了 Systemd,就不需要再用init了。Systemd 取代了initd,成为系统的第一个进程(PID 等于 1),其他进程都是它的子进程。

Systemd 的优点是功能强大,使用方便,缺点是体系庞大,非常复杂。事实上,现在还有很多人反对使用 Systemd,理由就是它过于复杂,与操作系统的其他部分强耦合,违反"keep simple, keep stupid"的Unix 哲学。

systemctl

systemctl是 Systemd 的主命令,用于管理系统。

systemctl - Control the systemd system and service manager

systemctl常见命令

systemctl is-enabled servicename.service #查询服务是否开机启动
systemctl enable *.service #开机运行服务
systemctl disable *.service #取消开机运行
systemctl start *.service #启动服务
systemctl stop *.service #停止服务
systemctl restart *.service #重启服务
systemctl reload *.service #重新加载服务配置文件
systemctl status *.service #查询服务运行状态
systemctl --failed #显示启动失败的服务

systemctl命令实操

# 查看相关unit
shaojiemike@tsjNas:~$ systemctl|grep wg
  [email protected]
       loaded active exited  WireGuard via wg-quick(8) for wg0

# 查看已经启动的服务
systemctl list-unit-files --state=enabled|grep wg
[email protected]                     enabled //由于我删除了wg0,所以.service前没wg0

# 删除服务
sh-4.4#  systemctl disable [email protected]
Removed symlink /etc/systemd/system/syno-low-priority-packages.target.wants/[email protected].

开机启动原理

Systemd 默认从目录/etc/systemd/system/读取配置文件。但是,里面存放的大部分文件都是符号链接,指向目录/usr/lib/systemd/system/,真正的配置文件存放在那个目录。

systemctl enable命令用于在上面两个目录之间,建立符号链接关系。

> $ sudo systemctl enable [email protected]
# 等同于
$ sudo ln -s '/usr/lib/systemd/system/[email protected]' '/etc/systemd/system/multi-user.target.wants/[email protected]'
> 
如果配置文件里面设置了开机启动,systemctl enable命令相当于激活开机启动。

与之对应的,systemctl disable命令用于在两个目录之间,撤销符号链接关系,相当于撤销开机启动。

> $ sudo systemctl disable [email protected]
> 
配置文件的后缀名,就是该 Unit 的种类,比如sshd.socket。如果省略,Systemd 默认后缀名为.service,所以sshd会被理解成sshd.service

把程序设置systemctl服务,并开机启动

  1. Systemd 默认从目录/etc/systemd/system/读取配置文件。但是,里面存放的大部分文件都是符号链接,指向目录/usr/lib/systemd/system/,真正的配置文件存放在那个目录。
  2. 进入目录/usr/lib/systemd/system,修改webhook.service
    [Unit]
    Description=Webhook receiver for GitHub
    
    [Service]
    Type=simple
    ExecStart=/usr/local/bin/webhook
    
    [Install]
    WantedBy=multi-user.target
    
    systemctl start nexus.service  #启动服务
    systemctl enable nexus.service #设置开机启动
    
    Loaded: loaded (/etc/systemd/system/webhook.service; enabled;这个enabled就是开机启动的意思

查看服务的log

journalctl - Query the systemd journal

# root @ snode0 in /etc/systemd/system [17:57:48]
$ journalctl -u webhook.service
-- Logs begin at Mon 2022-06-06 15:54:50 CST, end at Tue 2022-06-28 17:57:50 CST. --
Jun 28 17:30:53 snode0 systemd[1]: Started Webhook receiver for GitHub.

问题

$ systemctl reload webhook.service
==== AUTHENTICATING FOR org.freedesktop.systemd1.manage-units ===
Authentication is required to reload 'webhook.service'.
Multiple identities can be used for authentication:
 1.  Jun Shi (shijun)
 2.  Shaojie Tan (shaojiemike)
Choose identity to authenticate as (1-2): 2
Password:
==== AUTHENTICATION COMPLETE ===
Failed to reload webhook.service: Job type reload is not applicable for unit webhook.service.
Simple 类型不能reload

需要进一步的研究学习

暂无

遇到的问题

暂无

开题缘由、总结、反思、吐槽~~

参考文献

https://blog.csdn.net/qq_40741855/article/details/104984071

https://www.ruanyifeng.com/blog/2016/03/systemd-tutorial-commands.html