OOTD: outfit of the day
导言
个人形象管理的第一部分,也是最简单的部分,外貌部分的穿搭。
导言
个人形象管理的第一部分,也是最简单的部分,外貌部分的穿搭。
Pass类是实现优化的主要资源。然而,我们从不直接使用它,而是通过清楚的子类使用它。当实现一个Pass时,你应该选择适合你的Pass的最佳粒度,适合此粒度的最佳子类,例如基于函数、模块、循环、强联通区域,等等。常见的这些子类如下:
ModulePass:这是最通用的Pass;它一次分析整个模块,函数的次序不确定。它不限定使用者的行为,允许删除函数和其它修改。为了使用它,你需要写一个类继承ModulePass,并重载runOnModule()方法。FunctionPass:这个子类允许一次处理一个函数,处理函数的次序不确定。这是应用最多的Pass类型。它禁止修改外部函数、删除函数、删除全局变量。为了使用它,需要写一个它的子类,重载runOnFunction()方法。BasicBlockPass:这个类的粒度是基本块。FunctionPass类禁止的修改在这里也是禁止的。它还禁止修改或者删除外部基本块。使用者需要写一个类继承BasicBlockPass,并重载它的runOnBasicBlock()方法。被重载的入口函数runOnModule()、runOnFunction()、runOnBasicBlock()返回布尔值false,如果被分析的单元(模块、函数和基本块)保持不变,否则返回布尔值true。
char PIMProf::AnnotationInjection::ID = 0;
// 注册 llvm pass
static RegisterPass<PIMProf::AnnotationInjection> RegisterMyPass(
    "AnnotationInjection", "Inject annotators to uniquely identify each basic block.");

static void loadPass(const PassManagerBuilder &,
                           legacy::PassManagerBase &PM) {
    PM.add(new PIMProf::AnnotationInjection());
}

// Ox 的代码 llvm pass 在EP_OptimizerLast 位置load
static RegisterStandardPasses clangtoolLoader_Ox(PassManagerBuilder::EP_OptimizerLast, loadPass);
// O0 的代码 llvm pass EP_EnabledOnOptLevel0 位置load
static RegisterStandardPasses clangtoolLoader_O0(PassManagerBuilder::EP_EnabledOnOptLevel0, loadPass);
最简单框架hello.cpp如下,注意Important一定需要:
#include "llvm/Pass.h"
#include "llvm/IR/Function.h"
#include "llvm/Support/raw_ostream.h"
#include "llvm/IR/LegacyPassManager.h"
#include "llvm/Transforms/IPO/PassManagerBuilder.h"

using namespace llvm;

namespace {
 // Important
  struct Hello : public FunctionPass {
    static char ID;
    Hello() : FunctionPass(ID) {}
 // Important
    bool runOnFunction(Function &F) override {
      errs() << "Hello: ";
      errs().write_escaped(F.getName()) << '\n';
      return false;
    }
  };
}

char Hello::ID = 0;

// Important:Register for opt
static RegisterPass<Hello> X("hello", "Hello World Pass");

// Important:Register for clang
static RegisterStandardPasses Y(PassManagerBuilder::EP_EarlyAsPossible,
  [](const PassManagerBuilder &Builder, legacy::PassManagerBase &PM) {
    PM.add(new Hello());
  });
参考官方文档。
An example of a project layout is provided below.
Contents of <project dir>/CMakeLists.txt:
find_package(LLVM REQUIRED CONFIG)

separate_arguments(LLVM_DEFINITIONS_LIST NATIVE_COMMAND ${LLVM_DEFINITIONS})
add_definitions(${LLVM_DEFINITIONS_LIST})
include_directories(${LLVM_INCLUDE_DIRS})

add_subdirectory(<pass name>)
Contents of <project dir>/<pass name>/CMakeLists.txt:
运行cmake编译。产生LLVMPassname.so文件
请阅读知乎的文章
clang -c -emit-llvm main.c -o main.bc # 随意写一个C代码并编译到bc格式
opt -load path/to/LLVMHello.so -hello main.bc -o /dev/null
把源代码编译成IR代码,然后用opt运行Pass实在麻烦且无趣。
clang -Xclang -load -Xclang path/to/LLVMHello.so main.c -o main
# or
clang++ -Xclang -load -Xclang ./build/hello/libLLVMPassname.so test.cpp -o main
void InjectSimMagic2(Module &M, Instruction *insertPt, uint64_t arg0, uint64_t arg1, uint64_t arg2)
{
    LLVMContext &ctx = M.getContext();
    std::vector<Type *> argtype {
        Type::getInt64Ty(ctx), Type::getInt64Ty(ctx), Type::getInt64Ty(ctx)
    };
    FunctionType *ty = FunctionType::get(
        Type::getVoidTy(ctx), argtype, false
    );
    // template of Sniper's SimMagic0
    InlineAsm *ia = InlineAsm::get(
        ty,
        "\tmov $0, %rax \n"
        "\tmov $1, %rbx \n"
        "\tmov $2, %rcx \n"
        "\txchg %bx, %bx\n",
        "imr,imr,imr,~{rax},~{rbx},~{rcx},~{dirflag},~{fpsr},~{flags}",
        true
    );
    Value *val0 = ConstantInt::get(IntegerType::get(ctx, 64), arg0);
    Value *val1 = ConstantInt::get(IntegerType::get(ctx, 64), arg1);
    Value *val2 = ConstantInt::get(IntegerType::get(ctx, 64), arg2);
    std::vector<Value *> arglist {val0, val1, val2};
    CallInst::Create(
            ia, arglist, "", insertPt);
}
这段代码使用内联汇编嵌入到 LLVM IR 中,指令如下:
其中:
由于直接打印的是llvm IR的表示,想要打印特定架构比如x86的汇编代码,其实需要进行llvm后端的转换。(取巧,可执行文件反汇编,然后根据插入的汇编桩划分)
暂无
暂无
复现PIMProf论文时,用到了使用 llvm pass来插入特殊汇编
| 伪指令 | 描述 |
|---|---|
| .file | 指定由哪个源文件生成的汇编代码。 |
| .data | 表示数据段(section)的开始地址 |
| .text | 指定下面的指令属于代码段。 |
| .string | 表示数据段中的字符串常量。 |
| .globl main | 指明标签main是一个可以在其它模块的代码中被访问的全局符号 。 |
| .align | 数据对齐指令 |
| .section | 段标记 |
| .type | 设置一个符号的属性值 |
.type name , description%function 表示该符号用来表示一个函数名%object 表示该符号用来表示一个数据对象至于其它的指示你可以忽略。
从最简单的C文件入手
运行gcc -S -O3 main.c -o main.s,得到main.s文件
 .file "simple.cpp"
 .text
 .section .text.startup,"ax",@progbits
 .p2align 4
 .globl main
 .type main, @function
main:
.LFB0:
 .cfi_startproc
 endbr64
 xorl %eax, %eax
 ret
 .cfi_endproc
.LFE0:
 .size main, .-main
 .ident "GCC: (Ubuntu 9.4.0-1ubuntu1~20.04.1) 9.4.0"
 .section .note.GNU-stack,"",@progbits
 .section .note.gnu.property,"a"
 .align 8
 .long  1f - 0f
 .long  4f - 1f
 .long  5
0:
 .string  "GNU"
1:
 .align 8
 .long  0xc0000002
 .long  3f - 2f
2:
 .long  0x3
3:
 .align 8
4:
.section .rodata.str1.1,"aMS",@progbits,1rodata.str1.1是一个标号(label), 意思是只读数据段的字符串常量aMS是一个属性值:@progbits: 表示该段的类型是程序数据段(PROGBITS),这种类型的段包含程序的代码和数据。1: 表示该段的对齐方式是2^1 = 2个字节(按字节对齐)。如果不写这个数字,默认对齐到当前机器的字长。.section .text.startup,"ax",@progbits 其中ax表示该段是可分配的(allocatable)和可执行的(executable)。.section .note.GNU-stack"指令用于告诉链接器是否允许在堆栈上执行代码。.section .note.gnu.property"指令用于指定一些属性,这里是一个GNU特性标记。.text.startup” section,其首地址为“.globl main”。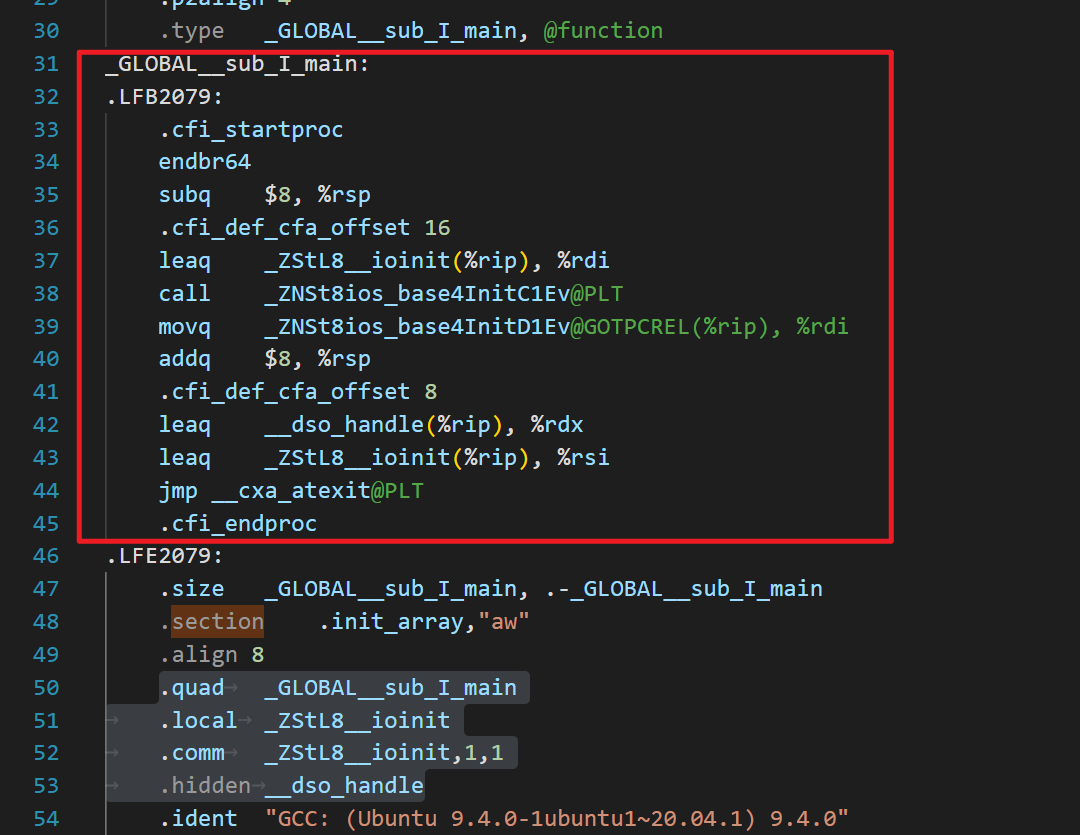
_GLOBAL__sub_I_xxx”的section中。ios_base::Init()",并注册了一个在程序退出时调用的析构函数 "__cxa_atexit"。.init_array" section中,定义了一个"_GLOBAL__sub_I_main"的地址,这是在程序启动时需要调用的所有C++全局和静态对象的初始化函数列表,编译器链接这个列表并在程序启动时依次调用这些初始化函数。其中四条指令都定义了一些符号或变量,并分配了一些内存空间,这些在程序里的意义如下:
.quad _GLOBAL__sub_I_main":在程序启动时,将调用所有全局静态对象的构造函数。这些构造函数被放在一个名为"_GLOBAL__sub_I_xxx"的section中,而每个section都是由一个指向该section所有对象的地址列表所引用。这里的".quad _GLOBAL__sub_I_main"是为了将"_GLOBAL__sub_I_main"函数的地址添加到该列表中。
.local _ZStL8__ioinit":这条指令定义了一个本地符号"_ZStL8__ioinit",它表示C++标准输入输出的初始化过程。由于该符号是一个本地符号,所以只能在编辑该文件的当前单元中使用该符号。
.comm _ZStL8__ioinit,1,1":这条指令定义了一个名为"_ZStL8__ioinit"的未初始化的弱符号,并为该符号分配了1个大小的字节空间。这个弱符号定义了一个C++标准输入输出部分的全局状态对象。在全用动态库时,不同的动态库可能有自己的IO状态,所以为了确保C++输入输出的状态正确,需要为其指定一个单独的段来存储这些状态数据。在这里,".comm _ZStL8__ioinit,1,1"将会为"_ZStL8__ioinit"符号分配一个字节大小的空间。
.hidden __dso_handle":这条指令定义了一个隐藏的符号 "__dso_handle"。这个符号是一个链接器生成的隐式变量,其定义了一个指向被当前动态库使用的全局数据对象的一个指针。该符号在被链接进来的库中是隐藏的,不会被其他库或者main函数本身调用,但是在main返回后,可以用来检查库是否已经被卸载。
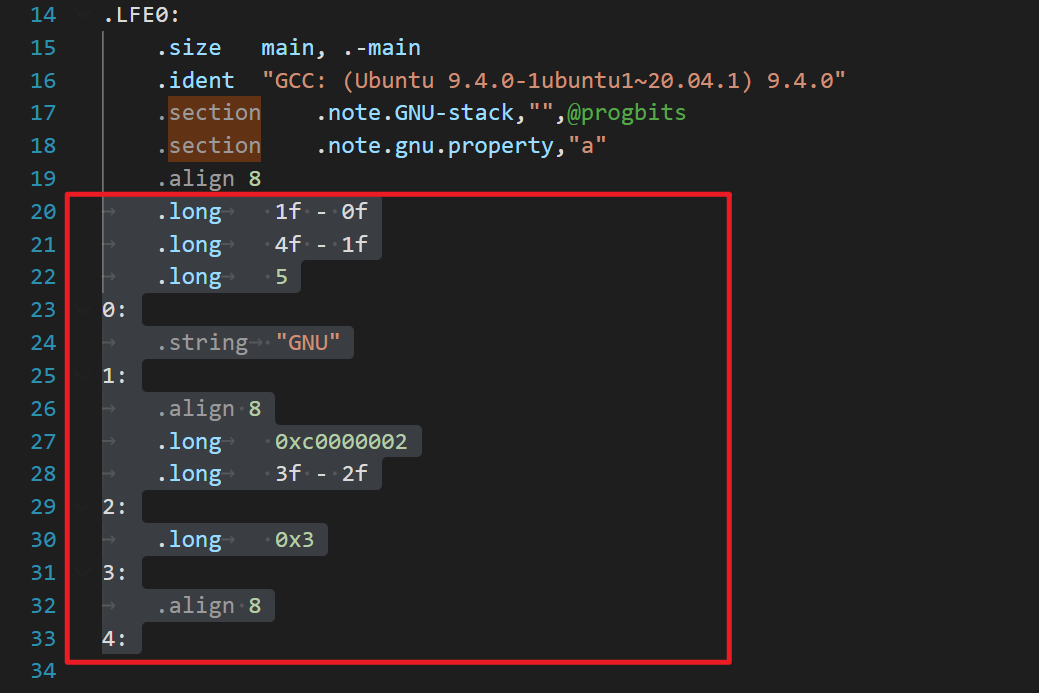
这段代码是一些特殊的指令和数据,主要是用于向可执行文件添加一些元数据(metadata)。这些元数据可能包含各种信息,如调试信息、特定平台的指令集支持等等。
具体来说:
.long 1f - 0f"建立了一个长整型数值,表示"1:"标签相对于当前指令地址(即0f)的偏移量。偏移量可以用来计算标签对应的指令地址,从而可用于跳转或计算指针偏移量。4f - 1f",即"4:"标签相对于"1:"标签的偏移量;.long 0xc0000002"表示这是一个特殊的属性标记,标识这个文件可以在Linux平台上执行。它是用来告诉操作系统这个程序是用特定指令集编译的。.long 0x3"表示另一个属性标记,表示这个文件可以加载到任意地址。总之,这些元数据可能对程序运行起到关键作用,但在大多数情况下可能都没有明显的作用,因此看起来没有用。
执行gcc -S -g testBigExe.cpp -o testDebug.s,对比之前的汇编文件,由72行变成9760行。
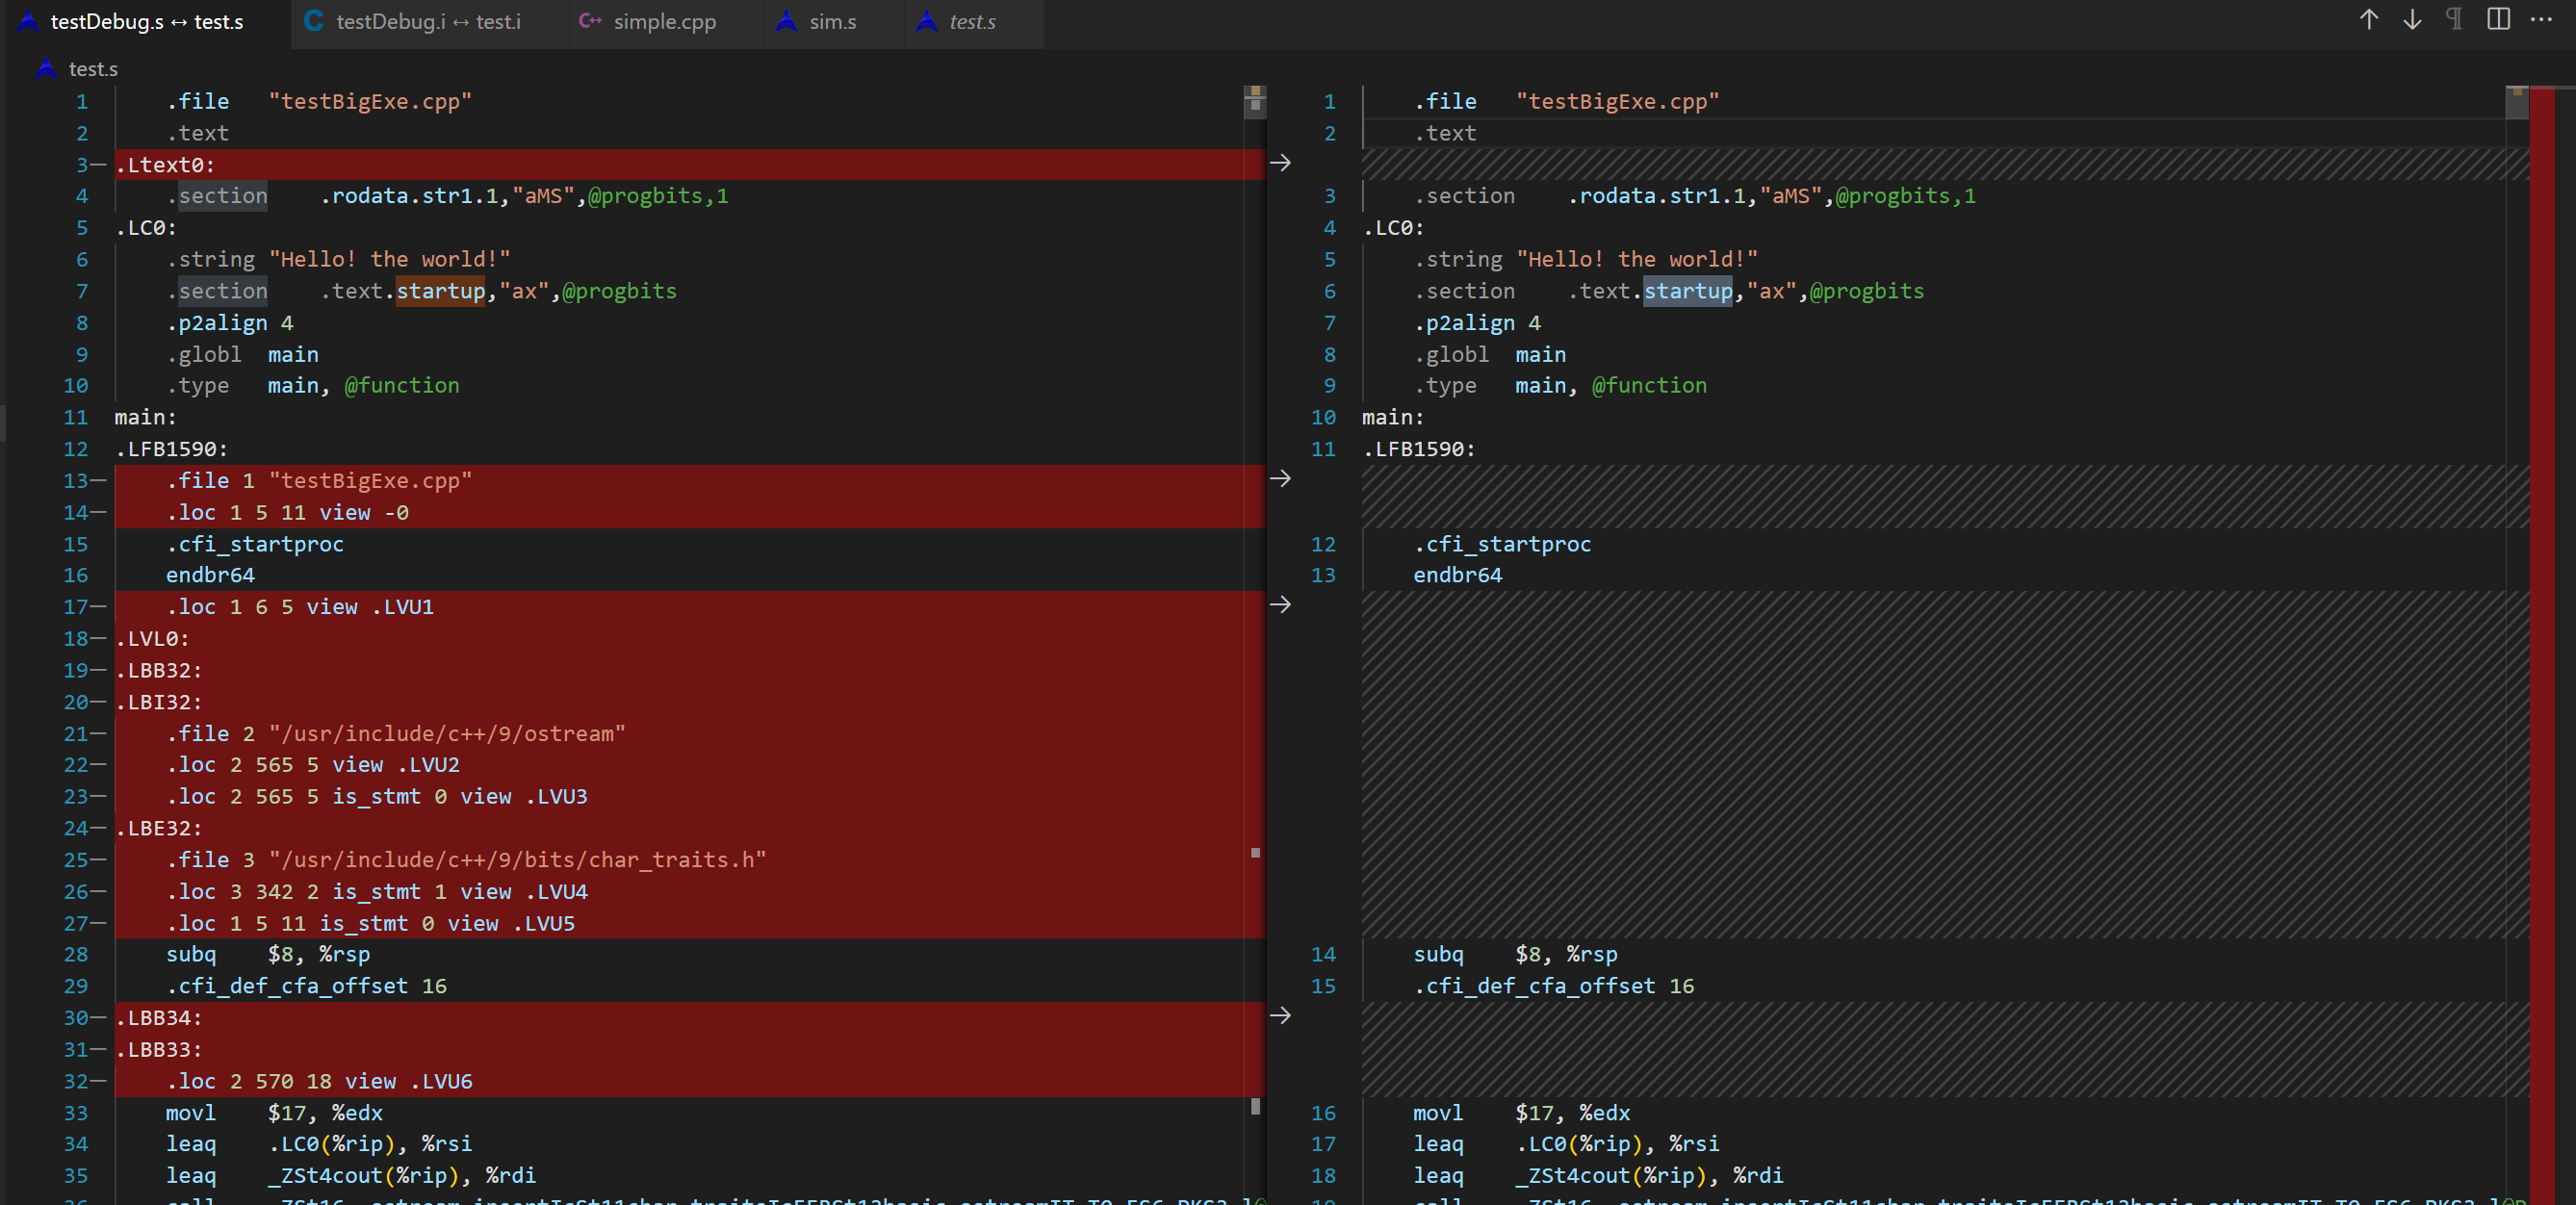
.LBE32:
 .file 3 "/usr/include/c++/9/bits/char_traits.h"
 .loc 3 342 2 is_stmt 1 view .LVU4
 .loc 1 5 11 is_stmt 0 view .LVU5
.loc 3 342 2 表示当前指令对应的源代码文件ID为3,在第342行,第2列(其中第1列是行号,第2列是第几个字符),同时is_stmt为1表示这条指令是语句的起始位置。.loc 1 5 11 表示当前指令对应的源代码文件ID为1,在第5行,第11列,同时is_stmt为0表示这条指令不是语句的起始位置。view .LVU4 表示当前指令所处的作用域(scope)是.LVU4。作用域是指该指令所在的函数、代码块等一段范围内的所有变量和对象的可见性。在这个例子中,.LVU4 是一个局部变量作用域,因为它是位于一个C++标准库头文件中的一个函数的起始位置。新增的这些 section 存储了 DWARF 调试信息。DWARF(Debugging With Attributed Record Formats)是一种调试信息的标准格式,包括代码中的变量、类型、函数、源文件的映射关系,以及代码的编译相关信息等等。
具体来说,这些 section 存储的内容如下:
.debug_info:包含程序的调试信息,包括编译单元、类型信息、函数和变量信息等。.debug_abbrev:包含了 .debug_info 中使用到的所有缩写名称及其对应的含义,用于压缩格式和提高效率。.debug_loc:存储每个程序变量或表达式的地址范围及其地址寄存器、表达式规则等信息。在调试时用来确定变量或表达式的值和范围。.debug_aranges:存储简化版本的地址范围描述,允许调试器加速地定位代码和数据的位置。.debug_ranges:存储每个编译单元(CU)的地址范围,每个范围都是一个有限开区间。.debug_line:存储源代码行号信息,包括每行的文件、行号、是否为语句起始位置等信息。.debug_str:包含了所有字符串,如文件名、函数名等,由于每个调试信息的数据都是字符串,因此这是所有调试信息的基础。需要注意的是,这些 section 中的信息是根据编译器的配置和选项生成的,因此不同编译器可能会生成略有不同的调试信息。
暂无
常见的web服务器有Apache、nginx、IIS
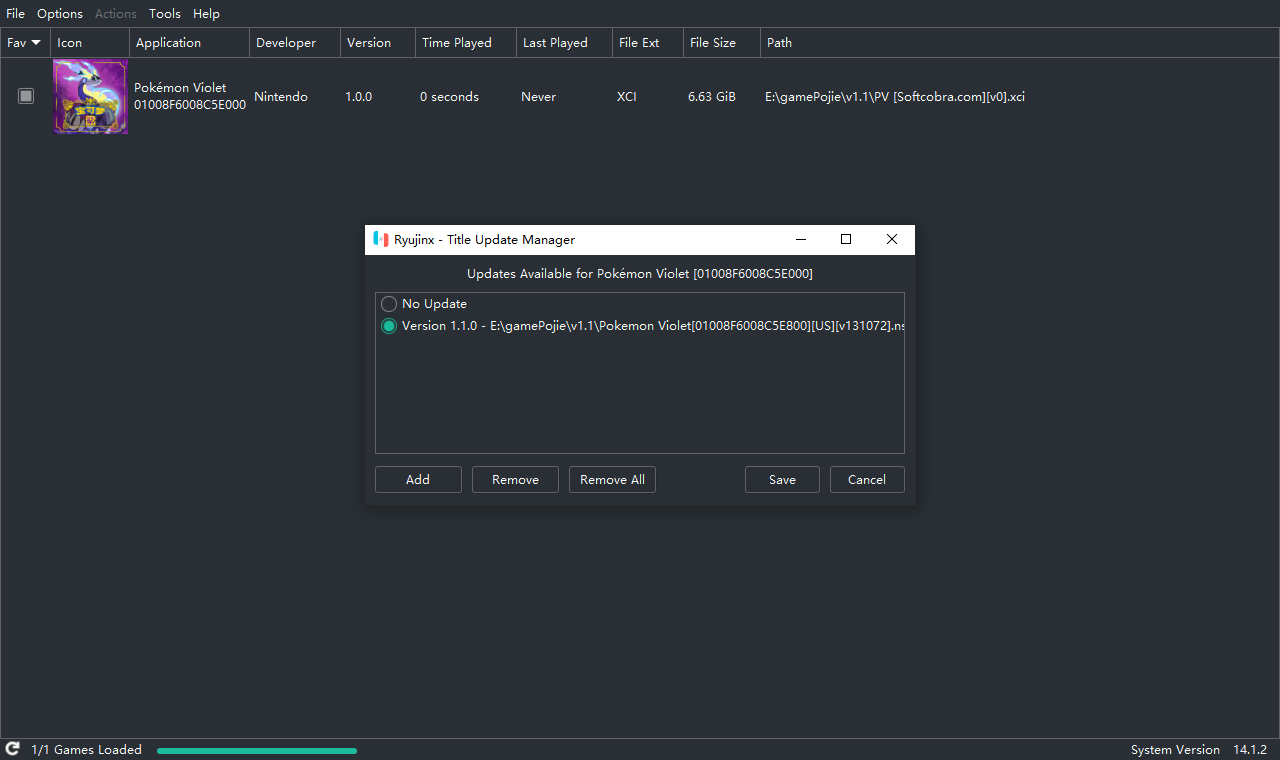
虽然 Ryujinx 模拟器项目本身是开源免费且合法的,但它默认情况下并不能直接运行市面上发行的各种商业游戏,因为它并不包含 Switch 系统固件,也没有游戏 ROM。
而按照国外的法规,如果你用户购买了主机和游戏,将其内容 DUMP (提取) 出来自己使用是合法的。
所以,无论是 Ryujinx 还是 Yuzu 等模拟器,想要开玩都需要先完成
prod.keys 密钥文件以及 Switch 的系统固件 (Firmware).NSP 或者 .XCI 格式率先支持了ARM和苹果 M 系列芯片
prod.keys 文件放进到 Ryujinx 目录中的 system 文件夹里,重启模拟器不是
而是
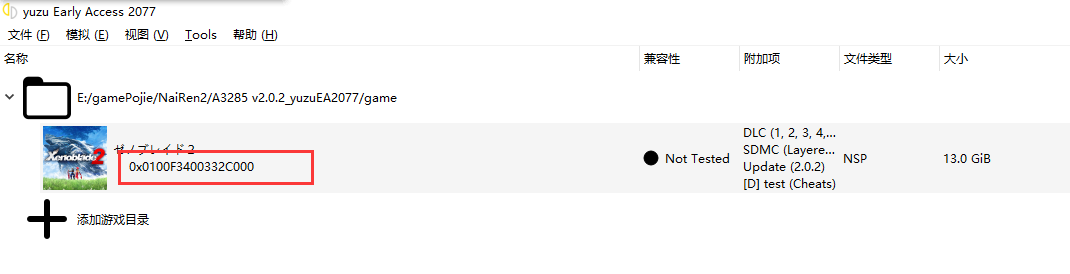
yuzu,奶刃2好像都是用这个
将你原来的User文件夹和ROM文件夹拖到新版模拟器文件夹的根目录即可。
将 prod.keys 文件放在Yuzu\user\keys
Yuzu\user\keysYuzu\user\nand\system\Contents\registeredhttps://www.playdanji.com/yuzu
https://www.playdanji.com/yuzujinshouzhi
Early Access版本是需要花钱订阅才能下载的。
github的release直接下载zip后解压替换即可。
游戏右键,打开存档位置。
F11
key和中文的问题,建议用之前好的文件
https://zhuanlan.zhihu.com/p/406048136
30帧720P
https://switch520.com/23050.html
v模式,暗场景会过曝。
贴吧老哥的放入目录
但是没什么用。
ini配置原理是,如下图对应配置目录
放入如下修改的ini文件来修改画质
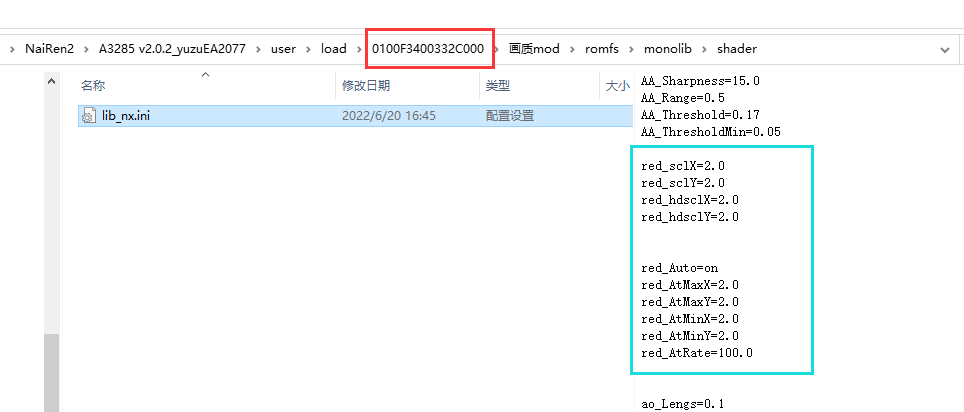
如下图成功
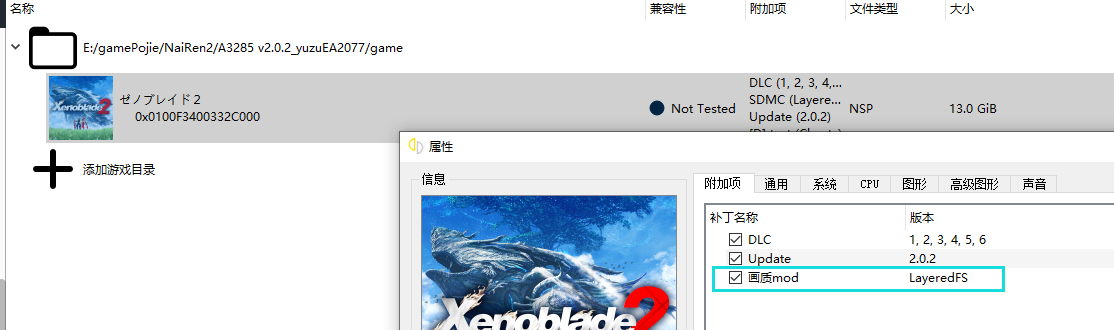
贴吧10楼:刚试了下,我把属性的mod选项关掉,然后把0100F3400332C000的画质mod删掉,效果一样有,所以效果应该只能在0100F3400332D001\画质mod\romfs\monolib\shader下的lib_nx.ini里改,其他的都没用
red_sclX=2.0
red_sclY=2.0
red_hdsclX=2.0
red_hdsclY=2.0


red_Auto=on
red_AtMaxX=2.0
red_AtMaxY=2.0
red_AtMinX=2.0
red_AtMinY=2.0
red_AtRate=100.0
2.0就是1440p,1.0就是原版720p。你们可以试试改其他的
60帧补丁实际效果远没有60帧而且一堆副作用,不用浪费时间了
按照B站设置,主要改了GLSL

游侠论坛的cemu模拟的效果就不错
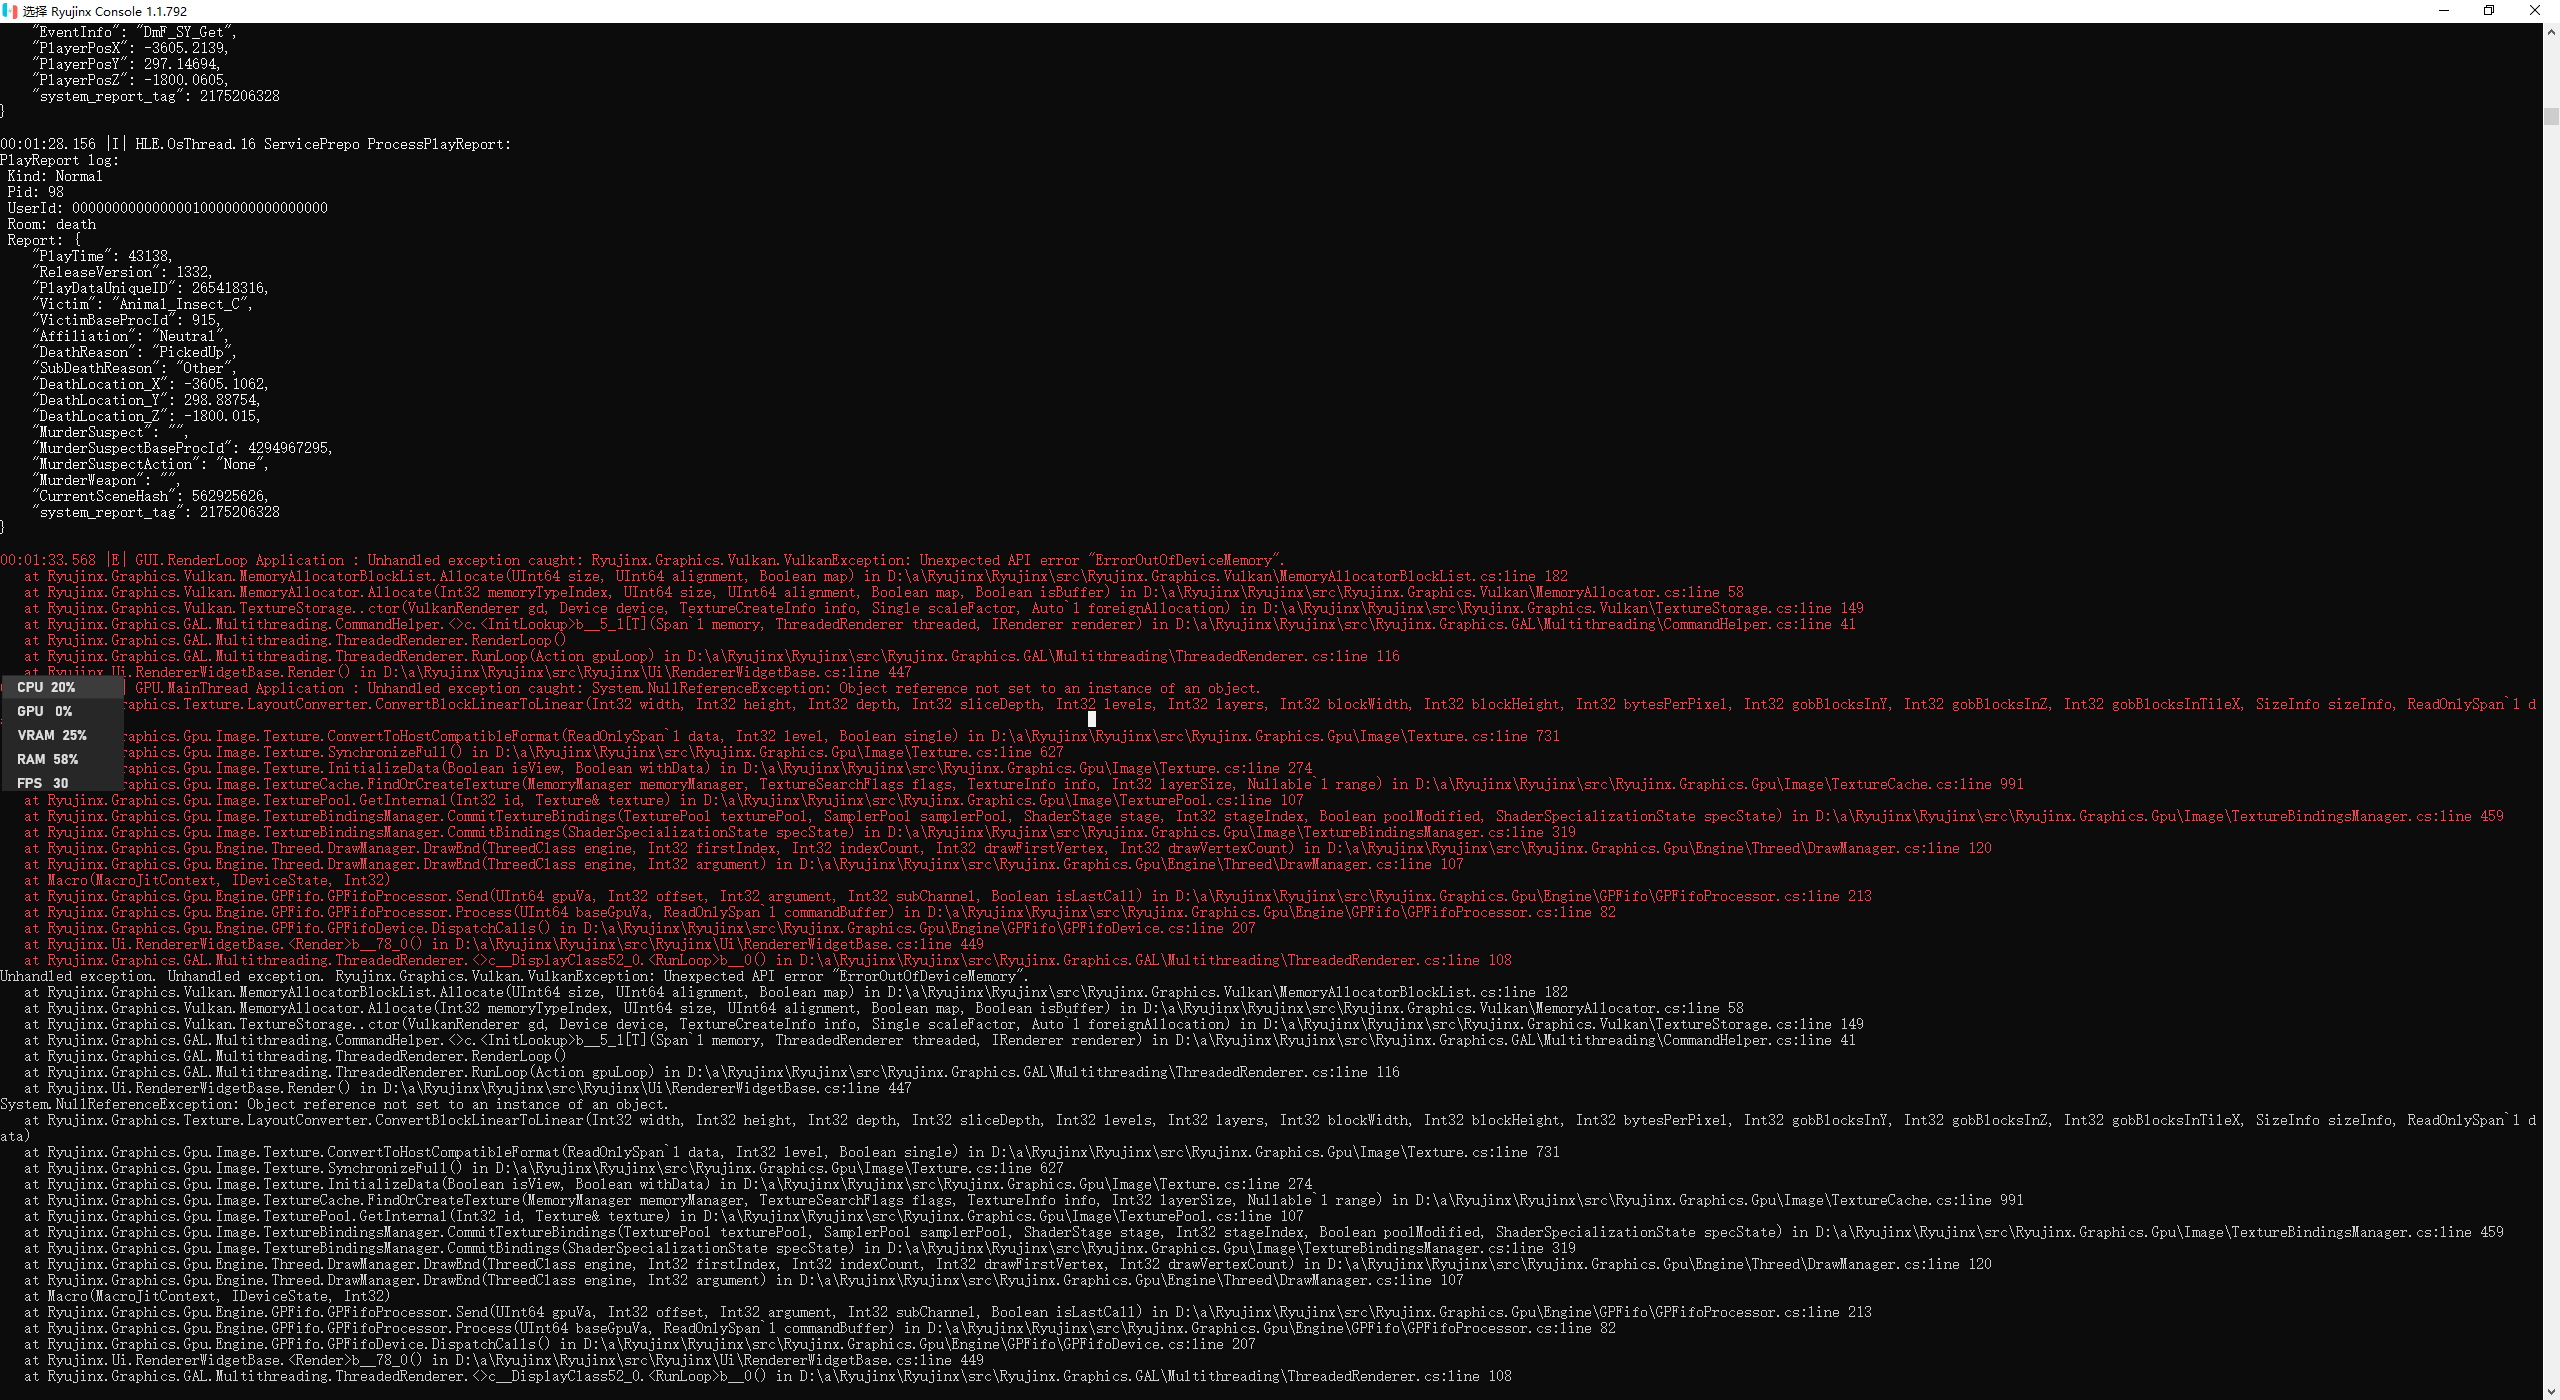
龙神模拟器,会经常闪退,暂时不知道解决办法(Cache PPTC rebuild?)。yuzu没有闪退的问题
暂无
暂无
之前买了正版的switch,游戏也入了两三千。旷/荒野之息,奥德赛,奶刃2都通关了。可惜被妈妈没收了~
想研究一下,PC模拟,记录踩坑过程
无
BitTorrent (简称 BT) 协议是和点对点(point-to-point)的协议程序不同,它是用户群对用户群(peer-to-peer, 或简写为 P2P) 传输协议, 它被设计用来高效地分发文件 (尤其是对于大文件、多人同时下载时效率非常高)。该协议基于HTTP协议,属于TCP/IP应用层。
将文件划分成多块(默认256Kb一块),每块可以从网络中不同的用户的BT客户端处并行下载。
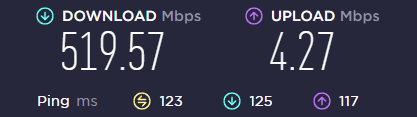
比特彗星,包括其他 BT 软件(迅雷除外,迅雷不是会员会限速,高速通道下载提高的速度一部分就是接触限速后获得的)都不会限制下载速度。
与迅雷不同,BT旨在“人人为我,我为人人”。用户和用户之间对等交换自己手中已有的资源。如果任何一方试图白嫖另外一方的资源,而自己不愿意上传自己的资源,那么那方就会被人视作吸血者而被踢出这个交换,下场是没有人会愿意和你交换数据,你的下载速度也就归零。
如果把上传速度限制为了10KB/s,10KB/s是BitComet上传最低限速,很大时候就这10KB会被包含DHT查询、向Tracker服务器注册,连接用户所产生的上传全部占满。在下载种子的时候,其他用户连上你是只能拿到1~2KB/s甚至一点都没有的。
现在的BT下载客户端都可以做到智能反吸血,所以基本想和交换数据的用户都把你当作Leecher(吸血鬼)Ban(封禁)处理了,故没有下载速度不足为奇。
一般来说,只要预留50KB/s的上传给其他网页浏览、聊天就可以了,在下载时应该尽量把上传留给那些和你交换资源的用户,这样才不会被他们视作你在吸血进而屏蔽你。
如果上传不足,就应该主动限制自己的下载速度,否则单位时间下载量远超过上传量反而会遭来更多的屏蔽,对下载速度提升更加不利。
.torrent 种子文件本质上是文本文件,包含Tracker信息和文件信息两部分。Tracker信息主要是BT下载中需要用到的Tracker服务器的地址和针对Tracker服务器的设置。
sudo XAUTHORITY=/home/qcjiang/.Xauthority qbittorrent以qBit的docker为例,参考linuxsever的docker-compose如下:(qBit相对于Transmission有多线程IO的优势) 也可以使用其余docker镜像
---
version: "2.1"
services:
  qbittorrent:
    image: lscr.io/linuxserver/qbittorrent:latest
    container_name: qbittorrent
    environment:
      - PUID=0 # 这里是root 如果想以其他用戶A修改文件,可以改成其他用户的UID。通過id A 查看
      - PGID=0
      - TZ=Etc/UTC
      - WEBUI_PORT=8080
    volumes:
      - /addDisk/DiskNo4/qBit:/config
      - /addDisk/DiskNo4/bt:/downloads

    network_mode: host
    restart: unless-stopped
默认账号 admin 默认密码 adminadmin
然后通过webUI http://222.195.72.218:8080/管理。
如果不想网络通过wireguard,而是本地可以如下设置
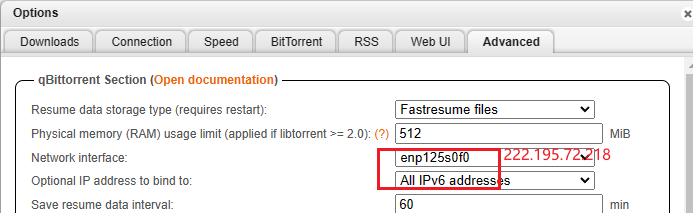

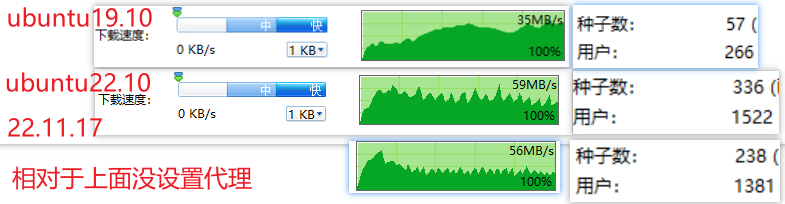
m站刷上传的时候,发现基本都是对方基本都是通过ipv6下载
 uTP是一种基于UDP的协议,它可以根据网络拥塞情况自动调节传输速度,从而减少对其他网络应用的影响。
BT连接是一种基于TCP的协议,它可以保证数据的完整性和可靠性,但是可能会占用较多的网络带宽和资源。
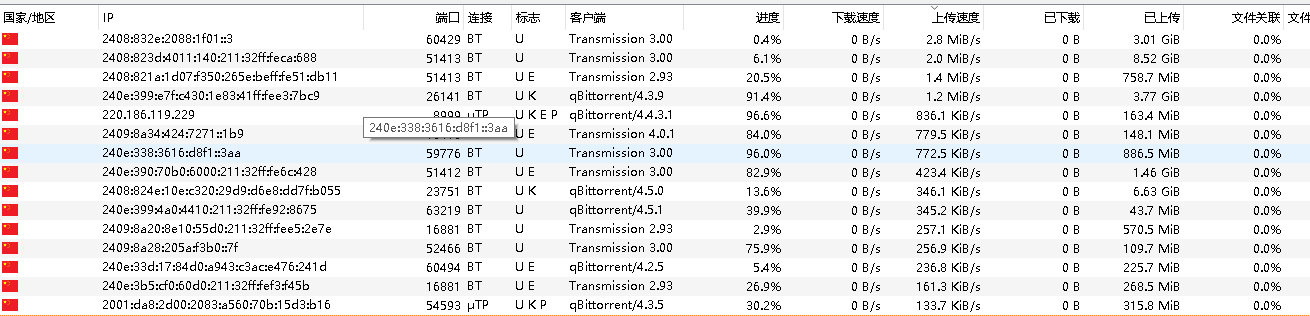
在qBittorrent中,标志U K E P分别表示以下含义:
U:表示你正在上传数据给对方,或者对方正在从你那里下载数据。
K:表示对方支持uTP协议,即基于UDP的传输协议。
E:表示对方使用了加密连接,即通过加密算法保护数据的安全性。
P:表示对方使用了代理服务器或VPN服务,即通过第三方网络隐藏自己的真实IP地址。
收集下载者信息的服务器,并将此信息提供给其他下载者,使下载者们相互连接起来,传输数据。
指一个下载任务中所有文件都被某下载者完整的下载,此时下载者成为一个种子。发布者本身发布的文件就是原始种子。
发布者提供下载任务的全部内容的行为;下载者下载完成后继续提供给他人下载的行为。
上傳資料量 / 下傳資料量的比率,是一種BT的良心度,沒實際作用.(一般为了良心,至少大于1)
BitComet的概念,相对于种子任务的上传能够控制。
长效种子就是你不开启任务做种,只要你启动了比特彗星,软件挂后台,当有其他用户也是用比特彗星下载你列表里的存在的文件时候就会被认为是长效种子 。
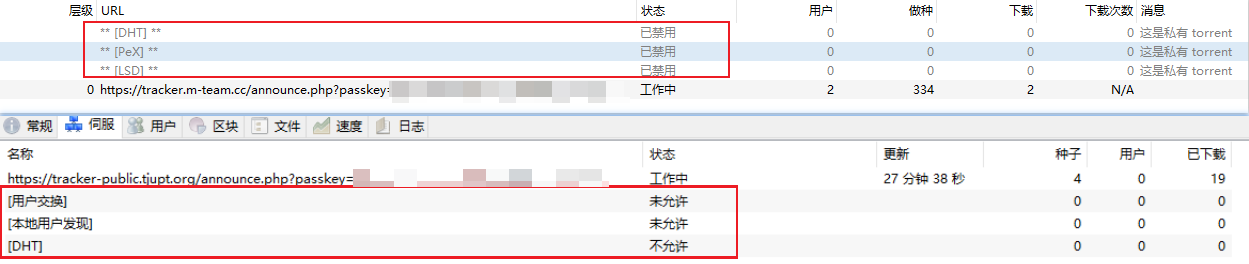
.DHT全称叫分布式哈希表(Distributed Hash Table),是一种分布式存储方法。在不需要服务器的情况下,每个客户端负责一个小范围的路由,并负责存储一小部分数据,从而实现整个DHT网络的寻址和存储。新版BitComet允许同行连接DHT网络和Tracker,也就是说在完全不连上Tracker服务器的情况下,也可以很好的下载,因为它可以在DHT网络中寻找下载同一文件的其他用户。
类似Tracker的根据种子特征码返回种子信息的网络。
在BitComet中,无须作任何设置即可自动连接并使用DHT网络,完全不需要用户干预。
Peer Exchange (PEX), 每个peer客户端的用户列表,可以互相交换通用。可以将其理解为“节点信息交换”。前面说到了 DHT 网络是没有中心服务器的,那么我们的客户端总不能满世界去喊:“我在下载这个文件,快来连我吧.”(很大声)。所以就通过各个 BT 客户端自带的节点去同步路由表实现 DHT 网络连接。
LSD(LPD)就是本地网络资源,内网下载,没什么几把用的东西,可能学校等私有网络好使
網絡業務提供商(Internet Service Provider,簡稱ISP),互聯網服務提供商,即向廣大用户綜合提供互聯網接入業務、信息業務、和增值業務的電信運營商。
bittorrent.anti_leech_min_byte
设定反吸血保护流量:要求对方在指定时间(秒)内需要上传的最少流量(byte), 取值范围:1-10000。

bittorrent.anti_leech_min_stable_sec
设定反吸血保护时间:指定与对方连接多长时间(秒)后开始检查流量(byte),取值范围:1-10000。
需要
文件下载后不能移动,不能删除,不能重命名(但可以在软件内改)。 一但BT 软件找不到文件,或删除了任务,就无法做种上传了。
可以在Bitcomet高级设置里设置时段限速
分享上传也需要频繁读取硬盘。
以Bitcomet为例,该软件就是通过磁盘缓存技术减小频繁随机读写对硬盘的损伤。
磁盘缓存就是利用物理内存作为缓冲,将下载下的数据先存放于内存中,然后定期的一次性写入硬盘,以减少对硬盘的写入操作,很大的程度上降低了磁盘碎片。
因为通常我们设置内存(磁盘缓存)为每任务XX兆,意味着,这个缓冲区可以存放数兆甚至几十兆的“块”,基本上可以杜绝碎片了。
现在BT软件都是自动设置缓存的,它是根据你物理内存的大小分配的。
路由器下载?
导言
想将Nas上的盘挂载到常驻的Ubuntu机器上,供jellyfin读取。
脚本和所需文件在Z:\shaojiemike\Documents\文献\计算机网络目录下。这里先使用fjw的脚本。
通过注册脚本register.py,获得私钥和分配的ip
[Interface]
PrivateKey = xxxx         #register.py的私钥
Address = xxx/32,xxx/128  #register.py的ipv4和ipv6
Table = off              # off禁止wg修改路由表

[Peer]
PublicKey = bmXOC+F1FxEMF9dyiK2H5/1SUtzH0JuVo51h2wPfgyo=
AllowedIPs = 0.0.0.0/0,::/0
Endpoint = [2606:4700:d0::a29f:c001]:500    #2408, 1701, 500, 4500
PersistentKeepalive = 25
main.sh修改包的3个字节。apt-get install nftables/etc/default/warp-helper文件填写对应的wg-conf里Endpoint。比如:ROUTING_ID=11,45,14
UPSTREAM=[2606:4700:d0::a29f:c001]:500ip route add default dev warp proto static scope link table defaultpython register.py #自动生成warp-op.conf,warp.conf和warp-helper
mv warp-helper /etc/default
# cat main.sh
# cat warp-op.conf
vim /etc/config/network #填写warp-op.conf内容,默认只转发172.16.0.0/24来测试连接
ifup warp #启动warp, 代替wg-quick up warp.conf
bash main.sh #启动防火墙实现报文头关键三字节修改
nft list ruleset #查看防火墙,是否配置成功
wg #查看warp状态,测试是否连接成果
这时还没创建warp_out路由表,所以还不能通过WARP出数据。
#/etc/config/network
config interface 'warp'
        option proto 'wireguard'
        option private_key 'wKpvFCOk4sf8d/RD001TF7sNQ39bWnllpqaFf8QnHG4='
        option listen_port '51825'
        list addresses '172.16.0.2/32'
        list addresses '2606:4700:110:8466:d4ea:ffb8:10da:470f/128'
        #option disabled '1'
ifconfig warp down && ifup
添加了WARP的网络出口后,路由器不在只是通过WAN出数据。防火墙需要更新:
wget --bind-address=WARP_ip来模拟10: from all lookup main suppress_prefixlength 11000: from all lookup warp_out,优先级1000root@tsjOp:~/warp# ip rule
0: from all lookup local
3: from 114.214.233.141/22 iif eth1 lookup wan
3: from 172.16.0.2 iif warp lookup warp
10: from all lookup main suppress_prefixlength 1
1000: from all lookup warp_out
32766: from all lookup main
32767: from all lookup default
cd ip_route
mv ../github_ipv4.txt .
python fill_ip_table.py --table warp_out --iface warp --p2p -f github_ipv4.txt
对所有github域名的ip执行类似ip ro add 192.30.252.0/22 dev warp proto static table warp_out操作。
mtr www.github.com
ssh -vT [email protected]
git clone https://github.com/llvm/llvm-project
修改/etc/rc.local
# Put your custom commands here that should be executed once
# the system init finished. By default this file does nothing.


sleep 30 && cd /root/warp/ip_route && python fill_ip_table.py --table warp_out --iface warp --p2p -f github_ipv4.txt

/root/warp/main.sh #重新添加防火墙

exit 0
基于1.1.1.1 的安装windows版本直接白嫖
暂无
暂无
https://gist.github.com/iBug/3107fd4d5af6a4ea7bcea4a8090dcc7e
glados
历史上,Linux 的启动一直采用init进程。 下面的命令用来启动服务。
这种方法有两个缺点。
一是启动时间长。init进程是串行启动,只有前一个进程启动完,才会启动下一个进程。
二是启动脚本复杂。init进程只是执行启动脚本,不管其他事情。脚本需要自己处理各种情况,这往往使得脚本变得很长。
Systemd 就是为了解决这些问题而诞生的。它的设计目标是,为系统的启动和管理提供一套完整的解决方案。
根据 Linux 惯例,字母d是守护进程(daemon)的缩写。 Systemd 这个名字的含义,就是它要守护整个系统。
使用了 Systemd,就不需要再用init了。Systemd 取代了initd,成为系统的第一个进程(PID 等于 1),其他进程都是它的子进程。
Systemd 的优点是功能强大,使用方便,缺点是体系庞大,非常复杂。事实上,现在还有很多人反对使用 Systemd,理由就是它过于复杂,与操作系统的其他部分强耦合,违反"keep simple, keep stupid"的Unix 哲学。
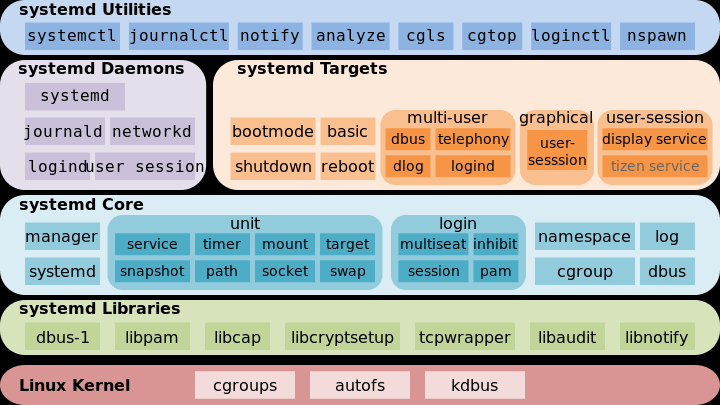
systemctl是 Systemd 的主命令,用于管理系统。
systemctl - Control the systemd system and service manager
systemctl is-enabled servicename.service #查询服务是否开机启动
systemctl enable *.service #开机运行服务
systemctl disable *.service #取消开机运行
systemctl start *.service #启动服务
systemctl stop *.service #停止服务
systemctl restart *.service #重启服务
systemctl reload *.service #重新加载服务配置文件
systemctl status *.service #查询服务运行状态
systemctl --failed #显示启动失败的服务
实操
# 查看相关unit
shaojiemike@tsjNas:~$ systemctl|grep wg
  [email protected]
      loaded active exited  WireGuard via wg-quick(8) for wg0

# 查看已经启动的服务
systemctl list-unit-files --state=enabled|grep wg
[email protected]                     enabled //由于我删除了wg0,所以.service前没wg0

# 删除服务
sh-4.4#  systemctl disable [email protected]
Removed symlink /etc/systemd/system/syno-low-priority-packages.target.wants/[email protected].
Systemd 默认从目录/etc/systemd/system/读取配置文件。但是,里面存放的大部分文件都是符号链接,指向目录/usr/lib/systemd/system/,真正的配置文件存放在那个目录。
systemctl enable命令用于在上面两个目录之间,建立符号链接关系。
$ sudo systemctl enable [email protected]
# 等同于
$ sudo ln -s '/usr/lib/systemd/system/[email protected]' '/etc/systemd/system/multi-user.target.wants/[email protected]'
systemctl enable命令相当于激活开机启动。
与之对应的,systemctl disable命令用于在两个目录之间,撤销符号链接关系,相当于撤销开机启动。
> $ sudo systemctl disable [email protected]
sshd.socket。如果省略,Systemd 默认后缀名为.service,所以sshd会被理解成sshd.service。
把程序设置systemctl服务,并开机启动
/etc/systemd/system/读取配置文件。但是,里面存放的大部分文件都是符号链接,指向目录/usr/lib/systemd/system/,真正的配置文件存放在那个目录。/usr/lib/systemd/system,修改webhook.service[Unit]
Description=Webhook receiver for GitHub
[Service]
Type=simple
ExecStart=/usr/local/bin/webhook
[Install]
WantedBy=multi-user.target
Loaded: loaded (/etc/systemd/system/webhook.service; enabled;这个enabled就是开机启动的意思
查看服务的log
journalctl - Query the systemd journal
$ systemctl reload webhook.service
==== AUTHENTICATING FOR org.freedesktop.systemd1.manage-units ===
Authentication is required to reload 'webhook.service'.
Multiple identities can be used for authentication:
 1.  Jun Shi (shijun)
 2.  Shaojie Tan (shaojiemike)
Choose identity to authenticate as (1-2): 2
Password:
==== AUTHENTICATION COMPLETE ===
Failed to reload webhook.service: Job type reload is not applicable for unit webhook.service.
https://blog.csdn.net/qq_40741855/article/details/104984071
https://www.ruanyifeng.com/blog/2016/03/systemd-tutorial-commands.html

All developers should start with Nsight Systems to identify the largest optimization opportunities. Nsight Systems provides developers a system-wide visualization of an applications performance. Developers can optimize bottlenecks to scale efficiently across any number or size of CPUs and GPUs; from large servers to our smallest SoC. For further optimizations to compute kernels developers should use Nsight Compute or to further optimize a graphics workloads, use Nsight Graphics.
Nsight Compute is an interactive kernel profiler for CUDA applications. It provides detailed performance metrics and API debugging via a user interface and command line tool. Nsight Compute also provides customizable and data-driven user interface and metric collection that can be extended with analysis scripts for post-processing results.
Nsight Graphics is a standalone application for the debugging, profiling, and analysis of graphics applications on Microsoft Windows and Linux. It allows you to optimize the performance of your Direct3D 11, Direct3D 12, DirectX Raytracing 1.1, OpenGL, Vulkan, and KHR Vulkan Ray Tracing Extension based applications.
cat /proc/sys/kernel/perf_event_paranoidsudo sh -c 'echo 2 >/proc/sys/kernel/perf_event_paranoid'重启会重置sudo sh -c 'echo kernel.perf_event_paranoid=2 > /etc/sysctl.d/local.conf'运行 nsight-sys,可以从整体上看GPU,CPU资源的使用情况,和分辨出热点函数和kernel,但是对于为什么是热点给不出具体分析。
勾选了CUDA-trace, GPU Metrics选项
否则会报错。一般情况下使用sudo能保证0 error
GPU Metrics [0]: The user running Nsight Systems does not have permission to access NVIDIA GPU Performance Counters on the target device. For more details, please visit https://developer.nvidia.com/ERR_NVGPUCTRPERM
- API function: NVPW_GPU_PeriodicSampler_GetCounterAvailability(¶ms)
- Error code: 17
- Source function: static std::vector<unsigned char> QuadDDaemon::EventSource::GpuMetricsBackend::Impl::CounterConfig::GetCounterAvailabilityImage(uint32_t)
- Source location: /dvs/p4/build/sw/devtools/Agora/Rel/DTC_F/QuadD/Target/quadd_d/quadd_d/jni/EventSource/GpuMetricsBackend.cpp:609
大致2到3倍时间:默认采样率,单独运行52s, Nsight-sys模拟需要135s。
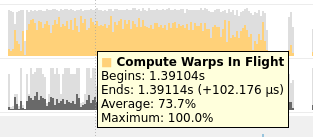
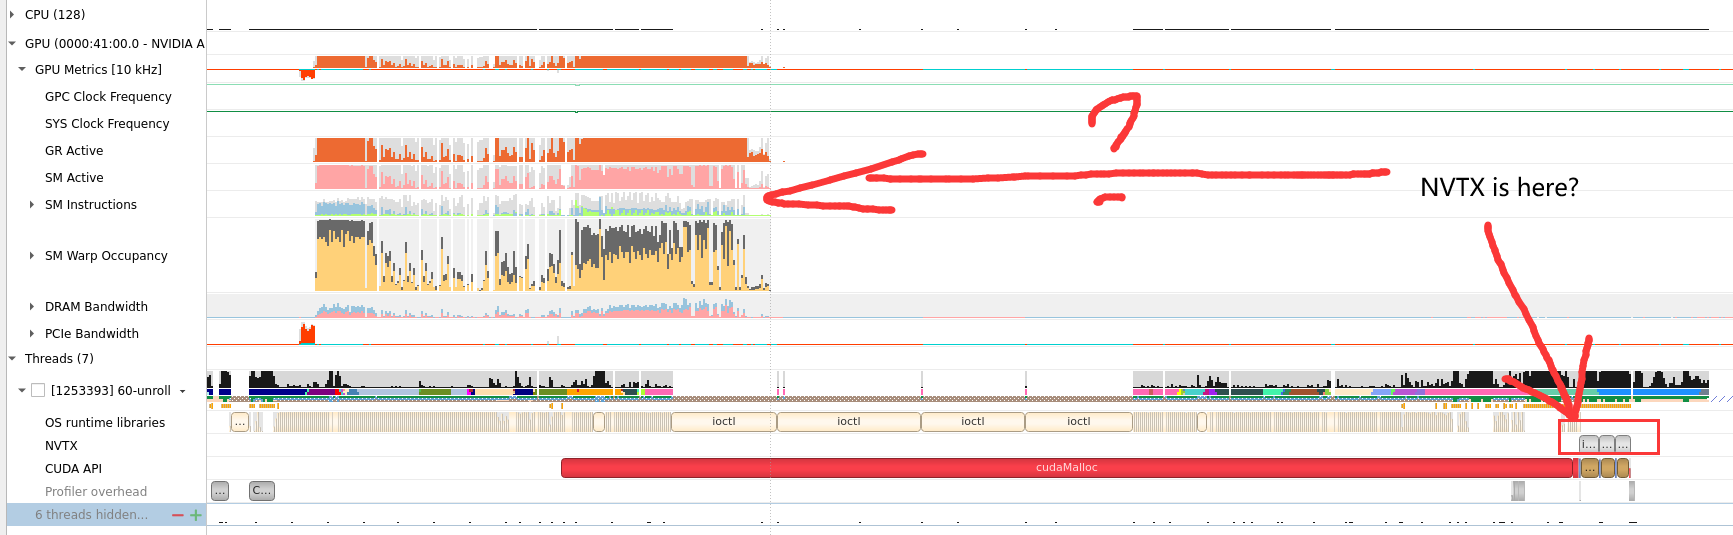
GPU Metrics选项能看出 PCIE, GPU DRAM Bandwidth, Warp的使用情况。
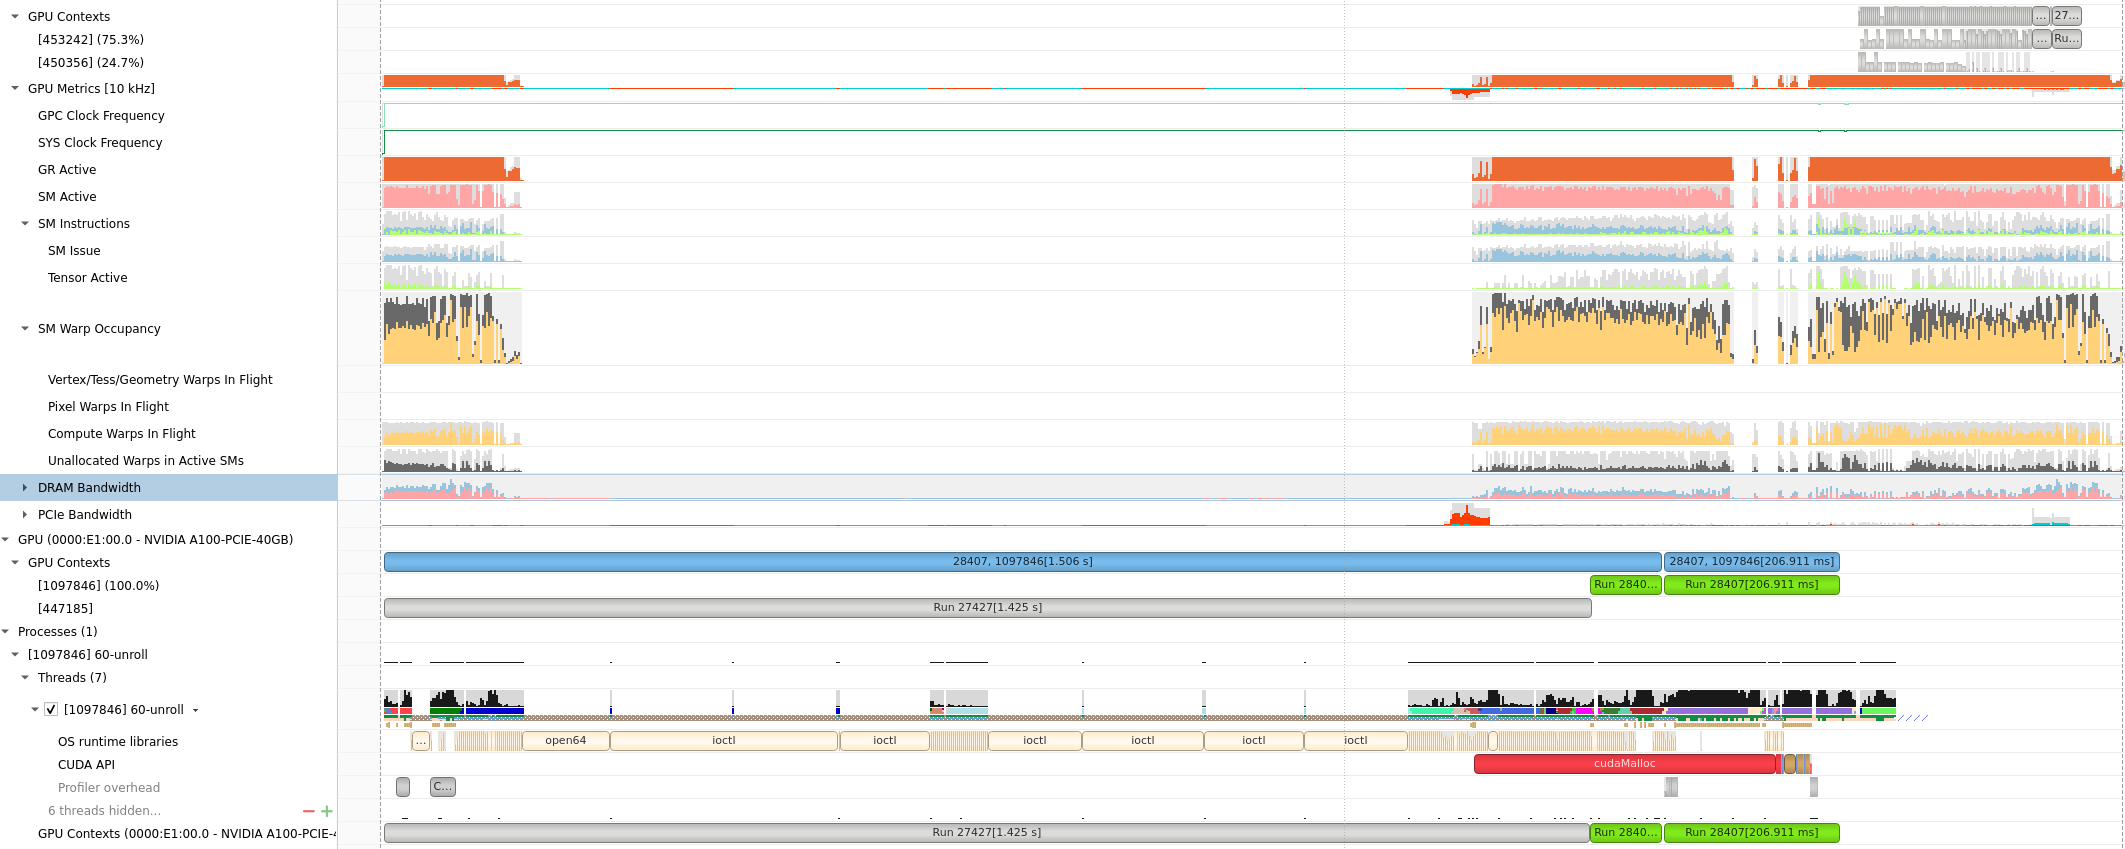
将鼠标放在上面会有具体的数值或者名称的解释,(正在使用的Warps)

由于没有根据kernel function区分,很难读。为此提供了NVTX来给代码打标签
使用NVTX可以在C代码里插入标记,使得Nvsight能有效监控区域代码。
头文件:1
需要标记代码前后加入:
nvtxRangePush("checkResult"); //nvtxRangePushA,nvtxRangePushW,nvtxRangePushEx 好像都差不多
checkResult<<<dim3(row_num / TPBX, col_num / TPBY, 1), dim3(TPBX, TPBY, 1)>>>(row_num, col_num, result);
cudaDeviceSynchronize();
nvtxRangePop();
注意NVTX是作用在CPU线程上的,无法在GPU里用。
注意需要 g++ -o testnv -I/usr/local/cuda/include -L/usr/local/cuda/lib64 -lnvToolsExt testnv.cpp。或者修改cmake来实现同样的效果
NVTX问题:怎么不在同一竖直方向上?GPU还先跑是什么情况2

具体分析见 Deploy Stable Diffusion to A100
默认kernel模式,会根据 function的调度关系,将程序划分为kernel
目测模拟时间慢百倍。
nv-nsight-cu-cli -> ncu
下面是一个使用样例:
/usr/local/NVIDIA-Nsight-Compute/nv-nsight-cu-cli -o mnist -f --csv --profile-from-start off /usr/bin/python3 mnist.py
其中-o是为了输出.nsight-cuprof-report文件用于后续的可视化查看,-f为强制覆盖原有文件,--csv可是在console输出除 timeline 以外数据的时候以逗号分隔数据,方便拷贝至csv文件, --profile-from-start的使用方法和Nsight System以及nvprof一样。其余flag选项可见文档。
上面的例子会生成mnist.nsight-cuprof-report文件。
注意
最前面的可执行文件需要绝对路径,如上面的python3需要使用 /usr/bin/python3。 生成过程中可能会产生很大的临时文件(几十G)。如果本次磁盘空间不够,可以设置如下环境变量来调整存储临时文件的地址。没有找到能直接使用 Nsight Compute 修改临时文件地址的方式。
https://www.freesion.com/article/34871449930/
为了显示原代码makefile添加 -g -G选项
对应CmakeList.txt
https://blog.csdn.net/yan31415/article/details/109491749

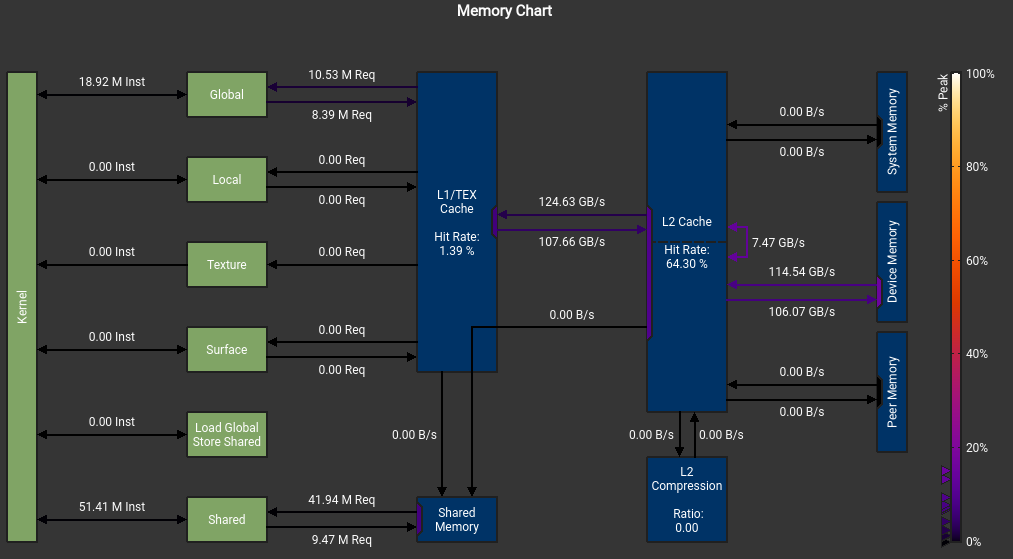 我不明白我的SMEM怎么不是从DRAM来的, 而且峰值怎么这么低?
这个错误也是令人迷惑 The memory access pattern for loads from L1TEX to L2 is not optimal. The granularity of an L1TEX request to L2 is a 128 byte cache line. That is 4 consecutive 32-byte sectors per L2 request. However, this kernel only accesses an average of 3.7 sectors out of the possible 4 sectors per cache line. Check the Source Counters section for uncoalesced loads and try to minimize how many cache lines need to be accessed per memory request.

不知道为什么有1%和2% 的bank conflict
可以看到 SMEM, Register,Block Size是怎么影响GPU Warp的分配调度的。
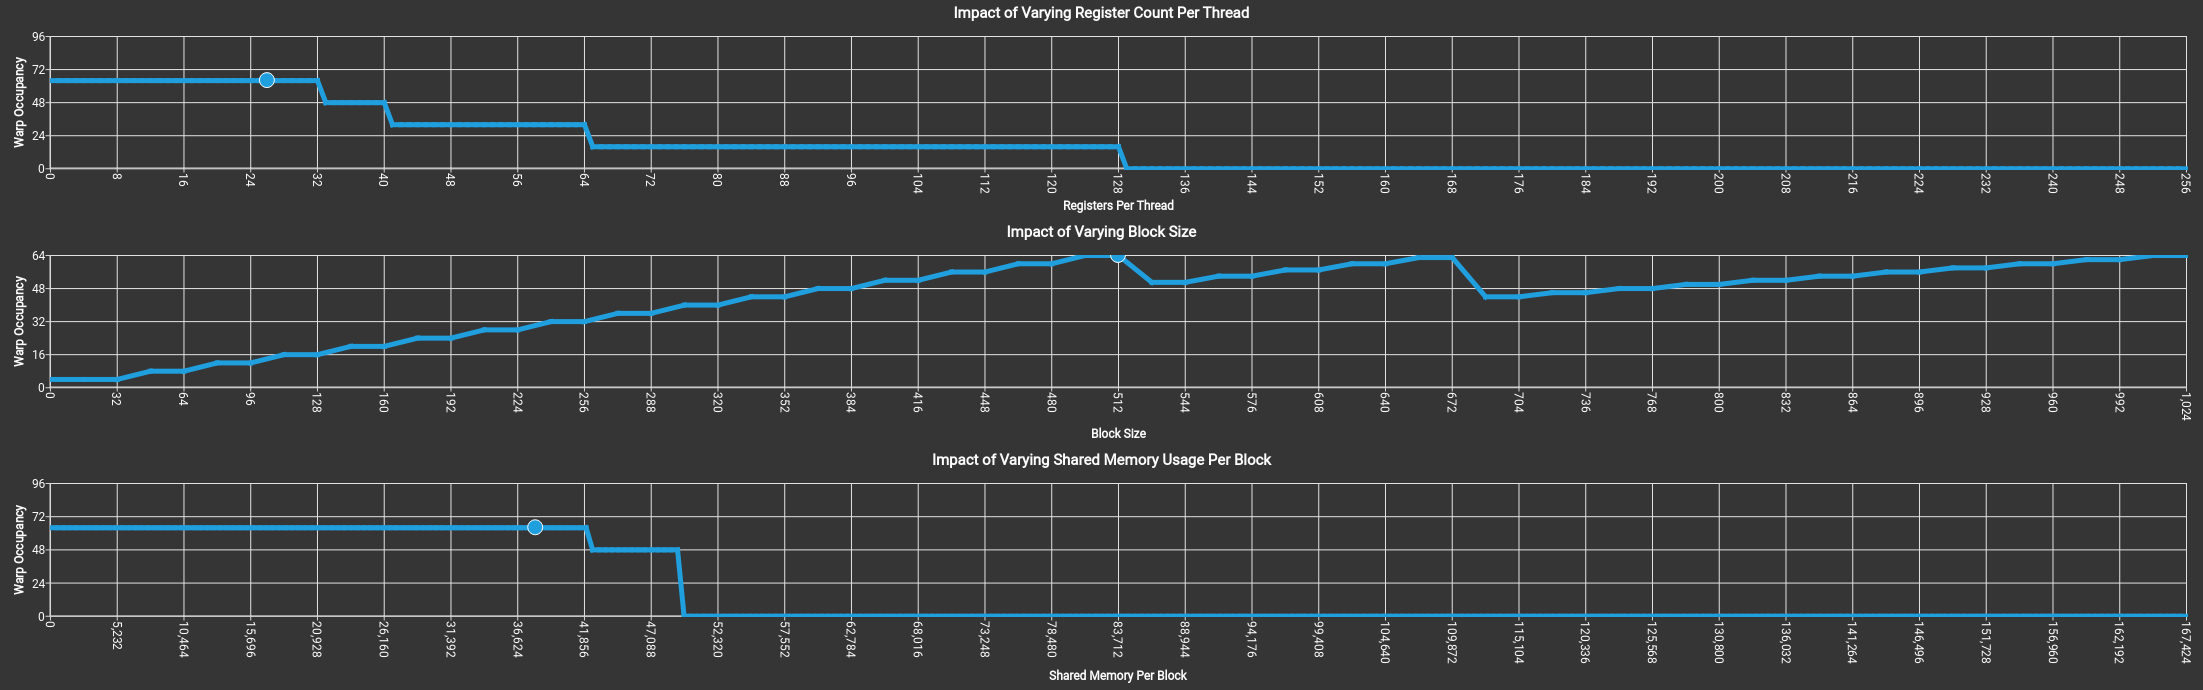 上图没有拖累,吃满了64个warp。
关于if语句
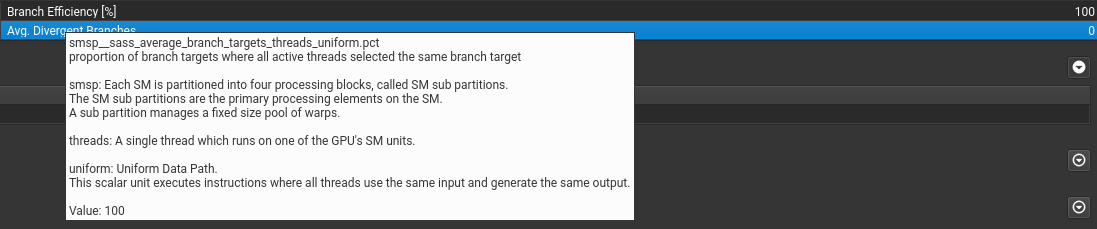 if语句只要warp里执行相同就行。
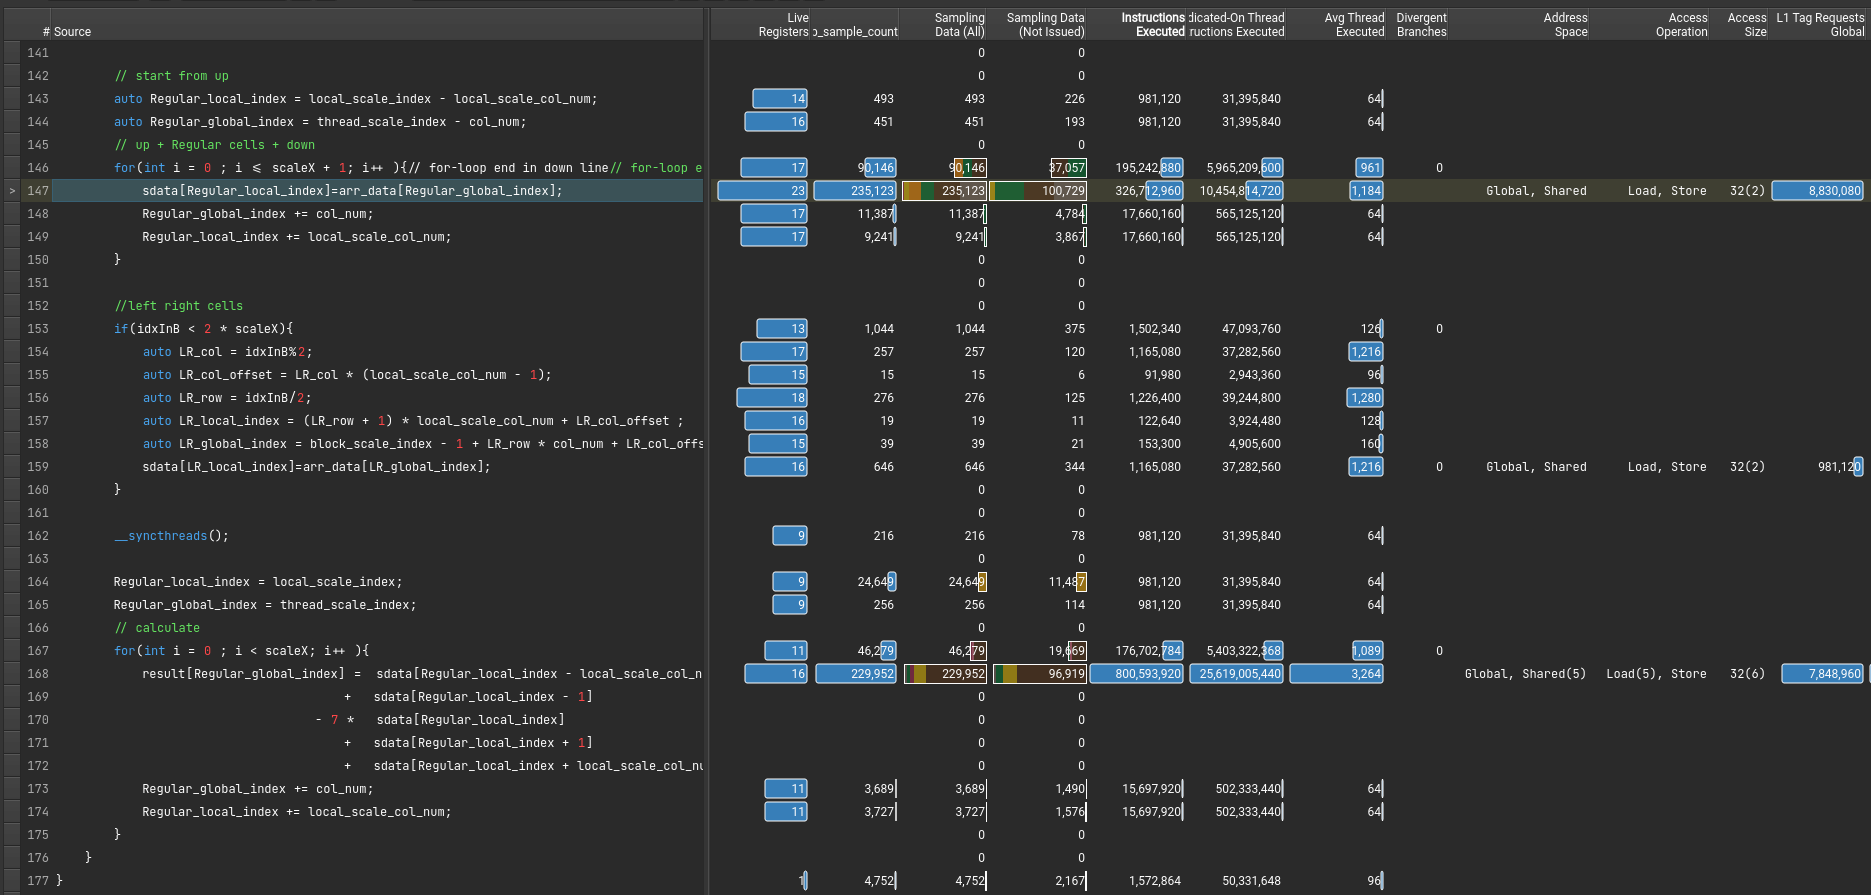
可以提示出不连续访问的地方。(这里是这样设计的,已经避免了绝大部分的不连续访问)

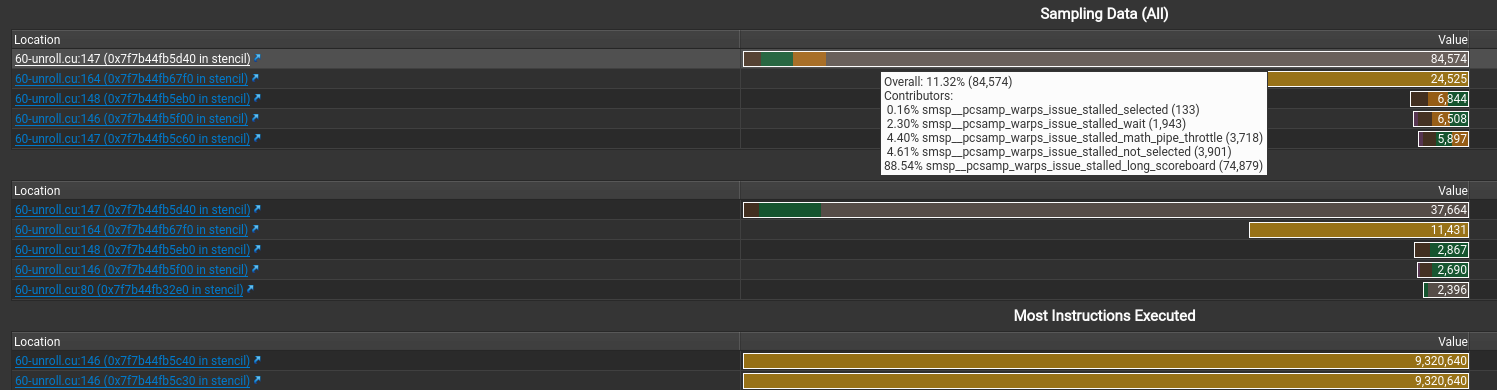
显示stall最多的指令是什么以及在等待什么。还有执行最多的指令
假如 file mismatched 手动选择文件就行
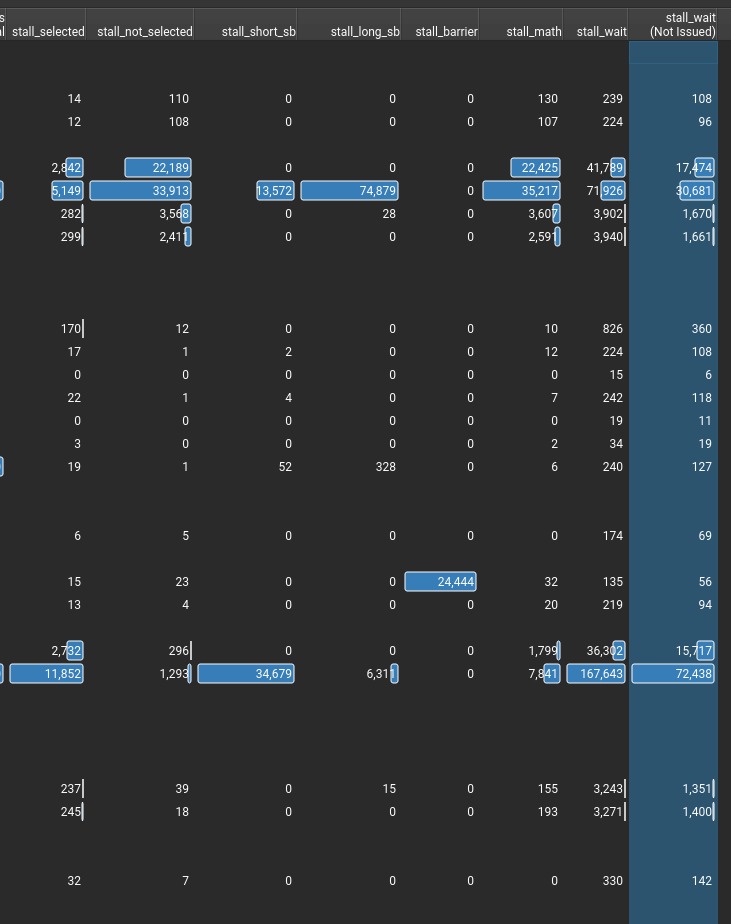
stall的信息,感觉就这些有点用。(其中sb是scoreboard的意思)
有两种汇编
请看PTX SASS一文
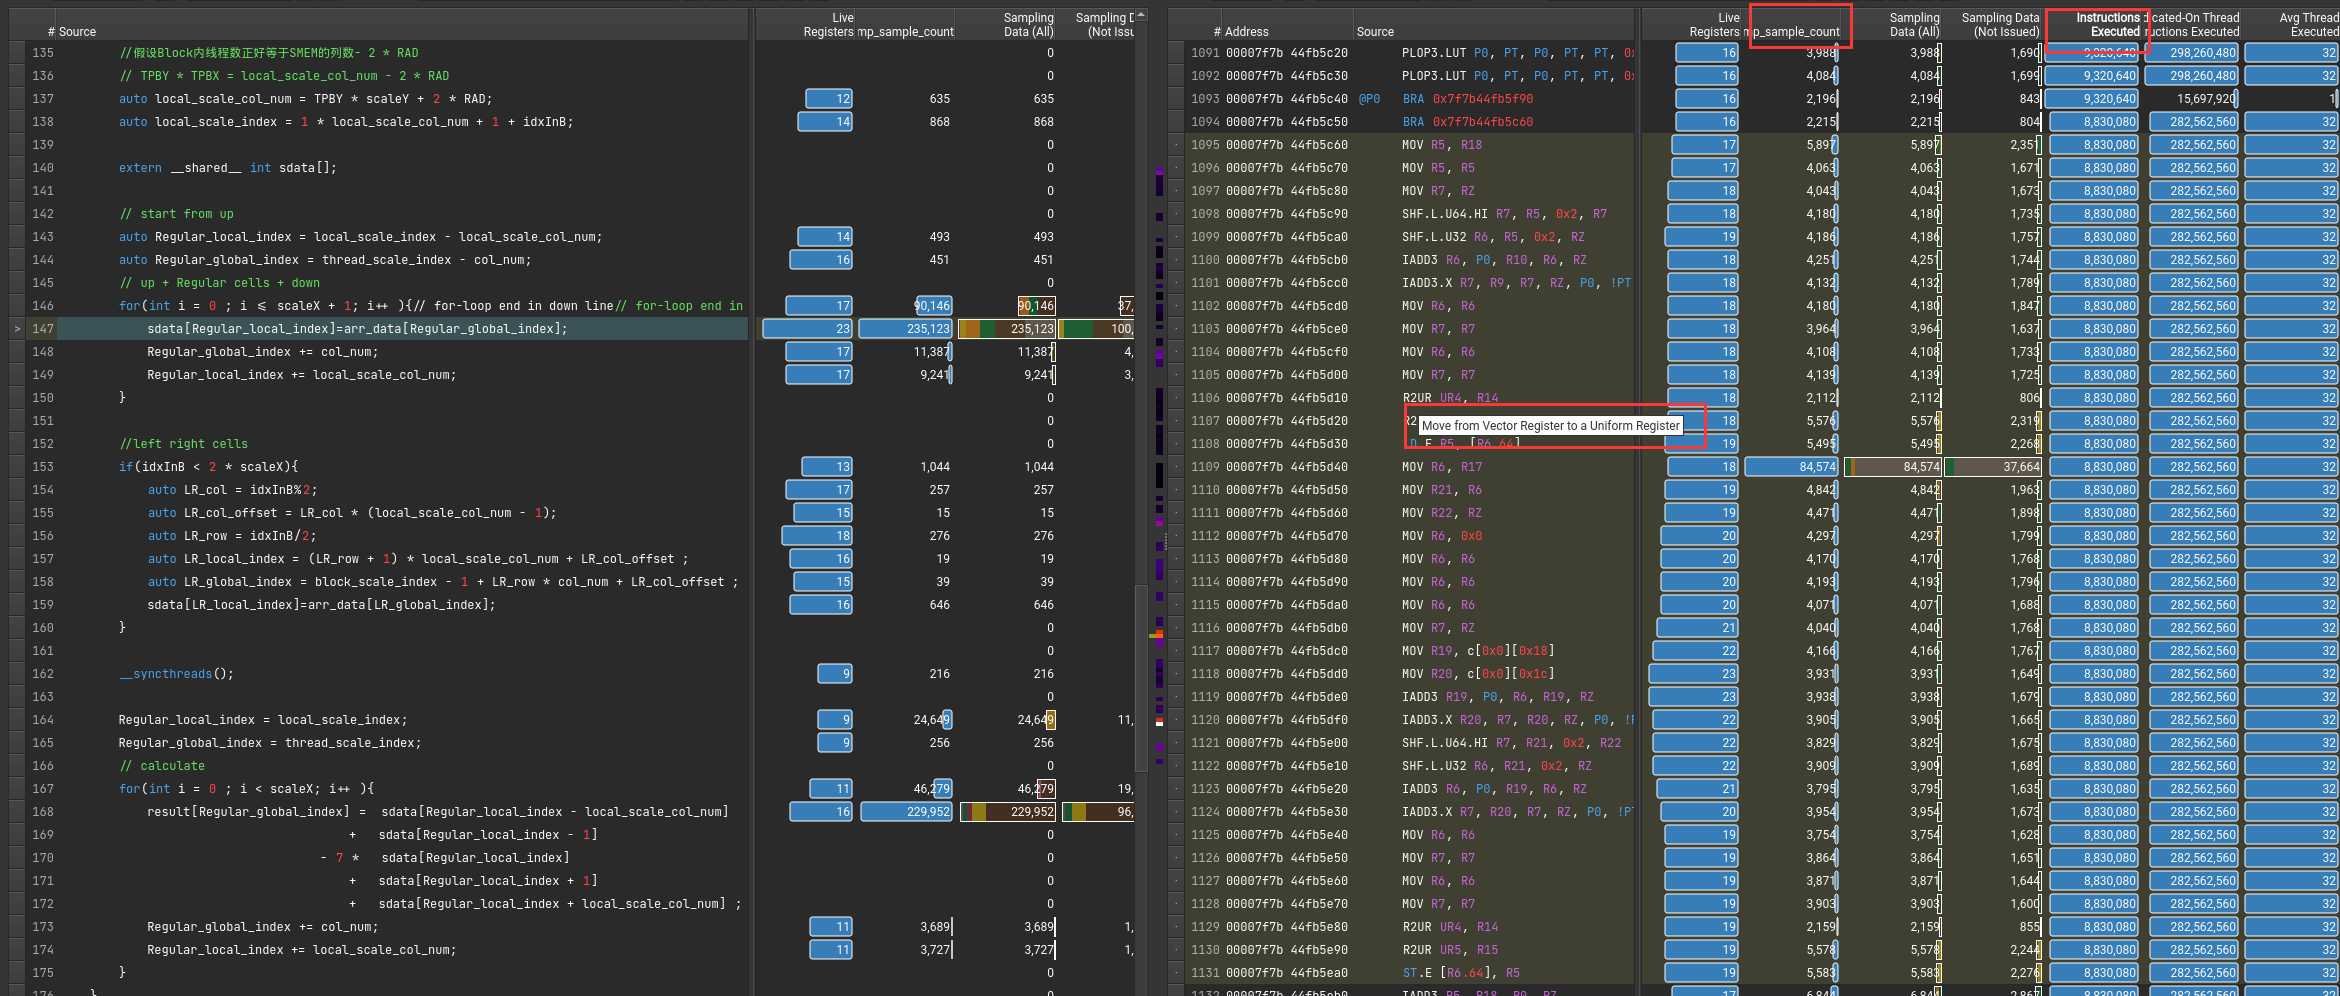
可以通过指令执行数或者采样率来得知,执行最多的指令。
鼠标悬停可以知道具体命令的含义
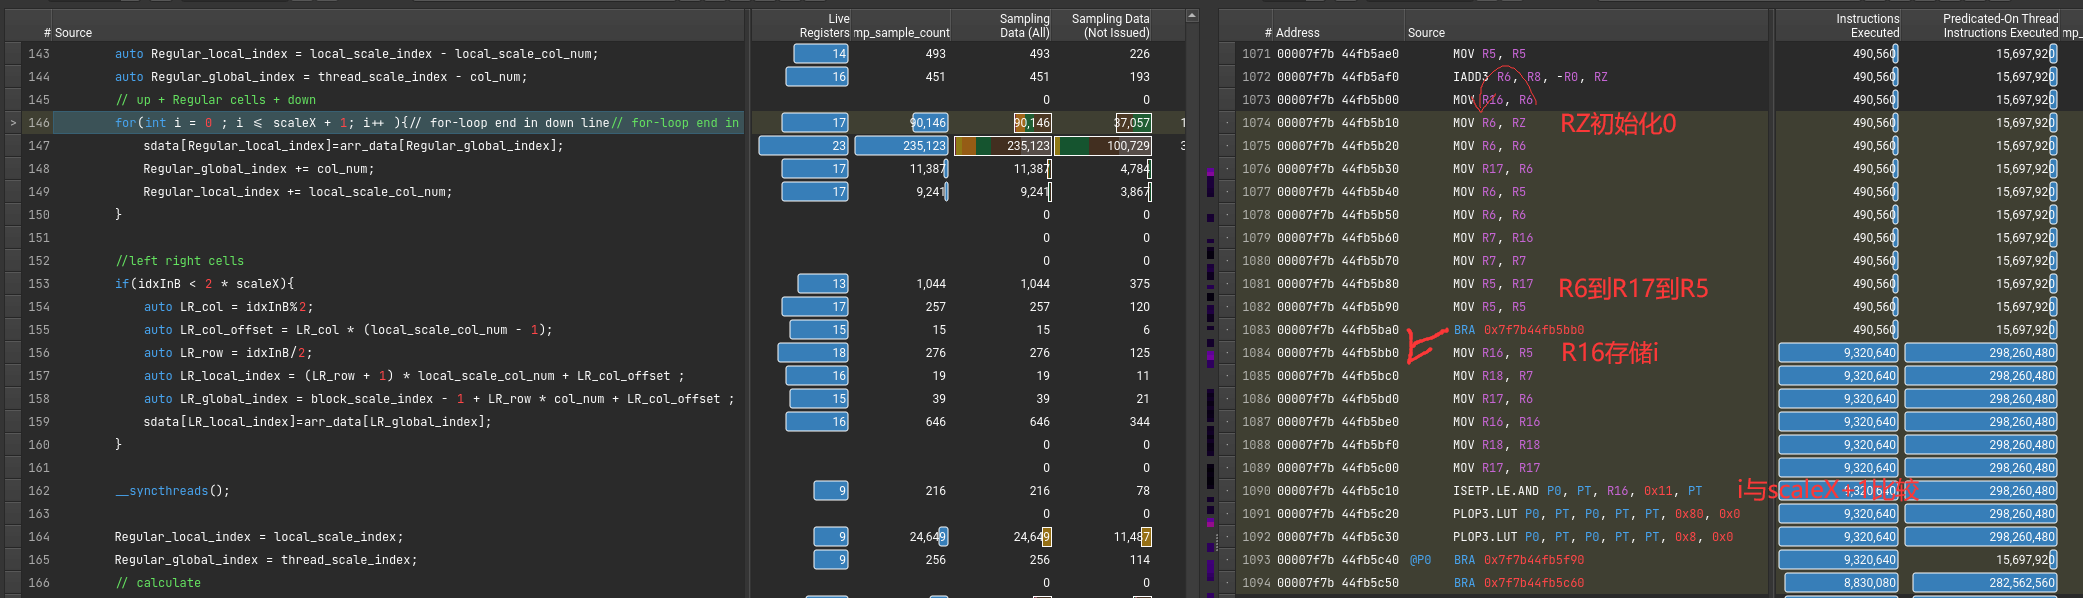
该从DRAM里读取到SMEM的指令对应的PTX和SASS代码
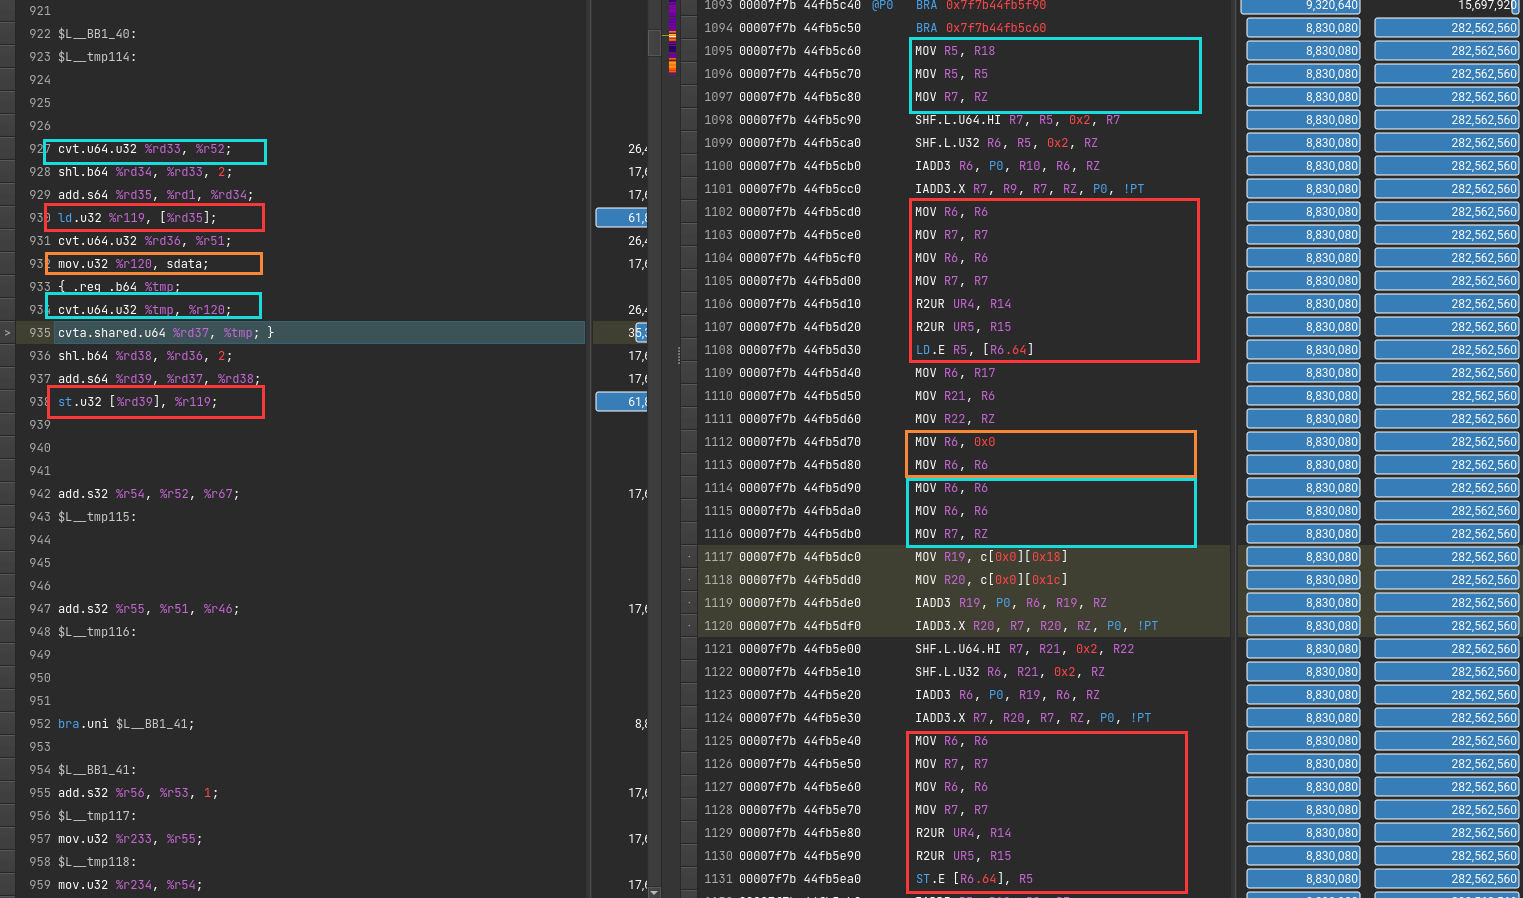
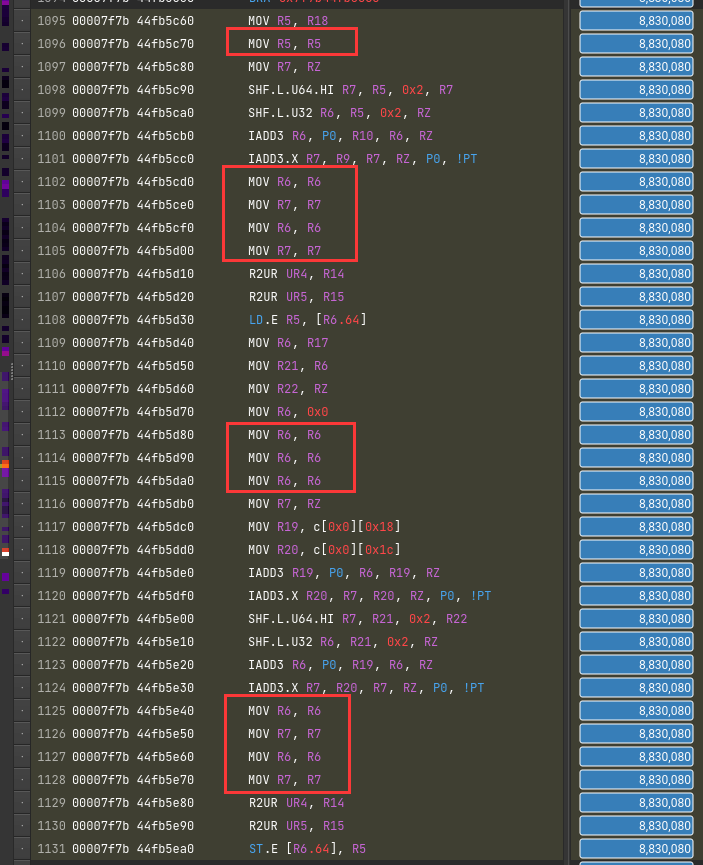
为了隐藏延迟?
直接原因是PTX翻译成SASS。一条mov变多条了

老一代debugger工具,逐渐被Nsight淘汰
在more里有建议
nvprof --analysis-metrics -o  nbody-analysis.nvprof ./nbody --benchmark -numdevices=2 -i=1
# 下面输出 .qdrep 文件
nsys profile --stats=true --force-overwrite=true  -o baseline-report ./single-thread-vector-add
解决方法在程序末尾加cudaDeviceReset()或者cudaProfilerStop()
Warning: Failed to get OpenGL version. OpenGL version 2.0 or higher is required.
OpenGL version is too low (0). Falling back to Mesa software rendering.
qt.qpa.plugin: Could not load the Qt platform plugin "xcb" in "" even though it was found.
This application failed to start because no Qt platform plugin could be initialized. Reinstalling the application may fix this problem.

Available platform plugins are: offscreen, wayland-egl, wayland, wayland-xcomposite-egl, wayland-xcomposite-glx, xcb.
解决办法
sudo apt-get install libxcb-xinerama0
sudo apt install libxcb-icccm4 libxcb-image0 libxcb-keysyms1 libxcb-render-util0
qt.qpa.plugin: Could not load the Qt platform plugin "xcb" in "" even though it was found.
This application failed to start because no Qt platform plugin could be initialized. Reinstalling the application may fix this problem.

Available platform plugins are: xcb.

Application could not be initialized!
    This is likely due to missing Qt platform dependencies.
    For a list of dependencies, please refer to https://doc.qt.io/qt-5/linux-requirements.html
    To view missing libraries, set QT_DEBUG_PLUGINS=1 and re-run the application.
按照说明 export QT_DEBUG_PLUGINS=1再次运行, 显示具体问题
Cannot load library /staff/shaojiemike/Install/cuda_11.7.0_515.43.04_linux/nsight-compute-2022.2.0/host/linux-desktop-glibc_2_11_3-x64/Plugins/platforms/libqxcb.so: (libxcb-xinput.so.0: cannot open shared object file: No such file or directory)
解决 sudo apt-get install libxcb-xinput0
ERR_NVGPUCTRPERM - The user does not have permission to profile on the target device
要用sudo,或者最新的NV
$ sudo ncu-ui
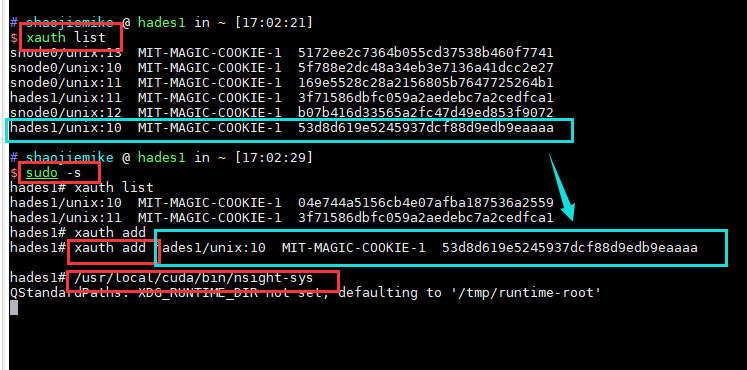
MobaXterm X11 proxy: Authorisation not recognised
qt.qpa.xcb: could not connect to display localhost:10.0
MobaXterm X11 proxy: Unsupported authorisation protocol
Error: Can't open display: localhost:10.0
解决办法(原因是sudo相当于切换到root用户,丢失了xauth信息)
$ xauth list
snode0/unix:12  MIT-MAGIC-COOKIE-1  84941f1f8be97d19436356685f75b884
snode0/unix:13  MIT-MAGIC-COOKIE-1  5172ee2c7364b055cd37538b460f7741
snode0/unix:11  MIT-MAGIC-COOKIE-1  589f3b5ab852f24ca3710c53e6439260
hades1/unix:10  MIT-MAGIC-COOKIE-1  9346adec202bd65250f3d21239025750
snode0/unix:10  MIT-MAGIC-COOKIE-1  52285c563f1688741fa1b434ed2b7b2c

sudo -s # 切换
xauth add snode0/unix:10  MIT-MAGIC-COOKIE-1  52285c563f1688741fa1b434ed2b7b2c # 补全xauth
# 正常执行 xauth有用的总是最后一个
原因是 软件对GPU的支持是逐步的需要安装最新的。
不支持的Nsight的可以尝试老的debugger工具 CUDA Visual Profiler
Pascal support was deprecated, then dropped from Nsight Compute after Nsight Compute 2019.5.1.
The profiling tools that support Pascal in the CUDA Toolkit 11.1 and later are nvprof and visual profiler.
暂无
NVTX问题
https://developer.nvidia.com/tools-overview
https://www.365seal.com/y/zyn1yxJQn3.html