Probability Theory
常用离散分布
二项分布
二项分布(Binomial Distribution)是概率论中常见的离散概率分布,用于描述在n重伯努利实验中成功事件发生的次数。
n重伯努利实验是指进行了n次独立重复的伯努利试验。伯努利试验是一种只有两个可能结果的随机试验,通常称为成功(S)和失败(F)。每次试验成功的概率为p,失败的概率为1-p。特点是每次试验只有两种可能的结果,通常表示为成功和失败。
在二项分布中,我们关注的是在n次独立重复试验中成功事件发生的次数(记为X),其中每次试验成功的概率为p。二项分布的概率质量函数可以表示为:
P(X = k)表示在n次试验中成功事件发生k次的概率。
泊松分布
泊松分布(Poisson Distribution)是一种离散概率分布,用于描述在一段固定时间或空间内随机事件发生的次数。它的特点是事件发生的次数是离散的且无限可数,且事件发生的概率在整个时间或空间内是恒定的。
在泊松分布中,我们关注的是在给定的时间或空间内,事件发生的次数(记为X)。泊松分布的概率质量函数可以表示为:
其中,P(X = k)表示在给定时间或空间内事件发生k次的概率。λ是事件发生的平均次数,即单位时间或空间内事件发生的平均频率。e是自然对数的底数,k!表示k的阶乘。
泊松分布常用于描述稀有事件的发生情况,例如单位时间内电话呼叫次数、单位面积内放射性粒子的撞击次数等。通过泊松分布,我们可以计算在给定平均发生率下,事件发生特定次数的概率,从而进行概率推断和预测。
超几何分布
超几何分布(Hypergeometric Distribution)是一种离散概率分布,用于描述从有限总体中进行抽样时,抽取的样本中具有某种特征的个数的分布。它与二项分布相似,但有一些关键区别。
在超几何分布中,我们考虑从总体中抽取固定大小的样本,总体中有M个具有某种特征的元素和N-M个没有该特征的元素。我们关注的是在抽样过程中,样本中具有该特征的元素的个数(记为X)。
超几何分布的概率质量函数可以表示为:
其中,P(X = k)表示样本中具有该特征的元素个数为k的概率。C(M, k)表示在M个具有该特征的元素中选择k个元素的组合数,C(N-M, n-k)表示在N-M个没有该特征的元素中选择n-k个元素的组合数,C(N, n)表示在总体中选择n个元素的组合数。
超几何分布常用于从有限总体中进行抽样,并研究样本中某种特征的出现情况。它的特点是,随着抽样数量的增加,成功事件的概率不再是恒定的,因为每次抽样都会影响总体中元素的可选性。通过超几何分布,我们可以计算在给定总体和抽样大小的情况下,样本中具有该特征的元素个数的概率分布。
几何分布
几何分布描述的是在独立重复试验中,第一次成功事件A发生所需的试验次数。每次试验都有成功(S)和失败(F)两种可能结果,且成功概率为p。几何分布的概率质量函数可以表示为:
其中,P(X = k)表示第一次成功事件发生在第k次试验的概率。
负二项分布(帕斯卡分布)
负二项分布描述的是在独立重复试验中,成功事件发生r次所需的试验次数。每次试验都有成功(S)和失败(F)两种可能结果,且成功概率为p。负二项分布的概率质量函数可以表示为:
其中,P(X = k)表示成功事件发生r次在第k次试验的概率。C(k-1, r-1)表示组合数,表示在前k-1次试验中取r-1次成功的组合数。
常用连续分布
常用密度函数表示
正态分布(高斯分布)
正态分布,也称为高斯分布(Gaussian Distribution),是统计学中最重要且广泛应用的连续概率分布之一。
正态分布的概率密度函数(Probability Density Function, PDF)可以用以下公式表示:
其中,f(x)表示随机变量X的概率密度函数。μ表示分布的均值(期望值),σ表示标准差,π表示圆周率,exp表示自然对数的指数函数。
正态分布具有以下特点:
- 对称性:正态分布的概率密度函数是关于均值对称的,呈现出钟形曲线的形状。
- 唯一性:正态分布由其均值和标准差唯一确定。
- 中心极限定理:许多随机现象的总体分布趋向于正态分布,尤其在样本量足够大时。
- 68-95-99.7规则:在正态分布中,约有68%的数据落在均值的一个标准差范围内,约有95%的数据落在两个标准差范围内,约有99.7%的数据落在三个标准差范围内。
均匀分布
均匀分布(Uniform Distribution)是一种简单而常见的概率分布,它在指定的区间内的取值具有相等的概率。在均匀分布中,每个可能的取值都具有相同的概率密度。
均匀分布的概率密度函数(Probability Density Function, PDF)可以用以下公式表示:
f(x) = 1 / (b - a),如果 a ≤ x ≤ b
f(x) = 0,其他情况
其中,f(x)表示随机变量X的概率密度函数。a和b分别表示分布的下限和上限。
指数分布
指数分布(Exponential Distribution)是一种连续概率分布,常用于描述事件发生的时间间隔。它是一种特殊的连续随机变量的分布,具有单峰、右偏的特点。
指数分布的概率密度函数(Probability Density Function, PDF)可以用以下公式表示:
f(x) = λ * exp(-λx),如果 x ≥ 0
f(x) = 0,其他情况
其中,f(x)表示随机变量X的概率密度函数,λ是分布的参数,被称为率参数。
指数分布具有以下特点:
- 单峰性:指数分布的概率密度函数是单峰的,峰值出现在0点,随着时间的增长逐渐减小。
- 无记忆性:指数分布具有无记忆性的特性,即给定已经等待了一段时间,再等待更多的时间的概率与刚开始等待的概率是相同的。这是指数分布与其他分布不同的重要特点。
指数分布在实际应用中具有广泛的应用。例如,它常用于描述随机事件的到达时间、服务时间、寿命等。在可靠性工程和排队论中,指数分布经常用于模拟和分析各种事件的发生和持续时间。
伽马分布
伽马分布(Gamma Distribution)是一种连续概率分布,它常用于描述正数随机变量的分布,如事件的等待时间、寿命等。伽马分布是指数分布的推广形式,它可以具有更灵活的形状。
伽马分布的概率密度函数(Probability Density Function, PDF)可以用以下公式表示:
$$ f(x) = (1 / (Γ(k) * θ^k)) * x^{k-1} * exp(-x/θ)$$,如果 x ≥ 0 0,其他情况
其中,f(x)表示随机变量X的概率密度函数,k和θ是分布的参数,k被称为形状参数,θ被称为尺度参数,Γ(k)表示伽马函数(Gamma function)。
伽马分布具有以下特点:
- 随机变量为正数:伽马分布的取值范围为正数,不包括0及负数。
- 形状灵活:通过调节形状参数k,可以改变伽马分布的形状。当k为整数时,伽马分布退化为Erlang分布。
- 可以用于建模持续时间:伽马分布常用于建模持续时间,如等待时间、寿命等,特别是当事件的发生率不是恒定的情况下。
伽马分布在实际应用中具有广泛的应用。例如,在可靠性工程中,它常用于描述零部件的寿命和故障时间。在金融领域,伽马分布被用于模拟和分析资产价格的变动。
贝塔分布
贝塔分布(Beta Distribution)是一种连续概率分布,它定义在区间[0, 1]上,并且常用于描述概率分布、比例、概率参数等随机变量的分布。
贝塔分布的概率密度函数(Probability Density Function, PDF)可以用以下公式表示:
$\(f(x) = (x^{α-1} * (1-x)^{β-1}) / B(α, β)\)$,如果 0 ≤ x ≤ 1 0,其他情况
其中,f(x)表示随机变量X的概率密度函数,α和β是分布的两个形状参数,B(α, β)表示贝塔函数(Beta function)。
贝塔分布具有以下特点:
- 取值范围:贝塔分布的取值范围为区间[0, 1],对应于概率或比例的取值范围。
- 形状灵活:通过调节形状参数α和β的值,可以改变贝塔分布的形状,使其适应不同的数据分布。
- 可以用于建模随机概率:贝塔分布常用于建模随机概率、比例等,例如二项分布中的成功概率、伯努利分布中的参数等。
贝塔分布在实际应用中具有广泛的应用。它常被用于贝叶斯统计推断、可靠性分析、A/B测试、市场份额预测等领域。此外,贝塔分布还与其他概率分布有着密切的关联,例如伯努利分布、二项分布和贝叶斯推断中的共轭先验分布等。
三大抽样分布
- 卡方分布(Chi-Square Distribution):卡方分布是一种连续概率分布,用于描述随机变量的平方和的分布。
- F分布是一种连续概率分布,用于描述两个独立正态分布方差比的分布。
- t分布(t-Distribution):t分布是一种连续概率分布,用于描述小样本情况下样本均值的分布。与正态分布相比,t分布的尖峰更高、尾部更厚,适用于样本容量较小或总体方差未知的情况。
随机过程
泊松过程
泊松过程(Poisson Process)是一种随机过程,用于描述在固定时间间隔内随机事件发生的模式。泊松过程的关键特征是事件在时间上的独立性和固定的平均发生率。它可以用于建模各种事件的发生,例如电话呼叫到达、事故发生、信号传输等。
马尔科夫
马尔可夫性质
当一个随机过程其未来状态的条件概率分布仅依赖于当前状态;换句话说,在给定现在状态时,它与过去状态(即该过程的历史路径)是条件独立的,那么此随机过程即具有马尔可夫性质。
马尔可夫链、过程
马尔可夫链(Markov Chain, MC)是概率论和数理统计中具有马尔可夫性质(Markov property)且存在于离散的指数集(index set)和状态空间(state space)内的随机过程(stochastic process)
适用于连续指数集的马尔可夫链被称为马尔可夫过程(Markov process)
马尔可夫决策过程
马尔可夫决策过程(Markov Decision Process, MDP)是序贯决策(sequential decision)的数学模型,用于在系统状态具有马尔可夫性质的环境中模拟智能体可实现的随机性策略与回报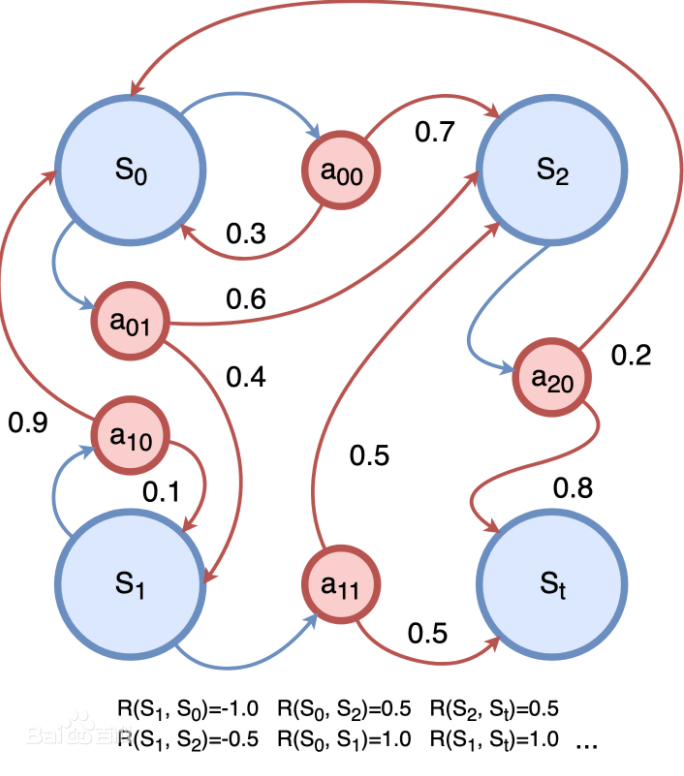
平稳过程
平稳过程(Stationary Process)是一种随机过程,其统计特性在时间上保持不变。具体而言,一个平稳过程在不同时间段内具有相同的概率分布和统计特性,如均值、方差和自协方差。
布朗运动
布朗运动(Brownian Motion),也被称为维纳过程(Wiener Process),是一种随机过程,以英国生物学家罗伯特·布朗(Robert Brown)的名字命名。布朗运动是一种连续时间、连续空间的随机运动,它在各个时间点上的位置是随机的。
布朗运动的特点包括:
- 随机性:布朗运动的运动路径是随机的,不可预测的。在每个时间点上,粒子的位置随机地变化。
- 连续性:布朗运动在连续的时间和空间上进行。粒子在任意瞬时的位置是连续变化的。
- 马尔可夫性:布朗运动满足马尔可夫性质,即未来的运动只与当前的位置有关,而与过去的运动路径无关。
- 独立增量:布朗运动的位置变化是具有独立增量的,即在不同时间段上的位置变化是相互独立的。
布朗运动在物理学、金融学、生物学等领域具有广泛的应用。它可以用来描述微粒在流体中的扩散、金融市场中的价格变动、细胞内分子的运动等随机现象。布朗运动的数学描述采用随机微分方程,其中包括随机增量项,用来表示随机性和不确定性。
鞅过程
鞅过程(Martingale Process)是一种随机过程,它在概率论和数学金融领域中具有重要的应用。鞅过程是一种随机变量序列,它满足一定的条件,其中最重要的性质是条件期望的无偏性。
具体而言,设{X(t), t ≥ 0}是一个随机过程,定义在一个概率空间上,关于时间t的随机变量。如果对于任意的s ≤ t,条件期望E[X(t) | X(s)]等于X(s),即 E[X(t) | X(s)] = X(s),那么这个随机过程被称为鞅过程。
换句话说,鞅过程在任意时刻的当前值的条件期望等于过去时刻的值,表明鞅过程在平均意义上不随时间变化而漂移。
一个典型的实际案例是赌博游戏中的赌徒之行。
假设有一个赌徒在每轮游戏中抛掷硬币,正面朝上赢得1单位的奖励,反面朝上输掉1单位的赌注。我们可以用一个鞅过程来描述赌徒的资金变化。假设赌徒的初始资金为0单位,并且在每轮游戏中抛硬币的结果是一个独立的随机事件。赌徒的资金变化可以表示为一个鞅过程{X(t), t ≥ 0},其中X(t)表示赌徒在时间t时的资金。
在这个例子中,条件期望的无偏性意味着在任意时刻t,赌徒的当前资金的条件期望等于过去时刻的资金,即 E[X(t) | X(s)] = X(s),其中s ≤ t。
这意味着赌徒在每轮游戏中没有系统性地赢或输。无论他之前的赢利或亏损情况如何,当前的资金预期值等于他之前的资金。
鞅过程在金融市场建模、随机控制理论、概率论等领域有广泛的应用。它在金融中可以用来描述资产价格的动态演化、期权定价、风险度量等。在概率论中,鞅过程是一类重要的随机过程,其具有丰富的性质和数学结构,被广泛研究和应用。
大数定理,中心极限定理
大数定理
大数定理(Law of Large Numbers)是概率论中的一条重要定理,描述了随机变量序列的均值的收敛性质。它指出,当随机变量的样本容量足够大时,样本均值将接近于随机变量的期望值。
中心极限定理
中心极限定理(Central Limit Theorem)是概率论和统计学中的重要结果之一。它描述了在一定条件下,当独立随机变量的数量足够大时,它们的平均值的分布将近似于正态分布。
中心极限定理的主要内容如下:
假设有n个独立随机变量X1, X2, ..., Xn,它们具有相同的分布和参数。这些随机变量的和S_n = X1 + X2 + ... + Xn的分布在n趋近于无穷大时,以及适当的标准化后,将近似于正态分布。
具体而言,当n足够大时,S_n的近似分布可以用正态分布来描述。
参数估计(概率分布模型)
在参数估计中,确实需要事先假设或确定一个概率分布模型(注意不是确定的模型,不然可以根据结果直接算出参数)。参数估计的前提是我们假设观测数据来自于某个特定的概率分布,而我们的目标是估计这个概率分布中的未知参数。
具体来说,参数估计的过程通常包括以下步骤:
- 假设概率分布模型:我们需要根据问题的特点和领域知识,假设观测数据符合某个特定的概率分布模型,例如正态分布、泊松分布、伽马分布等。这个假设是基于对问题的理解和经验的。
- 确定参数:在所假设的概率分布模型中,可能存在一个或多个未知参数,我们需要明确这些参数,并确定我们想要估计的参数。
- 收集观测数据:根据实际情况,我们收集一组观测数据,作为对概率分布中参数的估计依据。
- 构建估计方法:根据所选的概率分布模型和参数,我们构建相应的估计方法,例如最大似然估计、矩估计等。
- 估计参数:利用观测数据和估计方法,计算出对未知参数的估计值。
需要注意的是,参数估计的准确性和可靠性依赖于所假设的概率分布模型的正确性和数据的充分性。如果所假设的概率分布模型与实际情况不符,或者观测数据过少或存在较大的噪声,估计结果可能会出现偏差或不准确的情况。
因此,在参数估计之前,我们需要对问题进行合理的假设和模型选择,并在数据收集和估计方法的过程中考虑到模型假设的合理性和数据的质量。
贝叶斯定理
贝叶斯定理是概率论中的一个基本定理,描述了在观测到新的证据(观测数据)后,如何更新对某个事件的概率估计。
假设有两个事件 A 和 B,其中事件 A 是我们要推断或估计的事件,而事件 B 是观测到的证据。贝叶斯定理表述如下:
P(A|B) = (P(B|A) * P(A)) / P(B)
其中:
P(A|B)是在观测到事件 B 后事件 A 发生的条件概率,也称为后验概率。P(B|A)是在事件 A 发生的条件下观测到事件 B 的概率,也称为似然函数。P(A)是事件 A 的先验概率,即在观测到事件 B 之前对事件 A 发生的估计。P(B)是事件 B 的边际概率,即观测到事件 B 的概率。
贝叶斯定理的核心思想是通过观测到的证据(事件 B),更新对事件 A 的概率估计。它将先验概率和似然函数结合起来,得到后验概率。具体而言,贝叶斯定理可以用于根据已知信息更新模型参数、进行推断、进行分类等。
贝叶斯定理在贝叶斯统计学中具有重要的应用,它允许我们利用已有知识(先验)和新的证据(似然函数)来更新对未知事件的估计(后验)。通过不断地更新先验概率,我们可以根据新的观测数据获得更准确和可靠的后验概率估计。
先验分布 后验概率分布
在贝叶斯统计中,先验分布和后验概率分布是两个关键概念,用于描述我们对参数的初始信念和通过观测数据更新后的信念。
- 先验分布(Prior Distribution):先验分布是在观测数据之前对参数的分布做出的假设或先验信念。它反映了我们在观测数据之前对参数可能取值的主观或客观的认识。先验分布通常用一个概率分布函数来表示,例如贝塔分布、高斯分布等。先验分布可以看作是参数的初始猜测,它对参数的可能取值进行了一定的限制或权重。
- 后验概率分布(Posterior Probability Distribution):后验概率分布是在观测到数据后,通过贝叶斯定理将先验分布与似然函数结合起来得到的参数分布。它表示了在考虑观测数据之后,对参数取值的更新后的概率分布。后验概率分布结合了先验信息和观测数据的信息,提供了对参数的更准确估计,并反映了参数的不确定性程度。
先验分布和后验概率分布之间的关系可以用贝叶斯定理来表示:
后验概率分布 ∝ 先验分布 × 似然函数
其中,似然函数描述了观测数据出现的可能性。通过将先验分布与观测数据的似然函数相乘,并进行适当的归一化,可以得到后验概率分布。
贝叶斯统计的核心思想是通过不断地更新先验分布,利用观测数据提供的信息,得到后验概率分布,并在此基础上做出推断和决策。先验分布提供了先验知识和信念,而后验概率分布则是在考虑观测数据后对参数的更新和修正。
点估计与无偏性
点估计(Point Estimation)是参数估计的一种方法,它通过使用样本数据来估计总体参数的具体值。点估计的目标是找到一个单一的估计值,作为对未知参数的最佳猜测。
无偏性是点估计的性质之一。一个无偏估计是指在重复抽样的情况下,估计值的期望等于被估计参数的真实值。换句话说,如果一个估计值的期望与真实参数值相等,则该估计值是无偏的。
矩估计
- 使用使用样本矩来逼近/替代总体矩,从而得到参数的估计值。
- 样本矩(Sample Moments):样本矩是根据从总体中抽取的样本数据计算得出的统计量。常见的样本矩包括样本均值、样本方差、样本偏度、样本峰度等。
最大似然估计与EM算法
- 最大似然估计(maximum likelihood estimation,MLE),或者最大对数似然:
- 简单来说:估计的是已知概率分布模型的参数值,输入是测试的结果/样本。简单来说,模型已定,参数未知下,用已知的样本结果信息,反推最具有可能(最大概率)导致这些样本结果出现的模型参数值!
最大似然估计的基本思想是,在给定观测数据的情况下,寻找使得观测数据的联合概率密度函数(或概率质量函数)最大化的参数值。具体步骤包括以下几个步骤:
- 建立概率模型:首先需要确定一个适当的概率模型,假设观测数据满足某个概率分布,如正态分布、泊松分布等。
- 构建似然函数:根据概率模型,将观测数据的联合概率密度函数(或概率质量函数)表示为参数的函数,即似然函数。似然函数描述了在给定参数值的情况下,观测数据出现的可能性。
- 寻找最大似然估计:通过优化方法(如求导、迭代算法等),找到使得似然函数最大化的参数值。最大似然估计的目标是寻找最可能产生观测数据的参数值,使得观测数据的出现概率最大化。
最大似然估计具有一些良好的性质,例如在大样本下,最大似然估计的估计值具有渐近正态分布,且具有一致性和渐进有效性等特性。最大似然估计在统计学和机器学习等领域中广泛应用,用于估计参数、构建模型和进行推断。
- EM算法(Expectation-Maximization Algorithm)是一种迭代优化算法,用于在存在隐变量或缺失数据的统计模型中进行参数估计。它通过交替进行两个步骤:E步(Expectation Step)和M步(Maximization Step),以最大化似然函数或完成参数的最大似然估计。
EM算法的基本思想是通过引入隐变量,将含有缺失数据的问题转化为完全数据的问题。具体步骤如下:
- 初始化参数:首先需要对模型的参数进行初始化。
- E步(Expectation Step):在E步中,根据当前参数的估计值,计算隐变量的后验概率(或期望),即给定观测数据下隐变量的分布。这一步利用当前参数的估计值进行"填补"缺失数据或估计隐变量的取值。
- M步(Maximization Step):在M步中,根据E步得到的隐变量后验概率,重新估计模型的参数。这一步通过最大化完全数据的对数似然函数来更新参数的估计值。
- 迭代更新:重复进行E步和M步,直到参数的估计值收敛或满足停止准则。
EM算法通过迭代的方式逐步优化参数的估计值,使得在每次迭代中似然函数都得到增大,从而逐渐逼近最优参数值。由于每次迭代中的E步和M步都可以分别求解,因此EM算法在理论上保证了在每一步都能得到似然函数的增加。然而,EM算法并不能保证收敛到全局最优解,可能陷入局部最优解。
EM算法在许多统计学和机器学习问题中都有广泛的应用,特别是在存在隐变量的概率模型、混合模型、高斯混合模型等领域中。它为解决这些问题提供了一种有效的参数估计方法。
最小方差无偏估计
- 对于小样本, 无偏估计使用最小方差,对于有偏估计常使用均方误差。
- 有偏估计是指在统计学中,估计量的期望值不等于被估计参数的真实值。换句话说,有偏估计会在估计过程中引入一定的系统性偏差。
- 我的理解, 你设计的模型,就不是真实的(也无法保证),自然就从根本上不完全准确,有系统性偏差,所以常用均方误差。
贝叶斯估计
频率学派和贝叶斯学派是统计学中两种不同的观点或方法论。
频率学派(Frequentist Approach)注重使用频率或概率的概念进行推断和估计。在频率学派中,参数被视为固定但未知的,通过基于样本数据的统计量来推断参数的值。频率学派强调利用大量的重复抽样来研究统计性质,并通过估计量的偏差、方差和置信区间等指标来评估估计的准确性和可靠性。
贝叶斯学派(Bayesian Approach)则采用贝叶斯定理和概率论的观点来进行推断和估计。在贝叶斯学派中,参数被视为随机变量,其先验分布和样本数据的条件下的后验分布共同决定了参数的估计。贝叶斯学派注重将先验知识或信念结合到推断过程中,并使用后验分布来提供关于参数的概率分布以及置信区间等信息。
贝叶斯估计是贝叶斯学派中一种参数估计的方法。它利用贝叶斯定理计算参数的后验分布,并将后验分布作为参数的估计。贝叶斯估计不仅考虑了样本数据的信息,还结合了先验知识或信念,因此可以提供更全面和灵活的估计结果。贝叶斯估计还可以通过调整先验分布的参数或选择不同的先验分布来灵活地处理不同的问题和背景。
需要注意的是,频率学派和贝叶斯学派并不是相互排斥的,它们是统计学中不同的方法论和观点,各自有其适用的领域和优势。在实际应用中,可以根据问题的特点、数据的性质以及研究目的来选择适合的学派和方法。
区间估计
区间估计是统计学中一种参数估计的方法,用于估计未知参数的范围或区间。与点估计不同,区间估计提供了一个范围,该范围内有一定的置信度(置信水平)包含了真实参数值。
区间估计的基本思想是通过样本数据来构建一个区间,该区间涵盖了真实参数值的可能范围。在频率学派中,常用的区间估计方法包括置信区间。置信区间是基于样本数据计算出来的一个区间,其具体形式为"估计值 ± 误差",其中误差由抽样误差和估计误差组成。
置信区间的置信水平表示该区间在重复抽样中包含真实参数值的概率。例如,95%的置信水平意味着在多次重复抽样中,有95%的置信区间会包含真实参数值。
区间估计的优势在于提供了对未知参数范围的估计,并提供了对估计结果的不确定性的量化。它能够更全面地反映估计的可靠性,并且可以与其他区间进行比较,进行统计推断和假设检验等。
需要注意的是,区间估计并不提供关于真实参数值的具体点估计,而是提供了一个范围。不同的置信水平会得到不同宽度的区间,较高的置信水平通常会导致较宽的区间。在应用中,选择适当的置信水平需要权衡估计的准确性和置信区间的宽度。
方差回归与回归分析
需要进一步的研究学习
暂无
遇到的问题
暂无
开题缘由、总结、反思、吐槽~~
参考文献
无