Postgraduate dormitory
高新区宿舍(男
西电梯间

宿舍走道

寝室内
洗漱台

淋雨间

卫生间(马桶(我们的变杂物间了

四人宿舍

某人的宿舍位~(一定不是我的)~

ps:实验室装修时的图


洗漱台

淋雨间

卫生间(马桶(我们的变杂物间了

四人宿舍

某人的宿舍位~(一定不是我的)~


如果我们数据只会在 GPU 产生和使用,我们不需要来回进行拷贝。
https://migocpp.wordpress.com/2018/06/08/cuda-memory-access-global-zero-copy-unified/
简而言之,在 host 使用命令:cudaHostRegisterMapped 之后用 cudaHostGetDevicePointer 进行映射 最后解除绑定 cudaHostUnregister
即,
// First, pin the memory (or cudaHostAlloc instead)
cudaHostRegister(h_a, …, cudaHostRegisterMapped);
cudaHostRegister(h_b, …, cudaHostRegisterMapped);
cudaHostRegister(h_c, …, cudaHostRegisterMapped);

cudaHostGetDevicePointer(&a, h_a, 0);
cudaHostGetDevicePointer(&b, h_b, 0);
cudaHostGetDevicePointer(&c, h_c, 0);

kernel<<<...>>>(a, b, c);
cudaDeviceSynchronize();

// unpin/release host memory
cudaHostUnregister(h_a);
cudaHostUnregister(h_b);
cudaHostUnregister(h_c);
只要两个thread在 同一个warp中,允许thread直接读其他thread的寄存器值,这种比通过shared Memory进行thread间的通讯效果更好,latency更低,同时也不消耗额外的内存资源来执行数据交换。ref
对齐(Starting address for a region must be a multiple of region size)集体访问,有数量级的差异Coalesced
利用好每个block里的thread,全部每个线程各自读取自己对齐(Starting address for a region must be a multiple of region size 不一定是自己用的)数据到shared memory开辟的总空间。由于需要的数据全部合力读取进来了,计算时正常使用需要的读入的数据。
特别是对于结构体使用SoA(structure of arrays)而不是AoS(array of structures),
如果结构体实在不能对齐, 可以使用 __align(X), where X = 4, 8, or 16.强制对齐。
对于small Kernel和访存瓶颈的Kernel影响很大
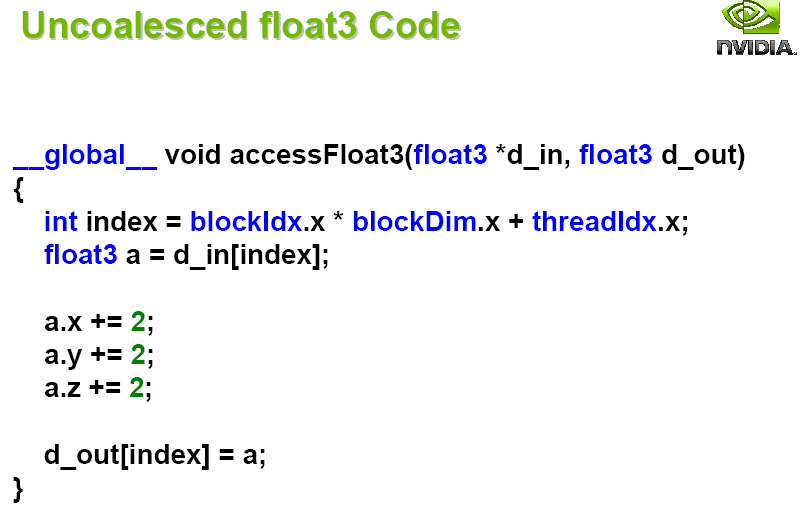
由于需要对齐读取,3float是12字节,所以只能拆成三份。
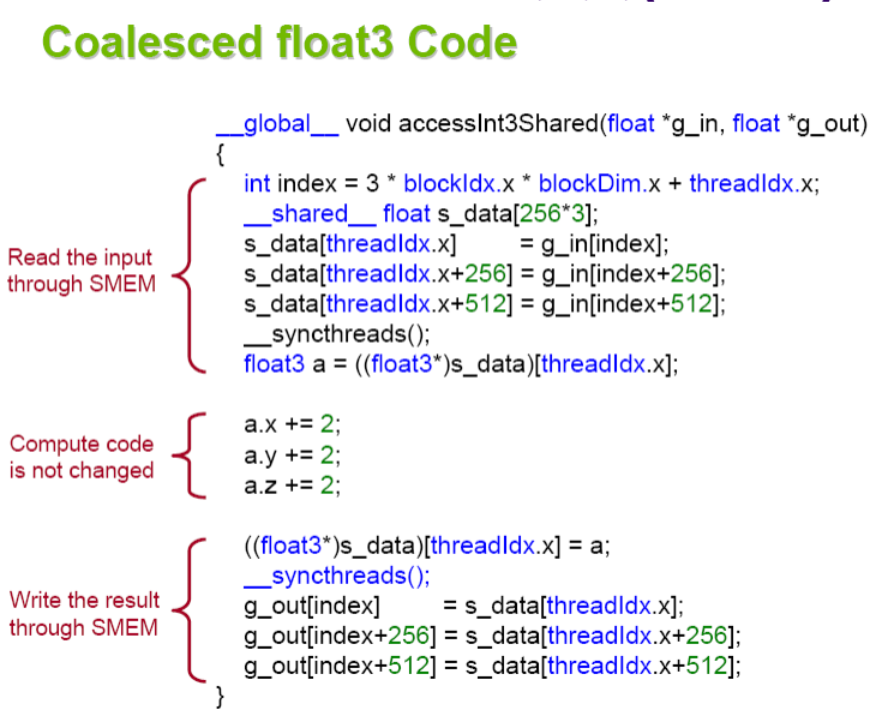
有无采用对齐shared读取,有10倍的加速。
__syncthreadsself-tuning出来占用率是指每个多处理器(Streaming Multiprocessor,SM)的实际的活动warps数量与最大理论的warps数量的比率。 高的占用率不一定能提升性能,因为这一般意味着每个线程分配的寄存器和shared memory变少。但低的占用率会导致内存延迟无法隐藏。
实际需要计算每个线程大概需要的shared memory和register数量
https://www.cnblogs.com/1024incn/p/4541313.html
https://www.cnblogs.com/1024incn/p/4545265.html
通过SMEM实现coalescing access
原本代码
_global__ void transpose_naive(float *odata, float *idata, int width, int height)
{
   unsigned int xIndex = blockDim.x * blockIdx.x + threadIdx.x;
   unsigned int yIndex = blockDim.y * blockIdx.y + threadIdx.y;
   if (xIndex < width && yIndex < height)
   {
      unsigned int index_in = xIndex + width * yIndex;
      unsigned int index_out = yIndex + height * xIndex;
      odata[index_out] = idata[index_in];
   }
}
思想:将大矩阵划分成方块,并且存储在SMEM里。不仅SMEM速度更快,而且每行元素个数变少,跨行访问的间距变小,局部性增强。而且对于大矩阵加速效果会更明显。
__global__ void transpose(float *odata, float *idata, int width, int height)
{
   __shared__ float block[BLOCK_DIM*BLOCK_DIM];
   unsigned int xBlock = blockDim.x * blockIdx.x;
   unsigned int yBlock = blockDim.y * blockIdx.y;
   unsigned int xIndex = xBlock + threadIdx.x;
   unsigned int yIndex = yBlock + threadIdx.y;
   unsigned int index_out, index_transpose;
   if (xIndex < width && yIndex < height)
   {
      unsigned int index_in = width * yIndex + xIndex;
      unsigned int index_block = threadIdx.y * BLOCK_DIM + threadIdx.x;
      block[index_block] = idata[index_in];
      index_transpose = threadIdx.x * BLOCK_DIM + threadIdx.y;
      index_out = height * (xBlock + threadIdx.y) + yBlock + threadIdx.x;
   }
   __syncthreads();
   if (xIndex < width && yIndex < height)
      odata[index_out] = block[index_transpose]
}
when Block/tile dimensions are multiples of 16 ???
https://developer.nvidia.com/blog/efficient-matrix-transpose-cuda-cc/
对于一个32 × 32个元素的共享内存块,一列数据中的所有元素都映射到相同的SMEM bank ,导致bank conflict 的最坏情况:读取一列数据会导致32路的存储库冲突。
幸运的是,只需要将tile的元素宽度改为33,而不是32就行。

为了避免全局同步的巨大开销,采取分级归约

由于归约的计算密度低 1 flop per element loaded (bandwidth-optimal)
所以优化目标是将访存带宽用满。
__global__ void reduce0(int *g_idata, int *g_odata) {
   extern __shared__ int sdata[];

   // each thread loads one element from global to shared mem
   unsigned int tid = threadIdx.x;
   unsigned int i = blockIdx.x*blockDim.x + threadIdx.x;
   sdata[tid] = g_idata[i];
   __syncthreads();

   // do reduction in shared mem
   for(unsigned int s=1; s < blockDim.x; s *= 2) {
      if (tid % (s) == 0) {
         sdata[tid] += sdata[tid + s];
      }
      __syncthreads();
   }

   // write result for this block to global mem
   if (tid == 0) g_odata[blockIdx.x] = sdata[0];
}
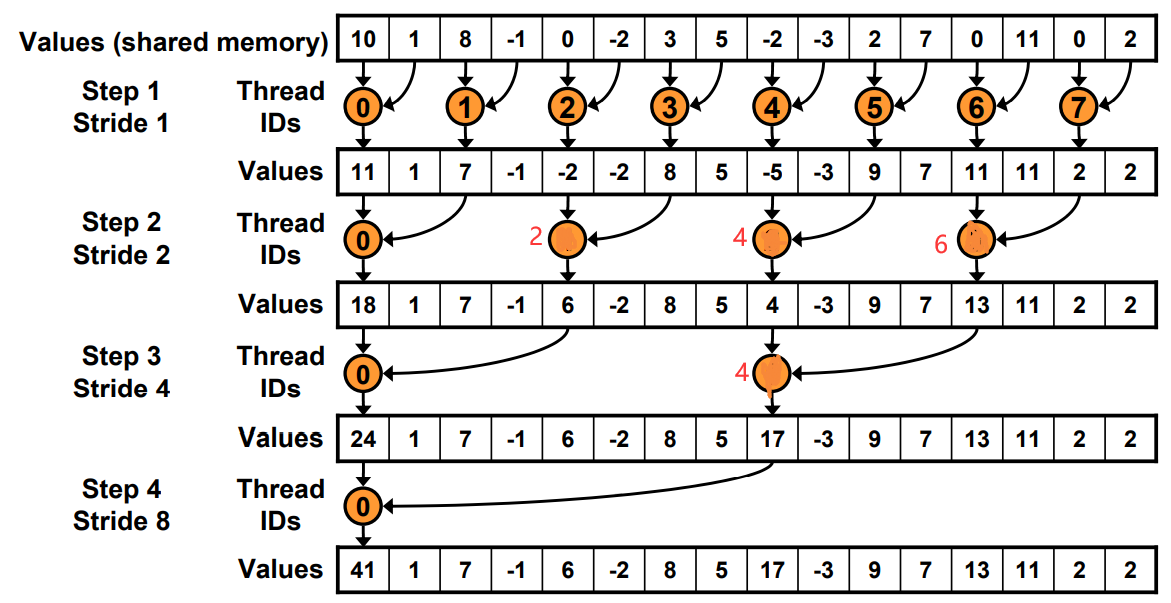 工作的线程越来越少。一开始是全部,最后一次只有thread0.
Just replace divergent branch With strided index and non-divergent branch,但是会带来bank conflict。
原理和Warp发射有关,假如在这里每个Warp并行的线程是2。一个Warp运行耗时为T.
Step0: 4+4+2+1=11T
Step1: 4+2+1+1=8T
for (unsigned int s=1; s < blockDim.x; s *= 2) {
   int index = 2 * s * tid;
   if (index < blockDim.x) {
      sdata[index] += sdata[index + s];
   }
   __syncthreads();
}
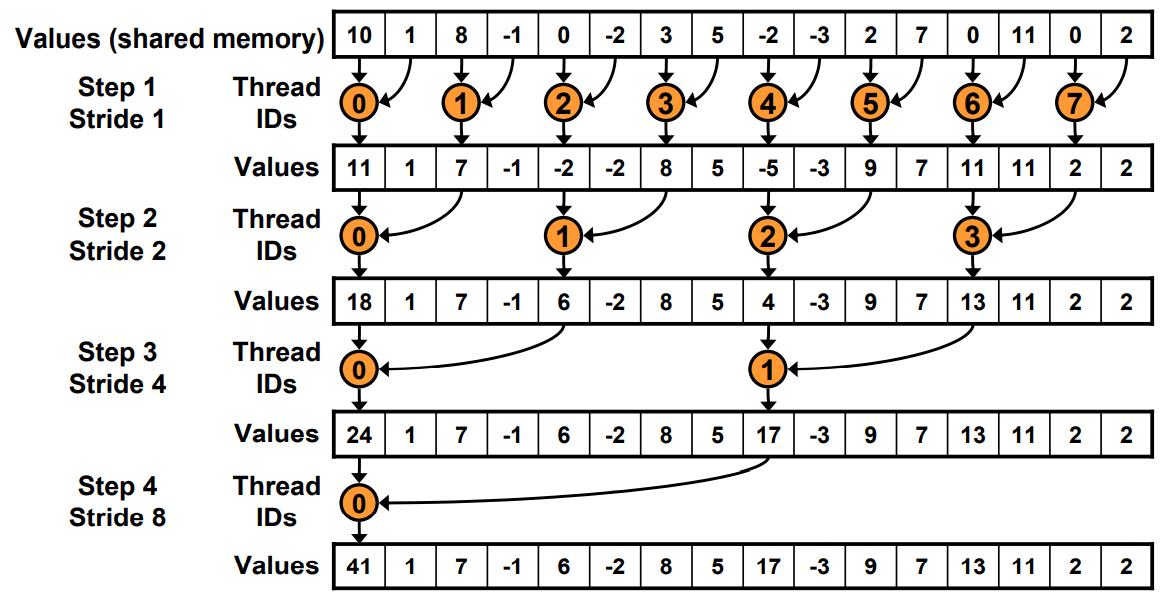

for (unsigned int s=blockDim.x/2; s>0; s>>=1) {
   if (tid < s) {
      sdata[tid] += sdata[tid + s];
   }
   __syncthreads();
}
原本寻址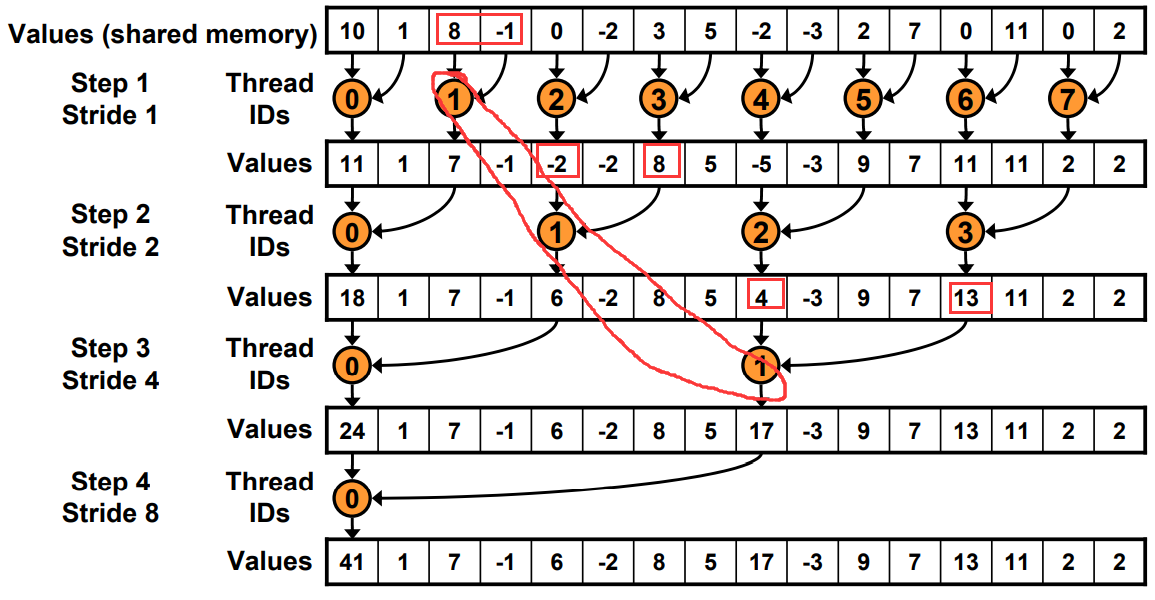
现在寻址有一边连续了
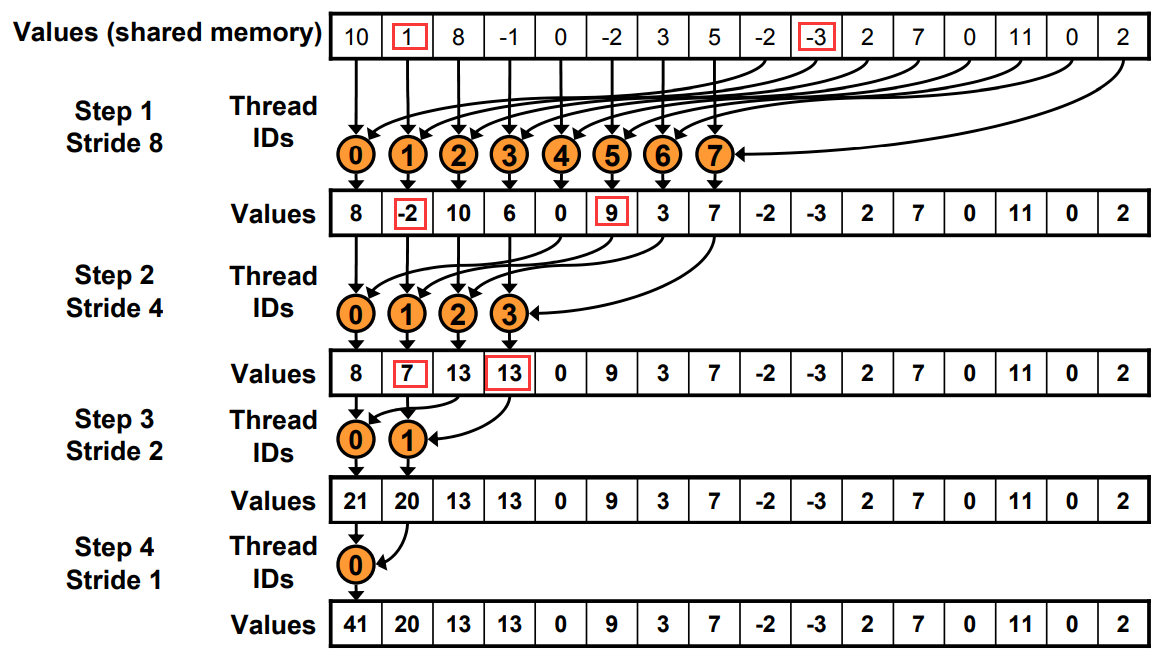

方法: 在load SMEM的时候提前做一次规约加法,通过减少一半的block数,将原本两个block里的值load+add存储在sum里。
// perform first level of reduction,
// reading from global memory, writing to shared memory
unsigned int tid = threadIdx.x;
unsigned int i = blockIdx.x*(blockDim.x*2) + threadIdx.x;
sdata[tid] = g_idata[i] + g_idata[i+blockDim.x];
__syncthreads();

当s< 32的时候,就只有一个Warp工作了。
使用warp的SIMD还省去了__syncthreads()的麻烦
for (unsigned int s=blockDim.x/2; s>32; s>>=1)
{
   if (tid < s)
      sdata[tid] += sdata[tid + s];
   __syncthreads();
}
if (tid < 32)
{
   sdata[tid] += sdata[tid + 32];
   sdata[tid] += sdata[tid + 16];
   sdata[tid] += sdata[tid + 8];
   sdata[tid] += sdata[tid + 4];
   sdata[tid] += sdata[tid + 2];
   sdata[tid] += sdata[tid + 1];
}
为了保持整洁,最后一个if还做了无效的计算。eg, Warp里的最后一个线程只有第一句命令有用。

由于for循环里是二分的,而且小于32的单独处理了,导致for循环里实际运行代码最多就3句。
利用代码模板和编译器的自动优化实现:
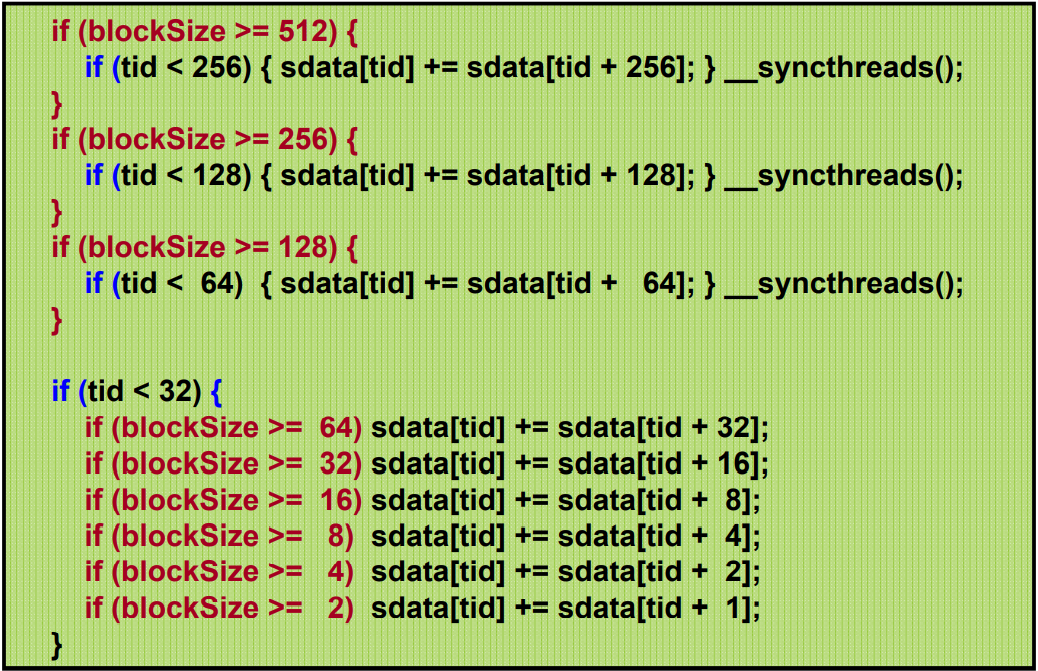
红色代码会在编译时自动优化。

加速级联??
Cost= processors × time complexity
我们知道N个元素直接二叉树归约是O(log N) 时间 Cost=N*O(log N).
但是假如只有P个线程先做N/P的串行加法, 然后是log(P)的归约。 总cost=P(N/P+log(P))
当P=N/log(N), cost=O(N)
each thread should sum O(log n) elements来设置
比如,1024 or 2048 elements per block vs. 256 线程。每个sum n=4个元素。 具体参数要perf
unsigned int tid = threadIdx.x;
unsigned int i = blockIdx.x*(blockSize*2) + threadIdx.x;
unsigned int gridSize = blockSize*2*gridDim.x;
sdata[tid] = 0;
while (i < n) {
   sdata[tid] += g_idata[i] + g_idata[i+blockSize];
   i += gridSize;
}
__syncthreads();

template <unsigned int blockSize>
__global__ void reduce6(int *g_idata, int *g_odata, unsigned int n)
{
   extern __shared__ int sdata[];

   unsigned int tid = threadIdx.x;
   unsigned int i = blockIdx.x*(blockSize*2) + tid;
   unsigned int gridSize = blockSize*2*gridDim.x;
   sdata[tid] = 0;

   do { sdata[tid] += g_idata[i] + g_idata[i+blockSize]; i += gridSize; } while (i < n);
   __syncthreads();

   if (blockSize >= 512) { if (tid < 256) { sdata[tid] += sdata[tid + 256]; } __syncthreads(); }
   if (blockSize >= 256) { if (tid < 128) { sdata[tid] += sdata[tid + 128]; } __syncthreads(); }
   if (blockSize >= 128) { if (tid < 64) { sdata[tid] += sdata[tid + 64]; } __syncthreads(); }

   if (tid < 32) {
      if (blockSize >= 64) sdata[tid] += sdata[tid + 32];
      if (blockSize >= 32) sdata[tid] += sdata[tid + 16];
      if (blockSize >= 16) sdata[tid] += sdata[tid + 8];
      if (blockSize >= 8) sdata[tid] += sdata[tid + 4];
      if (blockSize >= 4) sdata[tid] += sdata[tid + 2];
      if (blockSize >= 2) sdata[tid] += sdata[tid + 1];
   }
   if (tid == 0) g_odata[blockIdx.x] = sdata[0];
}
有if语句是没问题的,只要运行的时候全部执行if或者else就行。不要有些执行if,有些执行else,这才会等待。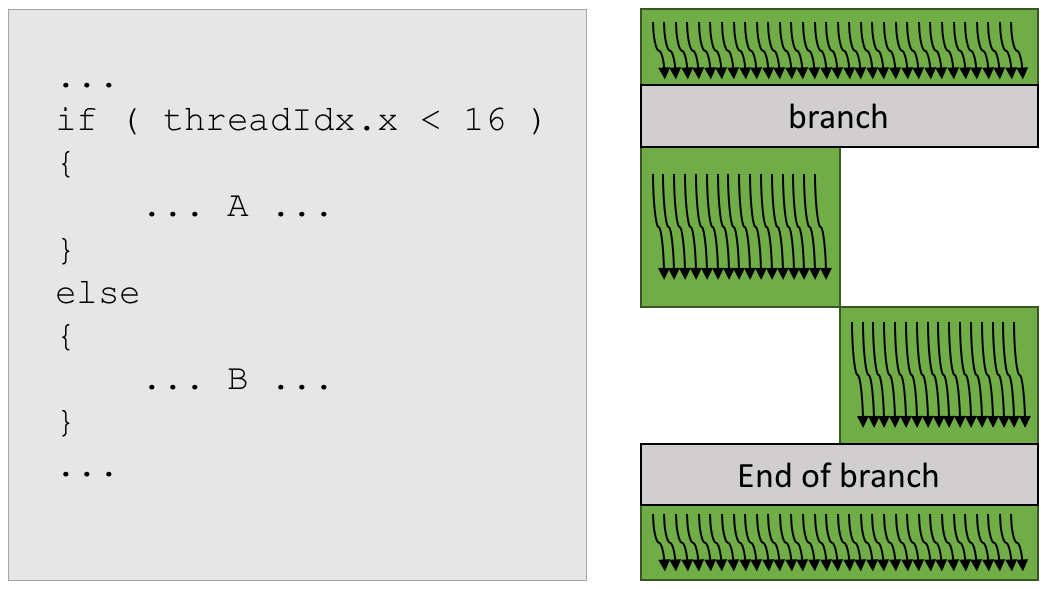
说不定也不是全部执行if或者else就行,只需要连续32个Thread Index,是相同的执行就行。(猜想,需要测试。
通过增加block里的线程数,并且同时读取来隐藏延迟。 不仅可以隐藏Global Memory的延迟,还可以隐藏写后读的延迟

线程太多会导致分配到每一个的寄存器和SMEM变少
通过编译时加-cubin选项,.cubin文件前几行会显示
architecture {sm_10}
abiversion {0}
modname {cubin}
code {
   name = BlackScholesGPU
   lmem = 0    # per thread local memory
   smem = 68   # per thread block shared memory
   reg = 20    # per thread registers
2009 清华 邓仰东 cuda lecture pdf 注意也是参考的SC07 Nvidia。 ↩↩
命令行直接运行
sudo /usr/local/cuda/bin/nvprof --log-file a.log --metrics achieved_occupancy /staff/shaojiemike/github/cutests/22-commonstencil/common
nvprof --export-profile timeline.prof <app> <app args>
nvprof --analysis-metrics -o  nbody-analysis.nvprof ./myApp
sudo /usr/local/cuda/bin/ncu -k stencil_kernel -s 0 -c 1 /staff/shaojiemike/github/cutests/22-commonstencil/best
ncu-ui是可视化界面,但是没弄懂
# shaojiemike @ snode0 in ~/github/cuda-samples-11.0 [16:02:08] $ ./bin/x86_64/linux/release/bandwidthTest [CUDA Bandwidth Test] - Starting... Running on... Device 0: Tesla P40 Quick Mode Host to Device Bandwidth, 1 Device(s) PINNED Memory Transfers Transfer Size (Bytes) Bandwidth(GB/s) 32000000 11.8 Device to Host Bandwidth, 1 Device(s) PINNED Memory Transfers Transfer Size (Bytes) Bandwidth(GB/s) 32000000 13.0 Device to Device Bandwidth, 1 Device(s) PINNED Memory Transfers Transfer Size (Bytes) Bandwidth(GB/s) 32000000 244.3 Result = PASS NOTE: The CUDA Samples are not meant for performance measurements. Results may vary when GPU Boost is enabled. # shaojiemike @ snode0 in ~/github/cuda-samples-11.0 [16:03:24] $ ./bin/x86_64/linux/release/p2pBandwidthLatencyTest
nvprof通过指定与dram,L1或者L2 的metrics来实现。具体解释可以参考官网
在 Maxwell 和之后的架构中 L1 和 SMEM 合并
| Metric Name | 解释 |
|---|---|
| achieved_occupancy | 活跃cycle是 Warps 活跃的比例 |
| dram_read_throughput | |
| dram_utilization | 在0到10的范围内,相对于峰值利用率,设备内存的利用率水平 |
| shared_load_throughput | |
| shared_utilization | |
| l2_utilization |
暂无
暂无
无
Liquid as its templating language. Hugo uses Go templating. Most people seem to agree that it is a little bit easier to learn Jekyll’s syntax than Hugo’s.1导言
学术分享:
工作汇报:
# 网页服务直接下载检查内容
wget 4.shaojiemike.top:28096
# -z 选项指示 nc 仅扫描打开的端口,而不发送任何数据,并且 -v 用于获取更多详细信息。
nc -z -v 4.shaojiemike.top 28096
# IPV6 也行
$ nmap -6 -p 8096 2001:da8:d800:611:5464:f7ab:9560:a646
Starting Nmap 7.80 ( https://nmap.org ) at 2023-01-04 19:33 CST
Nmap scan report for 2001:da8:d800:611:5464:f7ab:9560:a646
Host is up (0.00099s latency).

PORT     STATE SERVICE
8096/tcp open  unknown

Nmap done: 1 IP address (1 host up) scanned in 0.05 seconds

$ nmap -p 28096 4.shaojiemike.top
Starting Nmap 7.80 ( https://nmap.org ) at 2023-01-04 19:19 CST
Nmap scan report for 4.shaojiemike.top (114.214.181.97)
Host is up (0.0011s latency).

PORT      STATE SERVICE
28096/tcp open  unknown

Nmap done: 1 IP address (1 host up) scanned in 0.05 seconds
上方的过滤窗口
tcp.port==80&&(ip.dst==192.168.1.2||ip.dst==192.168.1.3)

ip.addr ==192.168.1.1 //显示所有目标或源地址是192.168.1.1的数据包
eth.addr== 80:f6:2e:ce:3f:00 //根据MAC地址过滤,详见“wireshark过滤MAC地址/物理地址”
tcp.port==23
抓包前在capture option中设置,仅捕获符合条件的包,可以避免产生较大的捕获文件和内存占用,但不能完整的复现测试时的网络环境。
host 192.168.1.1 //抓取192.168.1.1 收到和发出的所有数据包
src host 192.168.1.1 //源地址,192.168.1.1发出的所有数据包
dst host 192.168.1.1 //目标地址,192.168.1.1收到的所有数据包
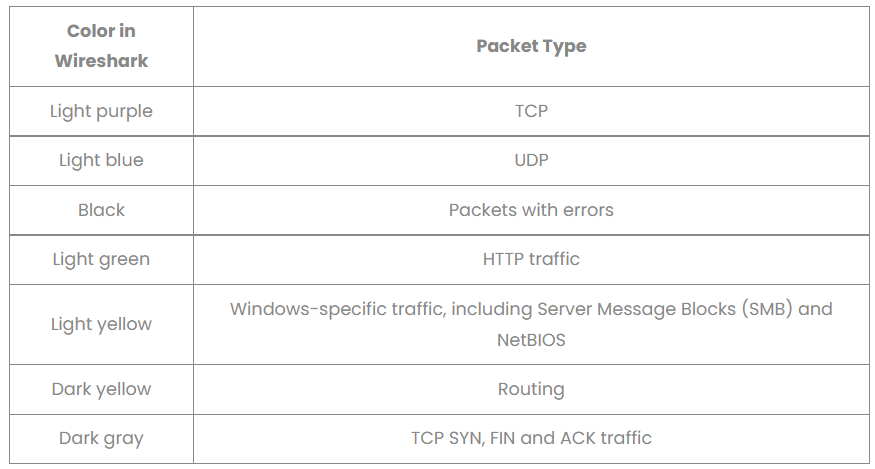
传统命令行抓包工具
注意过滤规则间的and
-nn :-i 指定网卡 -D查看网卡-v,-vv 和 -vvv 来显示更多的详细信息port 80 抓取 80 端口上的流量,通常是 HTTP。在前面加src,dst限定词tcpudmp -i eth0 -n arp host 192.168.199 抓取192.168.199.* 网段的arp协议包,arp可以换为tcp,udp等。-A,-X,-xx会逐渐显示包内容更多信息-e : 显示数据链路层信息。> 符号代表数据的方向。常见的三次握手 TCP 报文的 Flags:
github ip 为 20.205.243.166
ifconfig显示 ibs5的网卡有21TB的带宽上限,肯定是IB卡了。
sudo tcpdump -i ibs5 '((tcp) and (host 20.205.243.166))'
tcpdump: verbose output suppressed, use -v or -vv for full protocol decode
listening on ibs5, link-type LINUX_SLL (Linux cooked v1), capture size 262144 bytes
15:53:53.848619 IP snode0.59878 > 20.205.243.166.http: Flags [S], seq 879685062, win 64128, options [mss 2004,sackOK,TS val 4096492456 ecr 0,nop,wscale 7], length 0
15:53:53.952705 IP 20.205.243.166.http > snode0.59878: Flags [S.], seq 1917452372, ack 879685063, win 65535, options [mss 1436,sackOK,TS val 1127310087 ecr 4096492456,nop,wscale 10], length 0
15:53:53.952728 IP snode0.59878 > 20.205.243.166.http: Flags [.], ack 1, win 501, options [nop,nop,TS val 4096492560 ecr 1127310087], length 0
15:53:53.953208 IP snode0.59878 > 20.205.243.166.http: Flags [P.], seq 1:79, ack 1, win 501, options [nop,nop,TS val 4096492561 ecr 1127310087], length 78: HTTP: GET / HTTP/1.1
15:53:54.058654 IP 20.205.243.166.http > snode0.59878: Flags [P.], seq 1:89, ack 79, win 64, options [nop,nop,TS val 1127310193 ecr 4096492561], length 88: HTTP: HTTP/1.1 301 Moved Permanently
15:53:54.058668 IP snode0.59878 > 20.205.243.166.http: Flags [.], ack 89, win 501, options [nop,nop,TS val 4096492666 ecr 1127310193], length 0
15:53:54.059092 IP snode0.59878 > 20.205.243.166.http: Flags [F.], seq 79, ack 89, win 501, options [nop,nop,TS val 4096492667 ecr 1127310193], length 0
15:53:54.162608 IP 20.205.243.166.http > snode0.59878: Flags [F.], seq 89, ack 80, win 64, options [nop,nop,TS val 1127310297 ecr 4096492667], length 0
$ sudo tcpdump -i ibs5 -nn -vvv -e '((port 80) and (tcp) and (host 20.205.243.166))'                                                                                                                                                 tcpdump: listening on ibs5, link-type LINUX_SLL (Linux cooked v1), capture size 262144 bytes
16:09:38.743478 Out ethertype IPv4 (0x0800), length 76: (tos 0x0, ttl 64, id 15215, offset 0, flags [DF], proto TCP (6), length 60)
    10.1.13.50.38376 > 20.205.243.166.80: Flags [S], cksum 0x1fd5 (incorrect -> 0x98b6), seq 1489092902, win 64128, options [mss 2004,sackOK,TS val 4097437351 ecr 0,nop,wscale 7], length 0
16:09:38.848164  In ethertype IPv4 (0x0800), length 76: (tos 0x0, ttl 48, id 0, offset 0, flags [DF], proto TCP (6), length 60)
    20.205.243.166.80 > 10.1.13.50.38376: Flags [S.], cksum 0x69ba (correct), seq 3753100548, ack 1489092903, win 65535, options [mss 1436,sackOK,TS val 3712395681 ecr 4097437351,nop,wscale 10], length 0
16:09:38.848212 Out ethertype IPv4 (0x0800), length 68: (tos 0x0, ttl 64, id 15216, offset 0, flags [DF], proto TCP (6), length 52)
    10.1.13.50.38376 > 20.205.243.166.80: Flags [.], cksum 0x1fcd (incorrect -> 0x9613), seq 1, ack 1, win 501, options [nop,nop,TS val 4097437456 ecr 3712395681], length 0
16:09:38.848318 Out ethertype IPv4 (0x0800), length 146: (tos 0x0, ttl 64, id 15217, offset 0, flags [DF], proto TCP (6), length 130)
    10.1.13.50.38376 > 20.205.243.166.80: Flags [P.], cksum 0x201b (incorrect -> 0x9f0a), seq 1:79, ack 1, win 501, options [nop,nop,TS val 4097437456 ecr 3712395681], length 78: HTTP, length: 78
        GET / HTTP/1.1
        Host: www.github.com
        User-Agent: curl/7.68.0
        Accept: */*

16:09:38.954152  In ethertype IPv4 (0x0800), length 156: (tos 0x0, ttl 48, id 45056, offset 0, flags [DF], proto TCP (6), length 140)
    20.205.243.166.80 > 10.1.13.50.38376: Flags [P.], cksum 0x024d (correct), seq 1:89, ack 79, win 64, options [nop,nop,TS val 3712395786 ecr 4097437456], length 88: HTTP, length: 88
        HTTP/1.1 301 Moved Permanently
        Content-Length: 0
        Location: https://www.github.com/

16:09:38.954207 Out ethertype IPv4 (0x0800), length 68: (tos 0x0, ttl 64, id 15218, offset 0, flags [DF], proto TCP (6), length 52)
    10.1.13.50.38376 > 20.205.243.166.80: Flags [.], cksum 0x1fcd (incorrect -> 0x949a), seq 79, ack 89, win 501, options [nop,nop,TS val 4097437562 ecr 3712395786], length 0
16:09:38.954884 Out ethertype IPv4 (0x0800), length 68: (tos 0x0, ttl 64, id 15219, offset 0, flags [DF], proto TCP (6), length 52)
    10.1.13.50.38376 > 20.205.243.166.80: Flags [F.], cksum 0x1fcd (incorrect -> 0x9498), seq 79, ack 89, win 501, options [nop,nop,TS val 4097437563 ecr 3712395786], length 0
16:09:39.060177  In ethertype IPv4 (0x0800), length 68: (tos 0x0, ttl 48, id 45057, offset 0, flags [DF], proto TCP (6), length 52)
    20.205.243.166.80 > 10.1.13.50.38376: Flags [F.], cksum 0x95e2 (correct), seq 89, ack 80, win 64, options [nop,nop,TS val 3712395892 ecr 4097437563], length 0
16:09:39.060221 Out ethertype IPv4 (0x0800), length 68: (tos 0x0, ttl 64, id 15220, offset 0, flags [DF], proto TCP (6), length 52)
    10.1.13.50.38376 > 20.205.243.166.80: Flags [.], cksum 0x1fcd (incorrect -> 0x93c4), seq 80, ack 90, win 501, options [nop,nop,TS val 4097437668 ecr 3712395892], length 0
16:09:46.177269 Out ethertype IPv4 (0x0800), length 76: (tos 0x0, ttl 64, id 38621, offset 0, flags [DF], proto TCP (6), length 60)
snode0 ip 是 10.1.13.50
mtr = traceroute+ping
$ traceroute www.baid.com
traceroute to www.baidu.com (182.61.200.6), 30 hops max, 60 byte packets
1  acsa-nfs (10.1.13.1)  0.179 ms  0.180 ms  0.147 ms
2  192.168.252.1 (192.168.252.1)  2.016 ms  1.954 ms  1.956 ms
3  202.38.75.254 (202.38.75.254)  4.942 ms  3.941 ms  4.866 ms
traceroute命令用于显示数据包到主机间的路径。
# shaojiemike @ snode0 in /etc/NetworkManager [16:49:55]
$ nmcli general status
STATE         CONNECTIVITY  WIFI-HW  WIFI     WWAN-HW  WWAN
disconnected  unknown       enabled  enabled  enabled  enabled

# shaojiemike @ snode0 in /etc/NetworkManager [16:50:40]
$ nmcli connection show
NAME                     UUID                                  TYPE        DEVICE
InfiniBand connection 1  7edf4eea-0591-48ba-868a-e66e8cb720ce  infiniband  --
好像之前使用过的样子。
# shaojiemike @ snode0 in /etc/NetworkManager [16:56:36] C:127
$ service network-manager status
● NetworkManager.service - Network Manager
     Loaded: loaded (/lib/systemd/system/NetworkManager.service; enabled; vendor preset: enabled)
     Active: active (running) since Mon 2022-03-14 11:52:06 CST; 1 months 10 days ago
       Docs: man:NetworkManager(8)
   Main PID: 1339 (NetworkManager)
      Tasks: 3 (limit: 154500)
     Memory: 12.0M
     CGroup: /system.slice/NetworkManager.service
             └─1339 /usr/sbin/NetworkManager --no-daemon

Warning: some journal files were not opened due to insufficient permissions.
应该是这个 Secure site-to-site connection with Linux IPsec VPN 来设置的
暂无
暂无
FJW说所有网络都是通过NFS一起出去的
无
https://cloud.tencent.com/developer/article/1448642
/etc/passwd
如果发现自己不在/etc/passwd里,很可能使用了ldap 集中身份认证。可以在多台机器上实现分布式账号登录,用同一个账号。
ctrl + alt + F3     #jump into command line
login
su - {user-name}
sudo -s
sudo -i
# If invoked without a user name, su defaults to becoming the superuser
ip a |less          #check ip address fjw弄了静态IP就没这个问题了
宕机一般是爆内存,进程分配肯定会注意不超过物理核个数。
在zshrc里写入 25*1024*1024 = 25GB的内存上限
当前shell程序超内存,会输出Memory Error结束。
with open("/home/shaojiemike/test/DynamoRIO/OpenBLASRawAssembly/openblas_utest.log", 'r') as f:
    data= f.readlines()
    print(len(data))
有文章说Linux有些版本内核会失效
PyG是一个基于PyTorch的用于处理不规则数据(比如图)的库,或者说是一个用于在图等数据上快速实现表征学习的框架。它的运行速度很快,训练模型速度可以达到DGL(Deep Graph Library )v0.2 的40倍(数据来自论文)。除了出色的运行速度外,PyG中也集成了很多论文中提出的方法(GCN,SGC,GAT,SAGE等等)和常用数据集。因此对于复现论文来说也是相当方便。
经典的库才有函数可以支持,自己的模型,自己根据自动微分实现。还要自己写GPU并行。
MessagePassing 是网络交互的核心
torch_geometric.data.Data (下面简称Data) 用于构建图
通过data.face来扩展Data
在 PyG 中,我们使用的不是这种写法,而是在get()函数中根据 index 返回torch_geometric.data.Data类型的数据,在Data里包含了数据和 label。
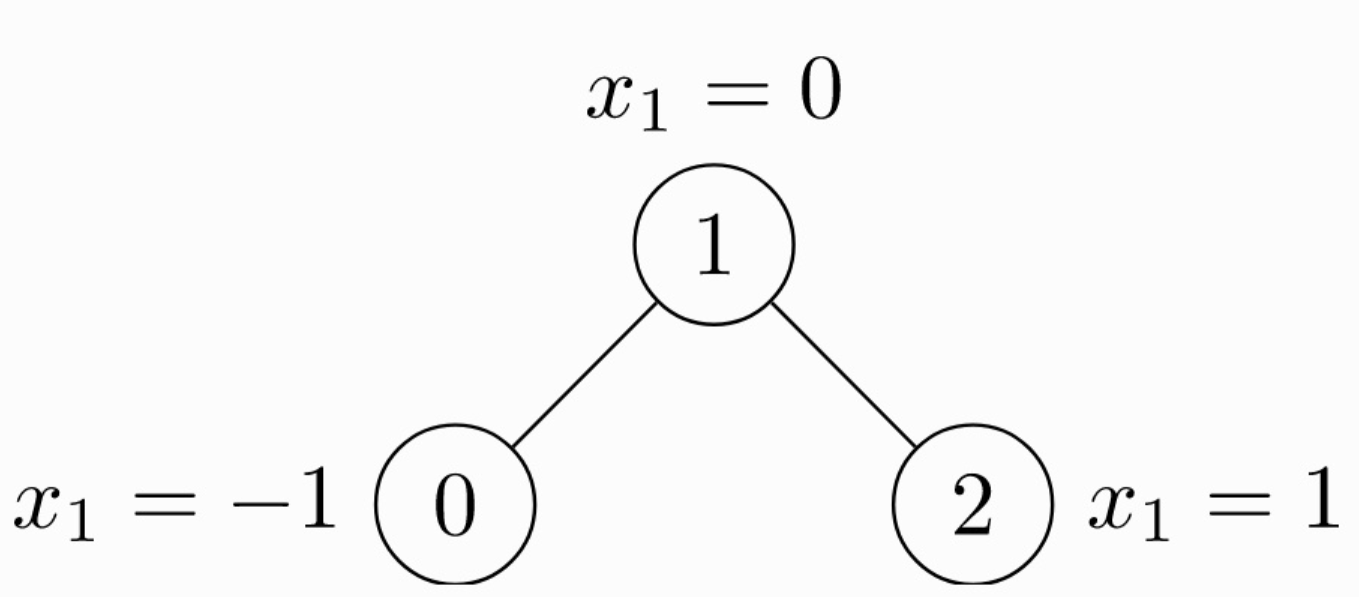 由于是无向图,因此有 4 条边:(0 -> 1), (1 -> 0), (1 -> 2), (2 -> 1)。每个节点都有自己的特征。上面这个图可以使用
 torch_geometric.data.Data来表示如下:
import torch
from torch_geometric.data import Data
# 由于是无向图,因此有 4 条边:(0 -> 1), (1 -> 0), (1 -> 2), (2 -> 1)
edge_index = torch.tensor([[0, 1, 1, 2],
                           [1, 0, 2, 1]], dtype=torch.long)
# 节点的特征
x = torch.tensor([[-1], [0], [1]], dtype=torch.float)

data = Data(x=x, edge_index=edge_index)
注意edge_index中边的存储方式,有两个list,第 1 个list是边的起始点,第 2 个list是边的目标节点。注意与下面的存储方式的区别。
import torch
from torch_geometric.data import Data

edge_index = torch.tensor([[0, 1],
                           [1, 0],
                           [1, 2],
                           [2, 1]], dtype=torch.long)
x = torch.tensor([[-1], [0], [1]], dtype=torch.float)

data = Data(x=x, edge_index=edge_index.t().contiguous())
这种情况edge_index需要先转置然后使用contiguous()方法。关于contiguous()函数的作用,查看 PyTorch中的contiguous。
import torch
from torch_geometric.data import InMemoryDataset


class MyOwnDataset(InMemoryDataset): # or (Dataset)
    def __init__(self, root, transform=None, pre_transform=None):
        super(MyOwnDataset, self).__init__(root, transform, pre_transform)
        self.data, self.slices = torch.load(self.processed_paths[0])

    # 返回一个包含没有处理的数据的名字的list。如果你只有一个文件,那么它返回的list将只包含一个元素。事实上,你可以返回一个空list,然后确定你的文件在后面的函数process()中。
    @property
    def raw_file_names(self):
        return ['some_file_1', 'some_file_2', ...]

    # 很像上一个函数,它返回一个包含所有处理过的数据的list。在调用process()这个函数后,通常返回的list只有一个元素,它只保存已经处理过的数据的名字。
    @property
    def processed_file_names(self):
        return ['data.pt']

    def download(self):
        pass
        # Download to `self.raw_dir`. or just pass

    # 整合你的数据成一个包含data的list。然后调用 self.collate()去计算将用DataLodadr的片段。
    def process(self):
        # Read data into huge `Data` list.
        data_list = [...]

        if self.pre_filter is not None:
            data_list [data for data in data_list if self.pre_filter(data)]

        if self.pre_transform is not None:
            data_list = [self.pre_transform(data) for data in data_list]

        data, slices = self.collate(data_list)
        torch.save((data, slices), self.processed_paths[0])
DataLoader 这个类允许你通过batch的方式feed数据。创建一个DotaLoader实例,可以简单的指定数据集和你期望的batch size。
DataLoader的每一次迭代都会产生一个Batch对象。它非常像Data对象。但是带有一个‘batch’属性。它指明了了对应图上的节点连接关系。因为DataLoader聚合来自不同图的的batch的x,y 和edge_index,所以GNN模型需要batch信息去知道那个节点属于哪一图。
 其中,x 表示表格节点的 embedding,e 表示边的特征,ϕ 表示 message 函数,□ 表示聚合 aggregation 函数,γ 表示 update 函数。上标表示层的 index,比如说,当 k = 1 时,x 则表示所有输入网络的图结构的数据。
为了实现这个,我们需要定义:
[2, num_messages], where messages from nodes in edge_index[0] are sent to nodes in edge_index[1]会根据 flow=“source_to_target”和if flow=“target_to_source”或者x_i,x_j,来区分处理的边。
x_j表示提升张量,它包含每个边的源节点特征,即每个节点的邻居。通过在变量名后添加_i或_j,可以自动提升节点特征。事实上,任何张量都可以通过这种方式转换,只要它们包含源节点或目标节点特征。
_j表示每条边的起点,_i表示每条边的终点。x_j表示的就是每条边起点的x值(也就是Feature)。如果你手动加了别的内容,那么它的_j, _i也会自动进行处理,这个自己稍微单步执行一下就知道了
在实现message的时候,节点特征会自动map到各自的source and target nodes。
aggregation scheme 只需要设置参数就好,“add”, “mean”, “min”, “max” and “mul” operations
aggregation 输出作为第一个参数,后面的参数是 propagate()的
该式子先将周围的节点与权重矩阵\theta相乘, 然后通过节点的度degree正则化,最后相加
步骤可以拆分如下
步骤1 和 2 需要在message passing 前被计算好。 3 - 5 可以torch_geometric.nn.MessagePassing 类。
添加self-loop的目的是让featrue在聚合的过程中加入当前节点自己的feature,没有self-loop聚合的就只有邻居节点的信息。
import torch
from torch_geometric.nn import MessagePassing
from torch_geometric.utils import add_self_loops, degree

class GCNConv(MessagePassing):
    def __init__(self, in_channels, out_channels):
        super().__init__(aggr='add')  # "Add" aggregation (Step 5).
        self.lin = torch.nn.Linear(in_channels, out_channels)

    def forward(self, x, edge_index):
        # x has shape [N, in_channels]
        # edge_index has shape [2, E]

        # Step 1: Add self-loops to the adjacency matrix.
        edge_index, _ = add_self_loops(edge_index, num_nodes=x.size(0))

        # Step 2: Linearly transform node feature matrix.
        x = self.lin(x)

        # Step 3: Compute normalization.
        row, col = edge_index
        deg = degree(col, x.size(0), dtype=x.dtype)
        deg_inv_sqrt = deg.pow(-0.5)
        deg_inv_sqrt[deg_inv_sqrt == float('inf')] = 0
        norm = deg_inv_sqrt[row] * deg_inv_sqrt[col]

        # Step 4-5: Start propagating messages.
        return self.propagate(edge_index, x=x, norm=norm)

    def message(self, x_j, norm):
        # x_j has shape [E, out_channels]

        # Step 4: Normalize node features.
        return norm.view(-1, 1) * x_j
所有的逻辑代码都在forward()里面,当我们调用propagate()函数之后,它将会在内部调用message()和update()。
 聚合函数(aggregation)我们用最大池化(max pooling),这样上述公示中的 AGGREGATE 可以写为:
 上述公式中,对于每个邻居节点,都和一个 weighted matrix 相乘,并且加上一个 bias,传给一个激活函数。相关代码如下(对应第二个图):
class SAGEConv(MessagePassing):
    def __init__(self, in_channels, out_channels):
        super(SAGEConv, self).__init__(aggr='max')
        self.lin = torch.nn.Linear(in_channels, out_channels)
        self.act = torch.nn.ReLU()

    def message(self, x_j):
        # x_j has shape [E, in_channels]

        x_j = self.lin(x_j)
        x_j = self.act(x_j)

        return x_j
对于 update 方法,我们需要聚合更新每个节点的 embedding,然后加上权重矩阵和偏置(对应第一个图第二行):
class SAGEConv(MessagePassing):
    def __init__(self, in_channels, out_channels):
        self.update_lin = torch.nn.Linear(in_channels + out_channels, in_channels, bias=False)
        self.update_act = torch.nn.ReLU()

    def update(self, aggr_out, x):
        # aggr_out has shape [N, out_channels]

        new_embedding = torch.cat([aggr_out, x], dim=1)
        new_embedding = self.update_lin(new_embedding)
        new_embedding = torch.update_act(new_embedding)

        return new_embedding
综上所述,SageConv 层的定于方法如下:
import torch
from torch.nn import Sequential as Seq, Linear, ReLU
from torch_geometric.nn import MessagePassing
from torch_geometric.utils import remove_self_loops, add_self_loops
class SAGEConv(MessagePassing):
    def __init__(self, in_channels, out_channels):
        super(SAGEConv, self).__init__(aggr='max') #  "Max" aggregation.
        self.lin = torch.nn.Linear(in_channels, out_channels)
        self.act = torch.nn.ReLU()
        self.update_lin = torch.nn.Linear(in_channels + out_channels, in_channels, bias=False)
        self.update_act = torch.nn.ReLU()

    def forward(self, x, edge_index):
        # x has shape [N, in_channels]
        # edge_index has shape [2, E]

        # Removes every self-loop in the graph given by edge_index, so that (i,i)∉E for every i ∈ V.
        edge_index, _ = remove_self_loops(edge_index)
        # Adds a self-loop (i,i)∈ E to every node i ∈ V in the graph given by edge_index
        edge_index, _ = add_self_loops(edge_index, num_nodes=x.size(0))


        return self.propagate(edge_index, size=(x.size(0), x.size(0)), x=x)

    def message(self, x_j):
        # x_j has shape [E, in_channels]

        x_j = self.lin(x_j)
        x_j = self.act(x_j)

        return x_j

    def update(self, aggr_out, x):
        # aggr_out has shape [N, out_channels]


        new_embedding = torch.cat([aggr_out, x], dim=1)

        new_embedding = self.update_lin(new_embedding)
        new_embedding = self.update_act(new_embedding)

        return new_embedding
GNN的batch实现和传统的有区别。
将网络复制batch次,batchSize的数据产生batchSize个Loss。通过Sum或者Max处理Loss,整体同时更新所有的网络参数。至于网络中循环输入和输出的H(t-1)和Ht。(感觉直接平均就行了。
有几个可能的问题 1. 网络中参数不是线性层,CNN这种的网络。pytorch会自动并行吗?还需要手动 2. 还有个问题,如果你还想用PyG的X和edge。并不能额外拓展维度。
通过 rescaling or padding(填充) 将相同大小的网络复制,来实现新添加维度。而新添加维度的大小就是batch_size。
但是由于图神经网络的特殊性:边和节点的表示。传统的方法要么不可行,要么会有数据的重复表示产生的大量内存消耗。
为此引入了ADVANCED MINI-BATCHING来实现对大量数据的并行。
https://pytorch-geometric.readthedocs.io/en/latest/notes/batching.html

可以实现将多个图batch成一个大图。 通过重写collate()来实现,并继承了pytorch的所有参数,比如num_workers.
在合并的时候,除开edge_index [2, num_edges]通过增加第二维度。其余(节点)都是增加第一维度的个数。
# 原本是[2*4]
# 自己实现的话,是直接连接
 >>> tensor([[0, 0, 1, 1, 0, 0, 1, 1],
             [0, 1, 1, 2, 0, 1, 1, 2]])
# 会修改成新的边
 print(batch.edge_index)
 >>> tensor([[0, 0, 1, 1, 2, 2, 3, 3],
             [0, 1, 1, 2, 3, 4, 4, 5]])
from torch_geometric.data import Data
from torch_geometric.loader import DataLoader

data_list = [Data(...), ..., Data(...)]
loader = DataLoader(data_list, batch_size=32)
from torch_geometric.datasets import TUDataset
from torch_geometric.loader import DataLoader

dataset = TUDataset(root='/tmp/ENZYMES', name='ENZYMES', use_node_attr=True)
loader = DataLoader(dataset, batch_size=32, shuffle=True)

for batch in loader:
    batch
    >>> DataBatch(batch=[1082], edge_index=[2, 4066], x=[1082, 21], y=[32])

    batch.num_graphs
    >>> 32
暂无
暂无
无